Appearance
How to Handle Bounces and Complaints with AWS SES and SNS
Whenever you send an email and it bounces—maybe because the address doesn’t exist—or someone marks it as spam because you were a bit too persistent, you should immediately stop sending emails to that address. If you keep sending emails to those addresses, your sender reputation will take a serious hit.
If you want your emails to land in your customers' inboxes, being a responsible sender is key. A big part of that is properly handling bounces and complaints.
Not familiar with AWS SES (Amazon Simple Email Service)?
AWS SES is an affordable and reliable email-sending service designed to get your emails to your customers’ inboxes. However, they’re extremely cautious about who gets production access, as they aim to protect their sender reputation from spammers.
If you’re new to AWS SES or still in the sandbox environment, check out our guide on setting it up.
The easiest way to handle bounces and complaints is to remove those addresses from your email list—or better yet, add them to a suppression list. A suppression list offers a key advantage: if, for some reason (e.g., bot activity), an email address that previously reported spam sneaks back into your list, a quick check against the suppression list ensures you never send them an email again. That’s why we strongly recommend using internal suppression lists.
Handling bounces and complaints isn’t just best practice—it’s a requirement if you want to secure production access to AWS SES.
This tutorial will walk you through setting up AWS SES and SNS step by step, so you can receive notifications whenever a bounce or complaint occurs and take appropriate action.
Let us handle bounces and complaints for you
If you’d rather not deal with the complexities of managing SES directly—like handling bounces, complaints, HTML rendering (yes, I’m talking about Outlook), and more—give bluefox.email a try! You can create a free account anytime.
How Bounce & Complaint Notifications Work with Amazon SES & SNS
By the end of this tutorial, you’ll have a fully automated system to handle bounces and complaints from AWS SES. Here’s how the process works:
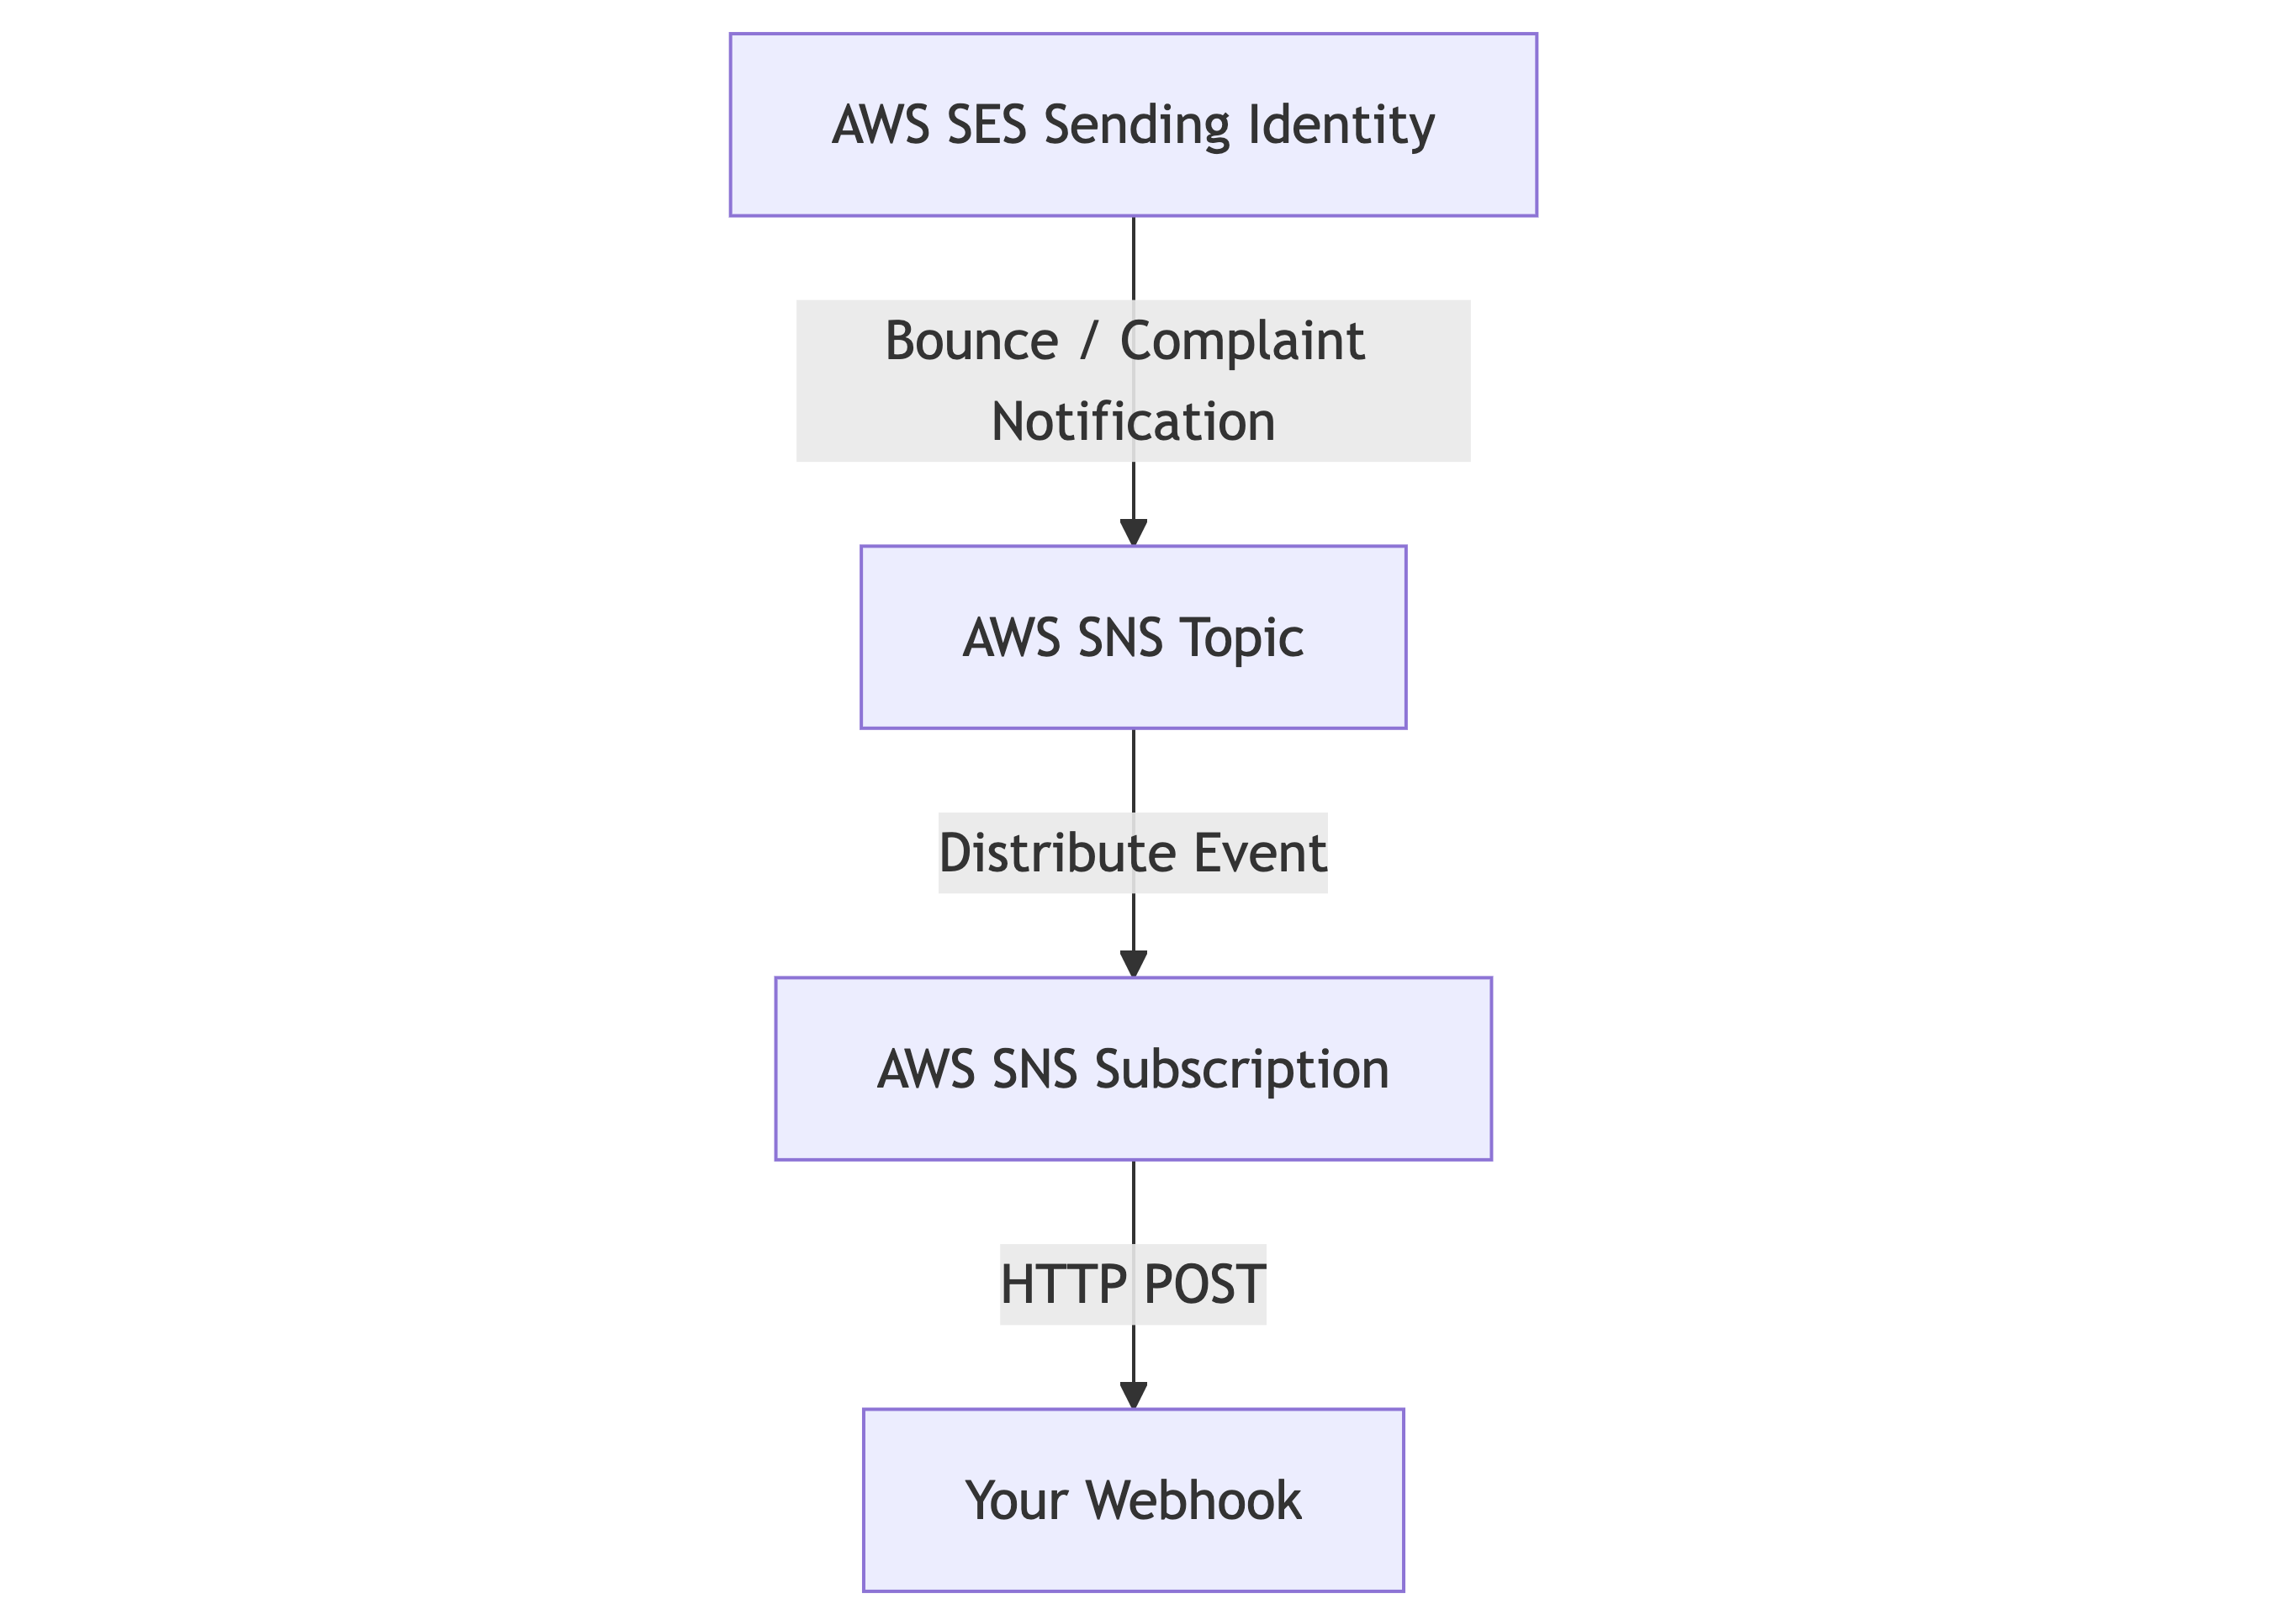
SES Generates Events
Whenever a bounce or complaint occurs, AWS SES triggers an event and sends it to an SNS topic.SNS Topics
These events are routed to specific SNS topics—one for bounces and another for complaints. Keeping them separate helps maintain organization and simplifies management.SNS Subscriptions
Each SNS topic has its own subscription that forwards the event to your webhook. Your webhook is where you’ll process the event (e.g., adding the email to your suppression list).Your Webhook
Finally, your webhook receives the event and takes action, such as adding the email to a suppression list to ensure it’s never contacted again.
Why Separate Topics and Subscriptions?
To keep things simple and manageable, we’ll create dedicated SNS topics and subscriptions for bounces and complaints. This way, you can process each type of event independently and maintain clarity in your workflow.
By setting this up for both bounces and complaints, you’ll have a robust mechanism in place to protect your sender reputation and comply with AWS SES requirements.
Let’s dive into the steps to get this working!
TL;DR
- Create a topic for bounces and another for complaints.
- Create a subscription for each, forwarding notifications to your webhook. (Use ngrok for local development.)
- Configure your SES sender identity (e.g., sending domain) to send notifications to these topics.
- Implement webhook logic (e.g., adding reported addresses to a suppression list).
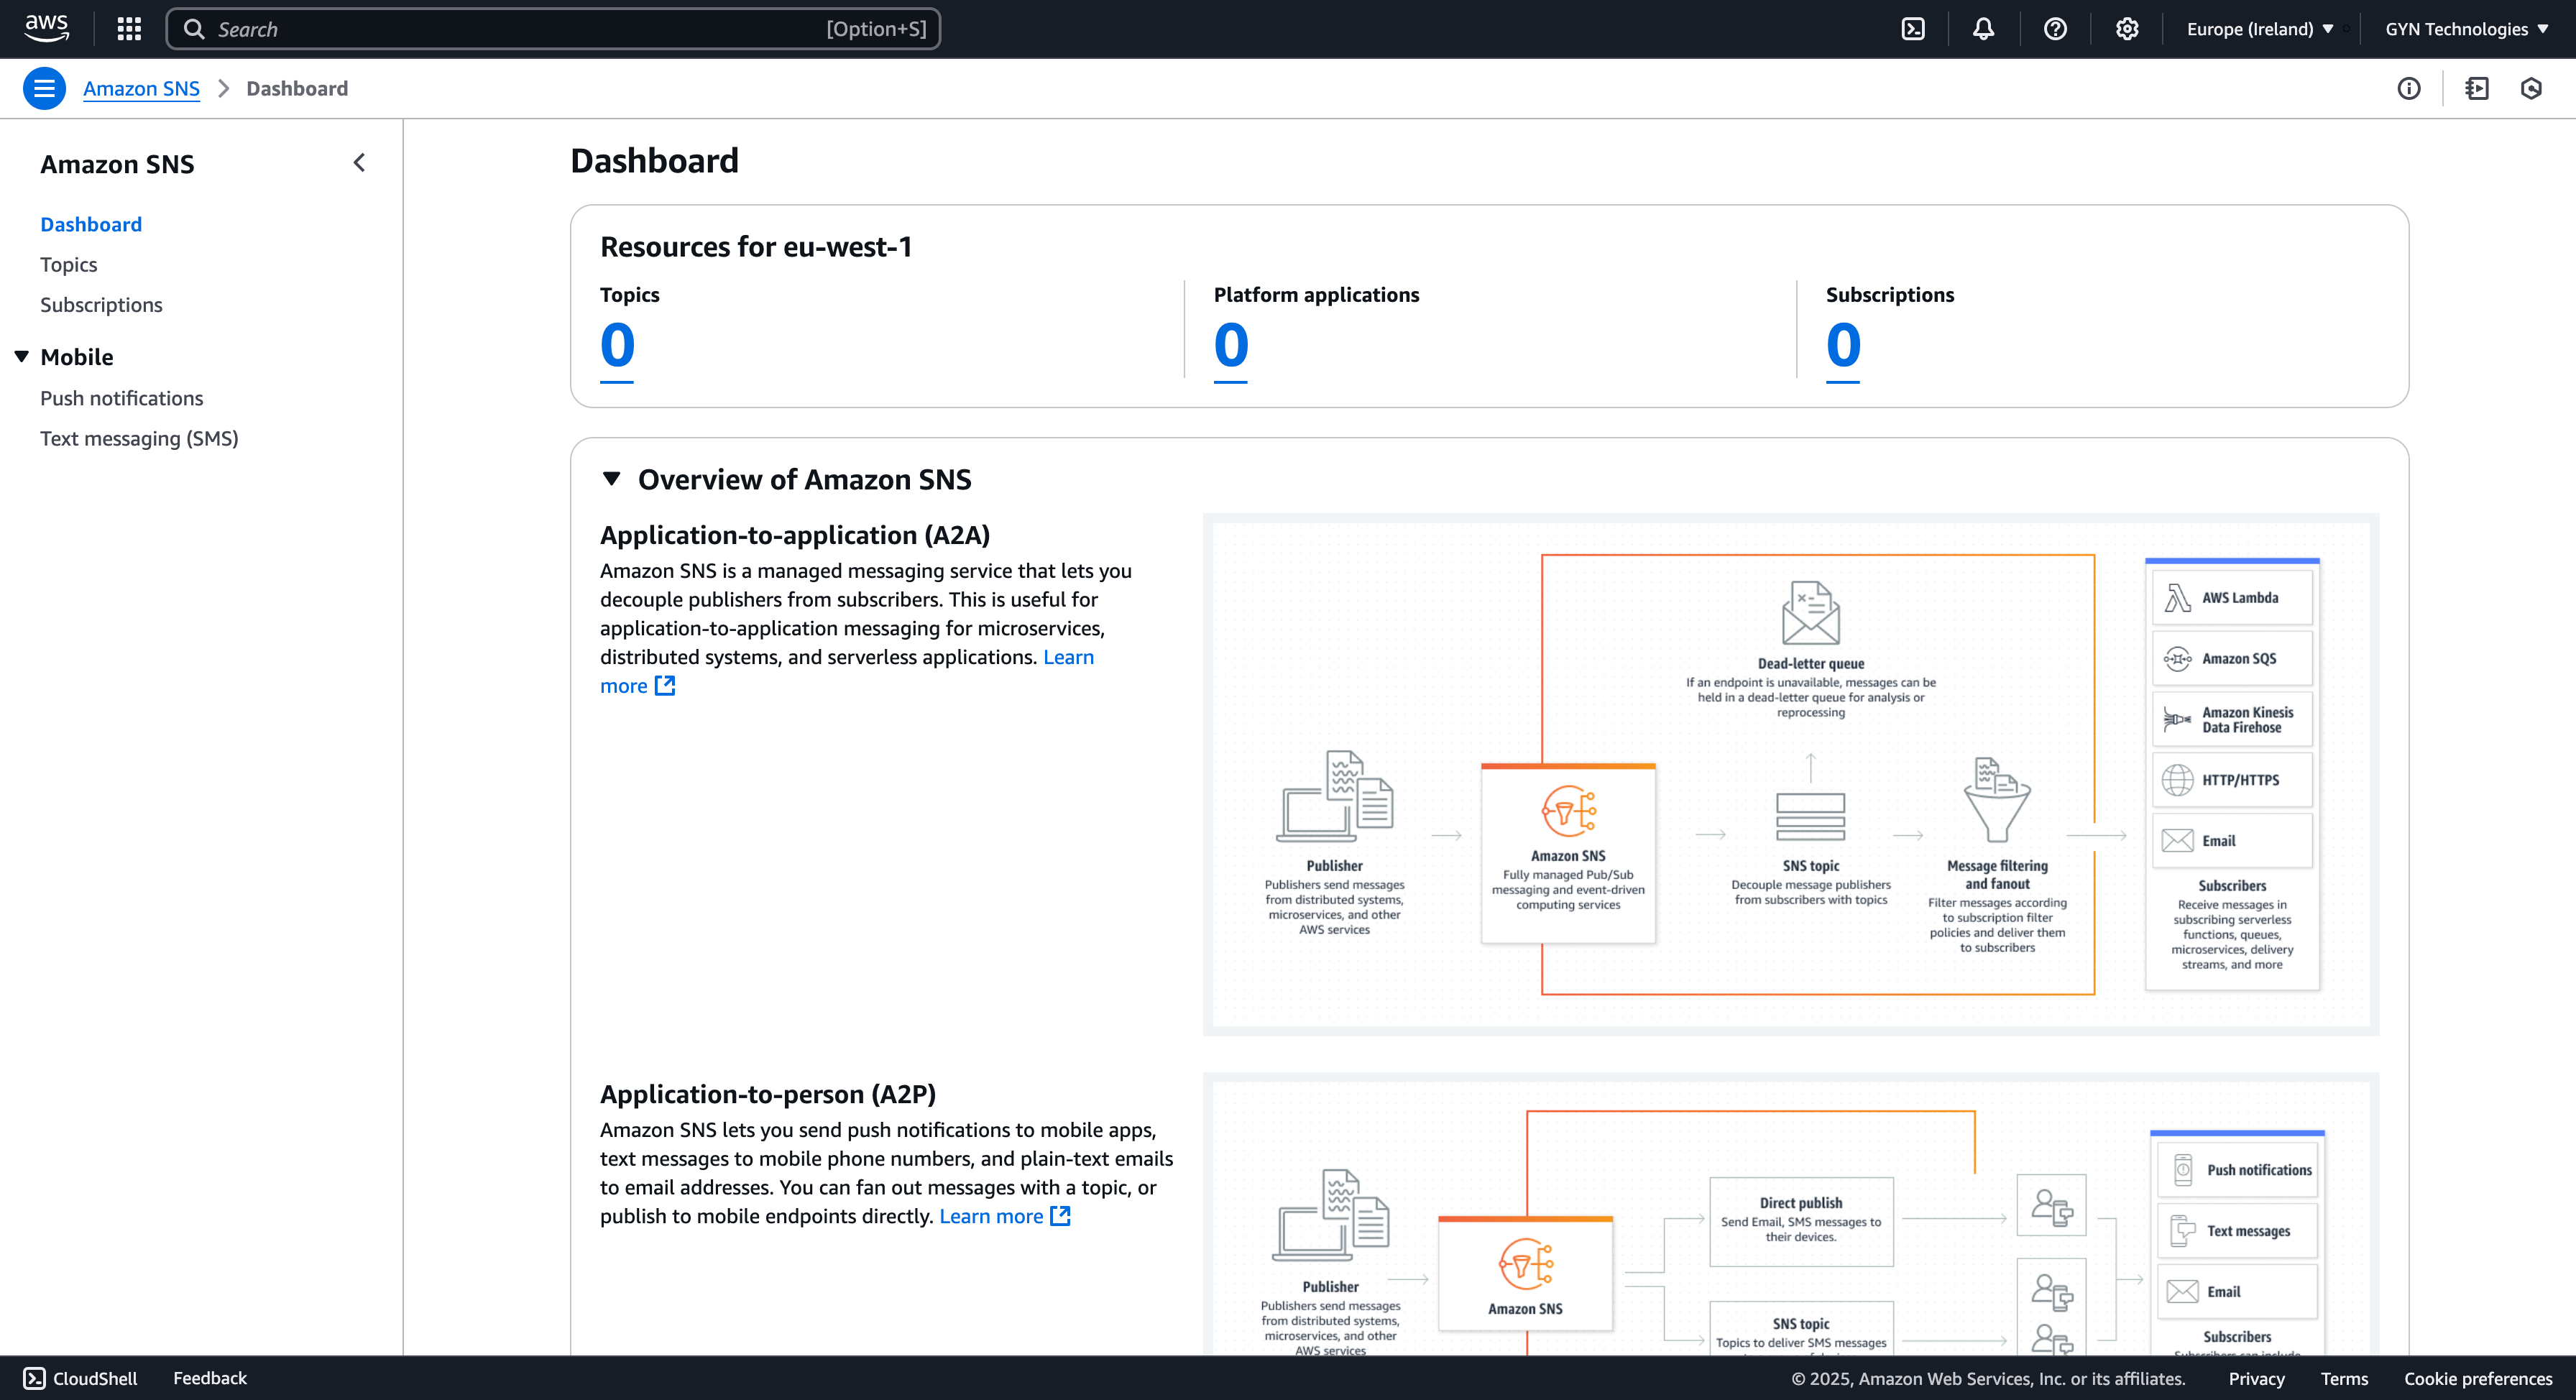
Create an Amazon SNS Topic
To get started, navigate to Amazon SNS in your AWS console. Your SNS dashboard should look something like this:
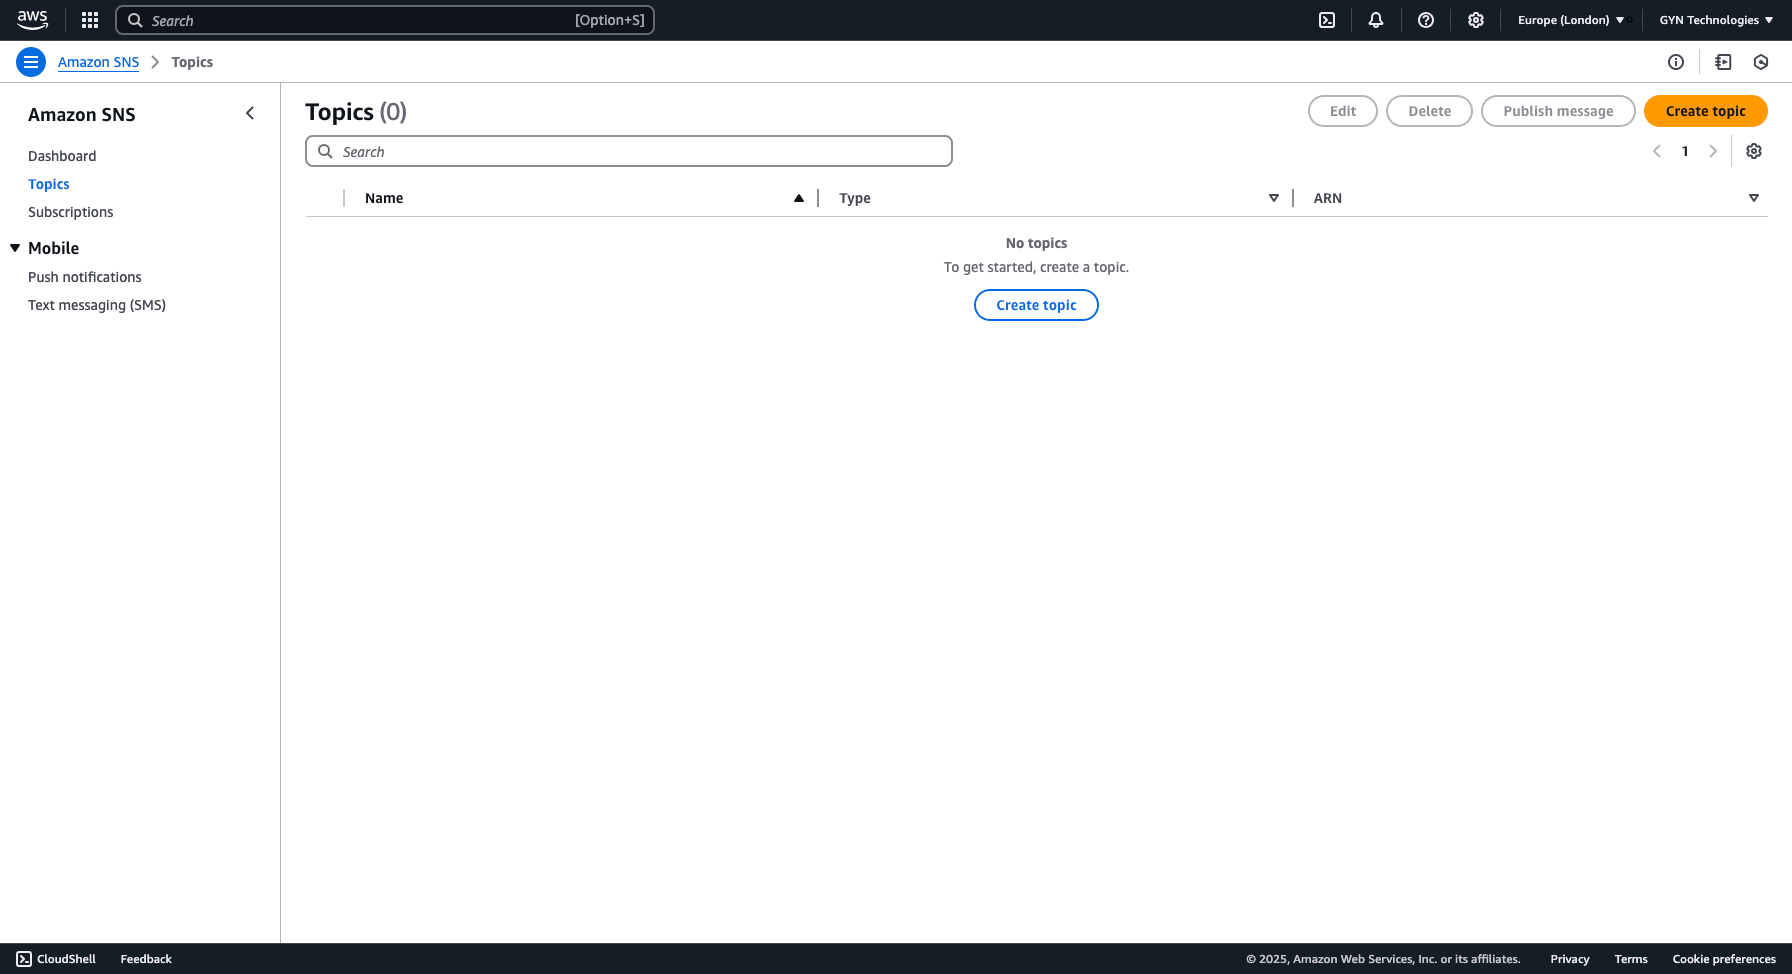
Next, go to the Topics section and click the "Create topic" button.
Configure the Topic
You’ll now see several configuration options. Let's go through the exact settings you need.
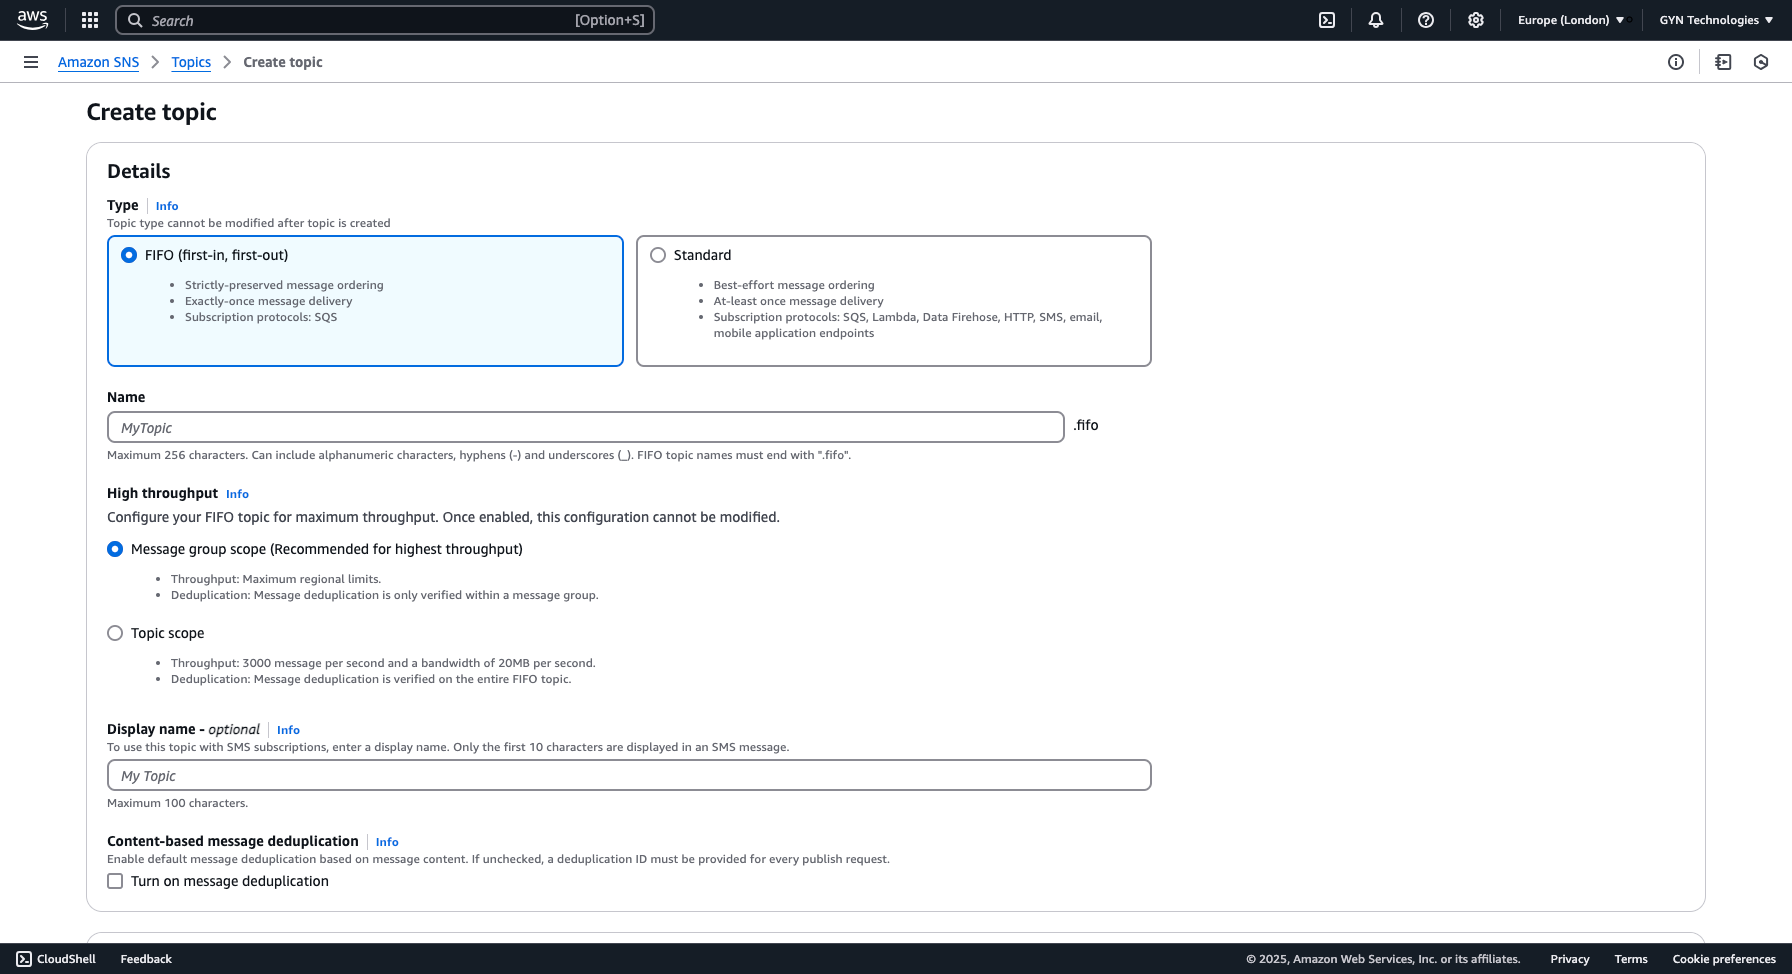
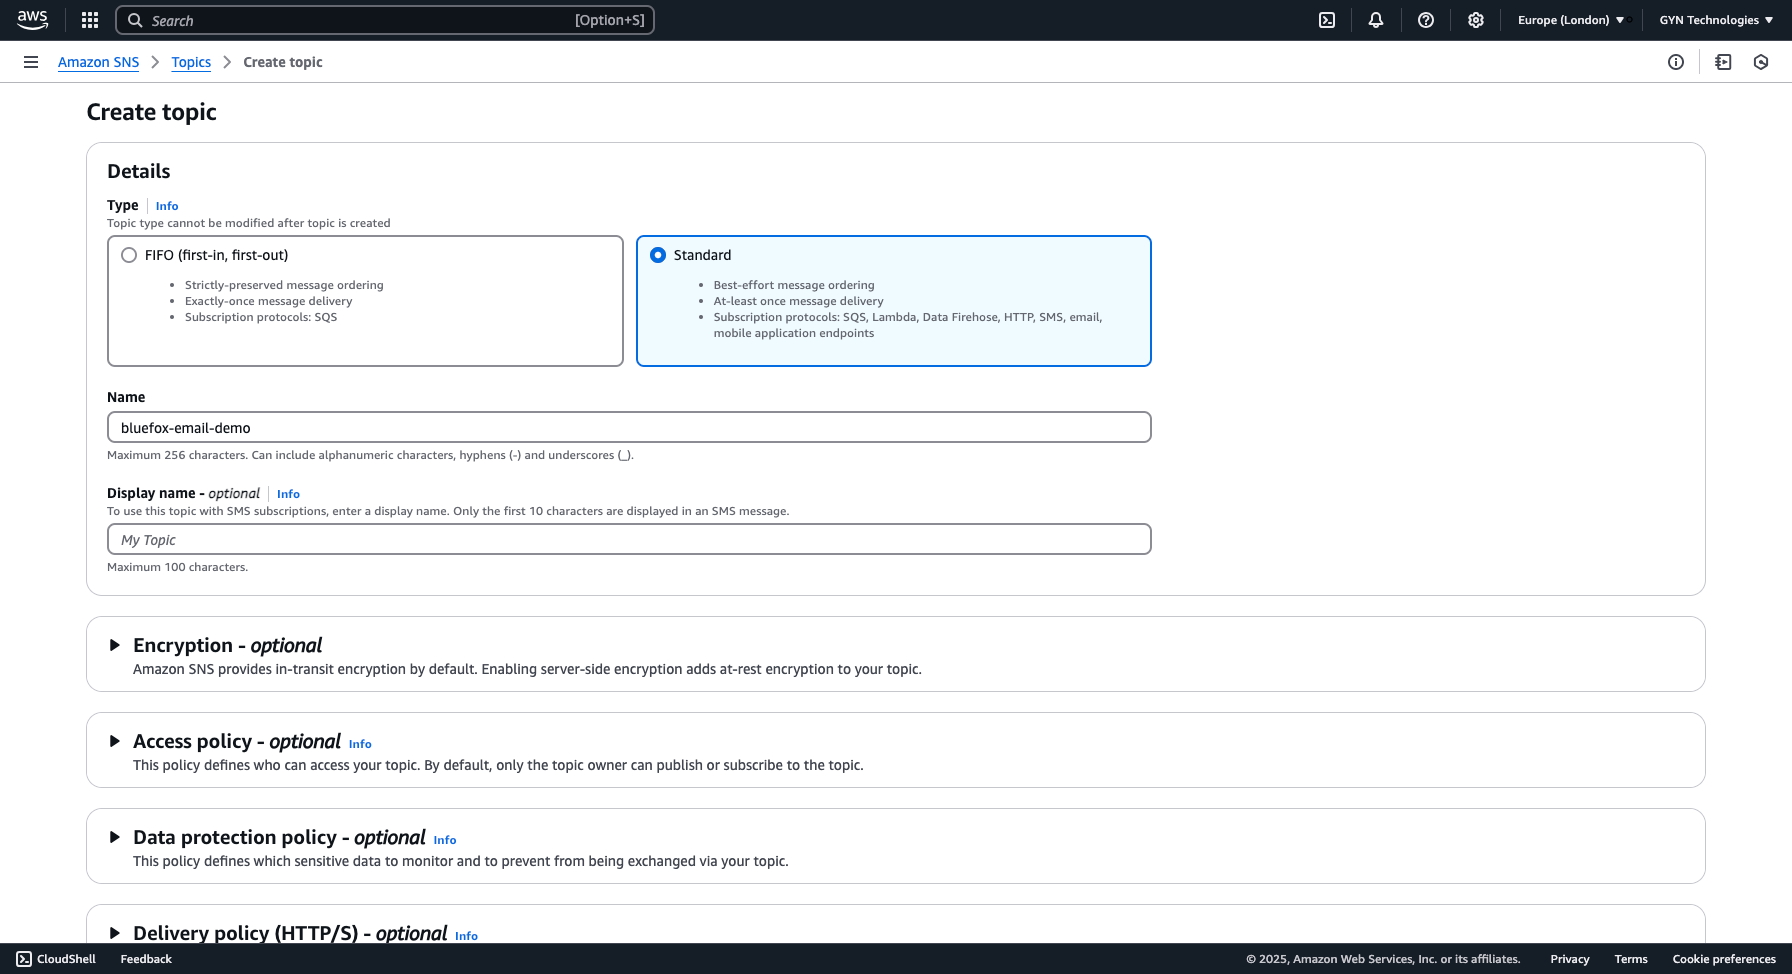
Select "Standard" as the Topic Type
You don’t need aFIFOtopic; a Standard topic is sufficient for handling bounce and complaint notifications.Name Your Topic Clearly
- Use a descriptive name for your topic.
- We recommend appending
-bouncesor-complaintsto make its purpose clear. - It’s also a good idea to include your environment (
prod,staging, etc.) for better organization.
For example:
✅ myapp-prod-bounces
✅ myapp-staging-complaints
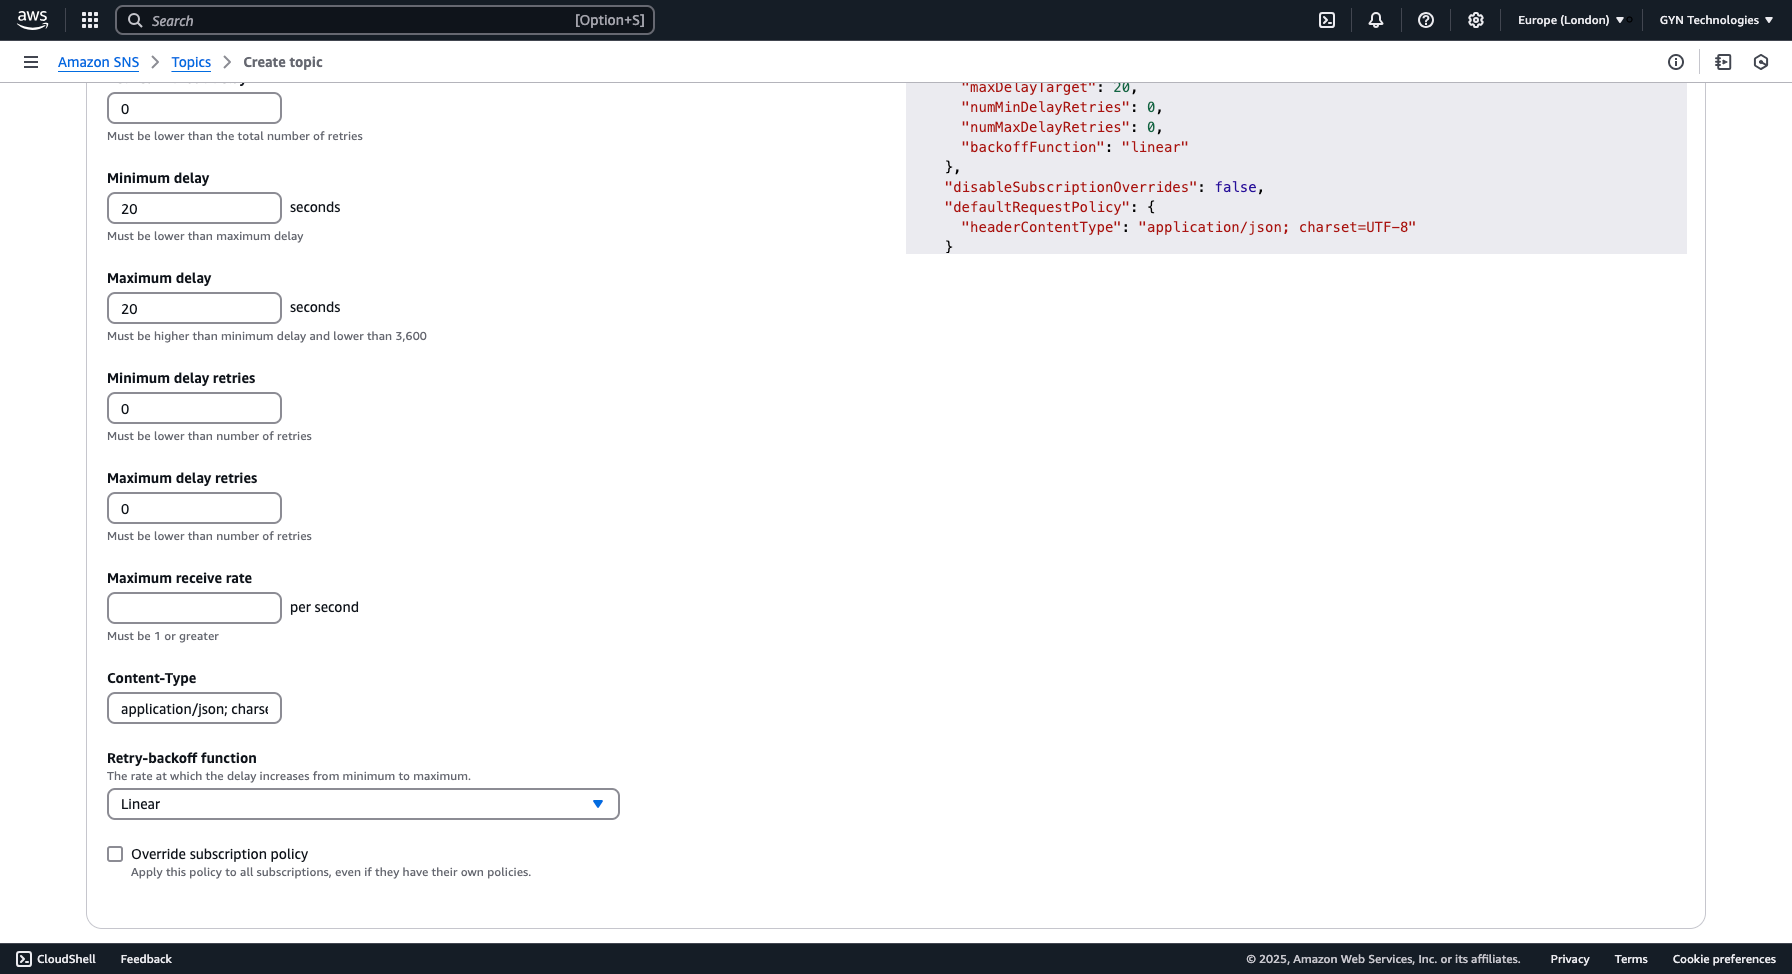
Adjust the Delivery Policy
Now, scroll down to the Delivery policy section.
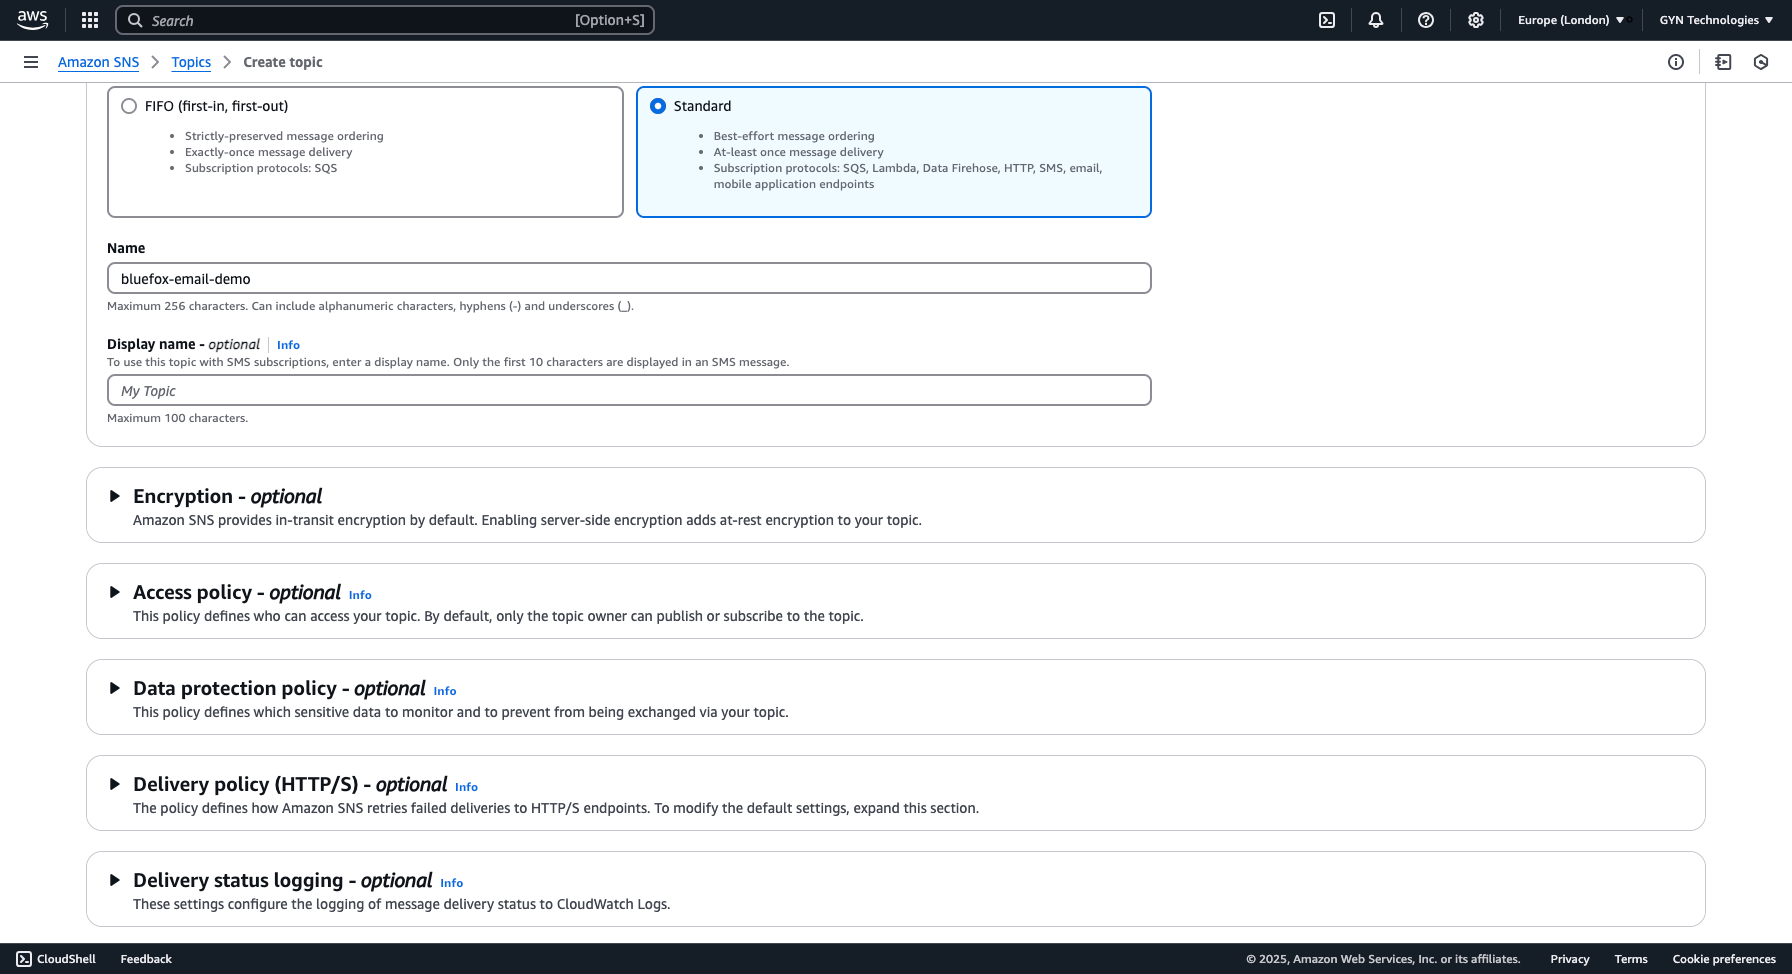
Expand this section to see the default settings. By default, the Content-Type is set to text/plain, but it’s best to change it to application/json.
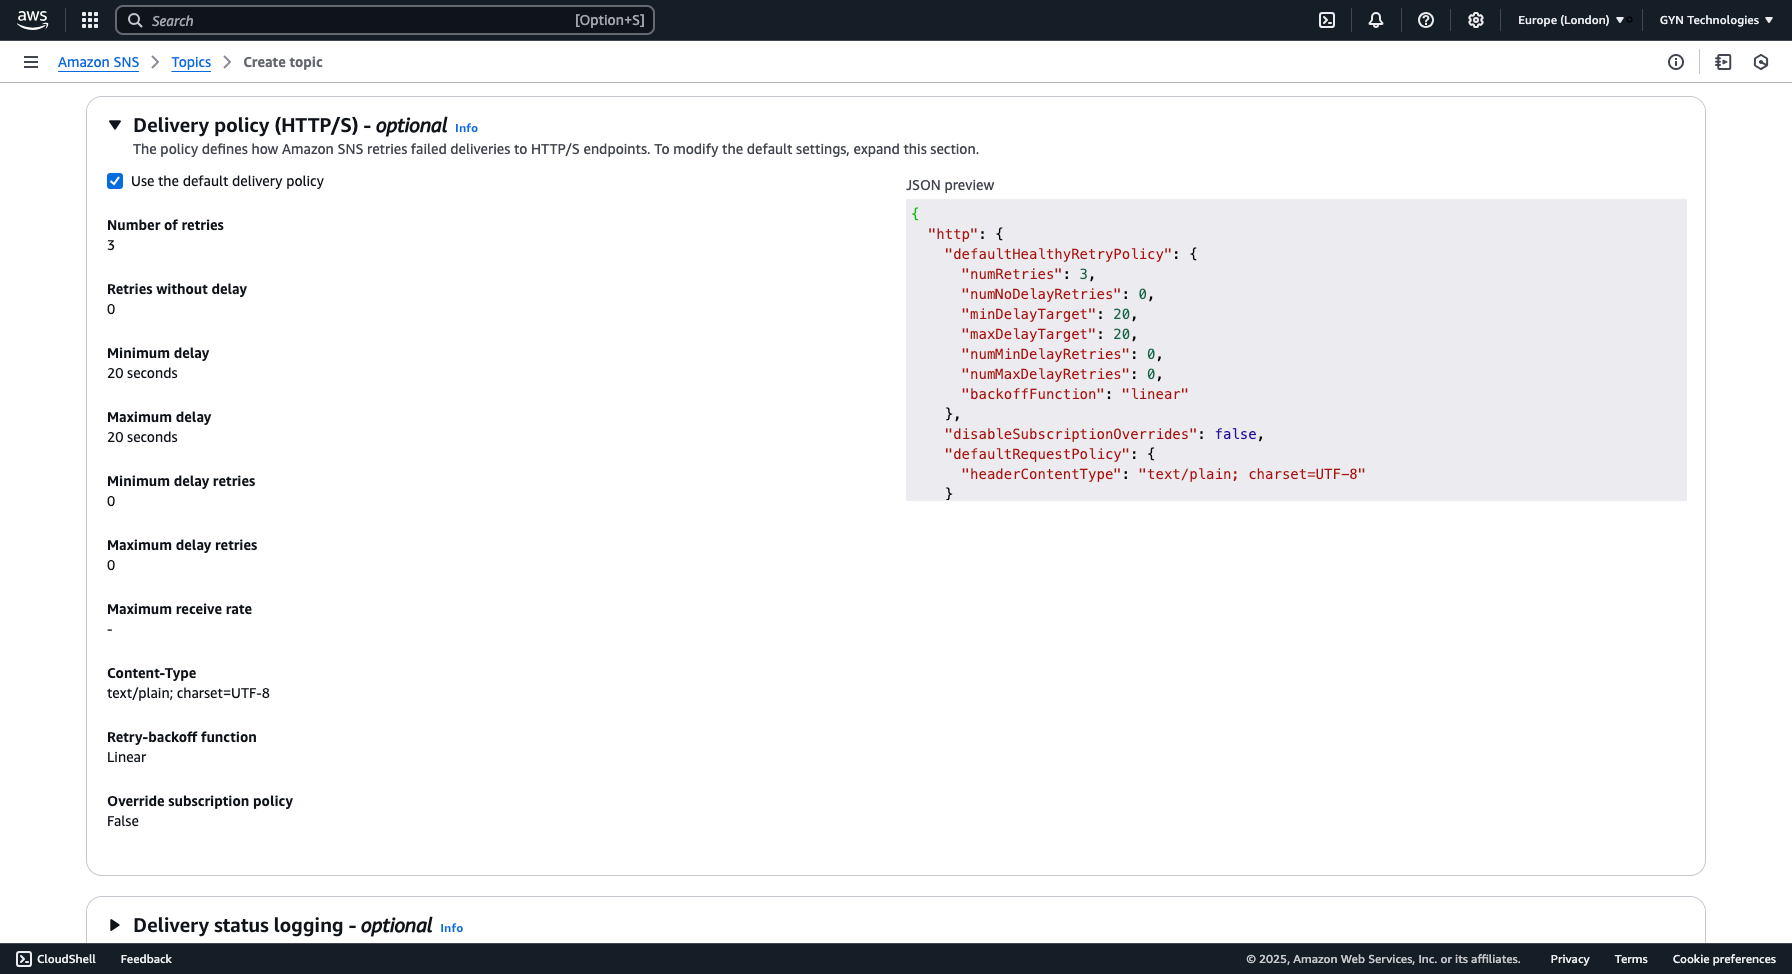
To modify it:
- Uncheck the "Use default delivery policy" option.
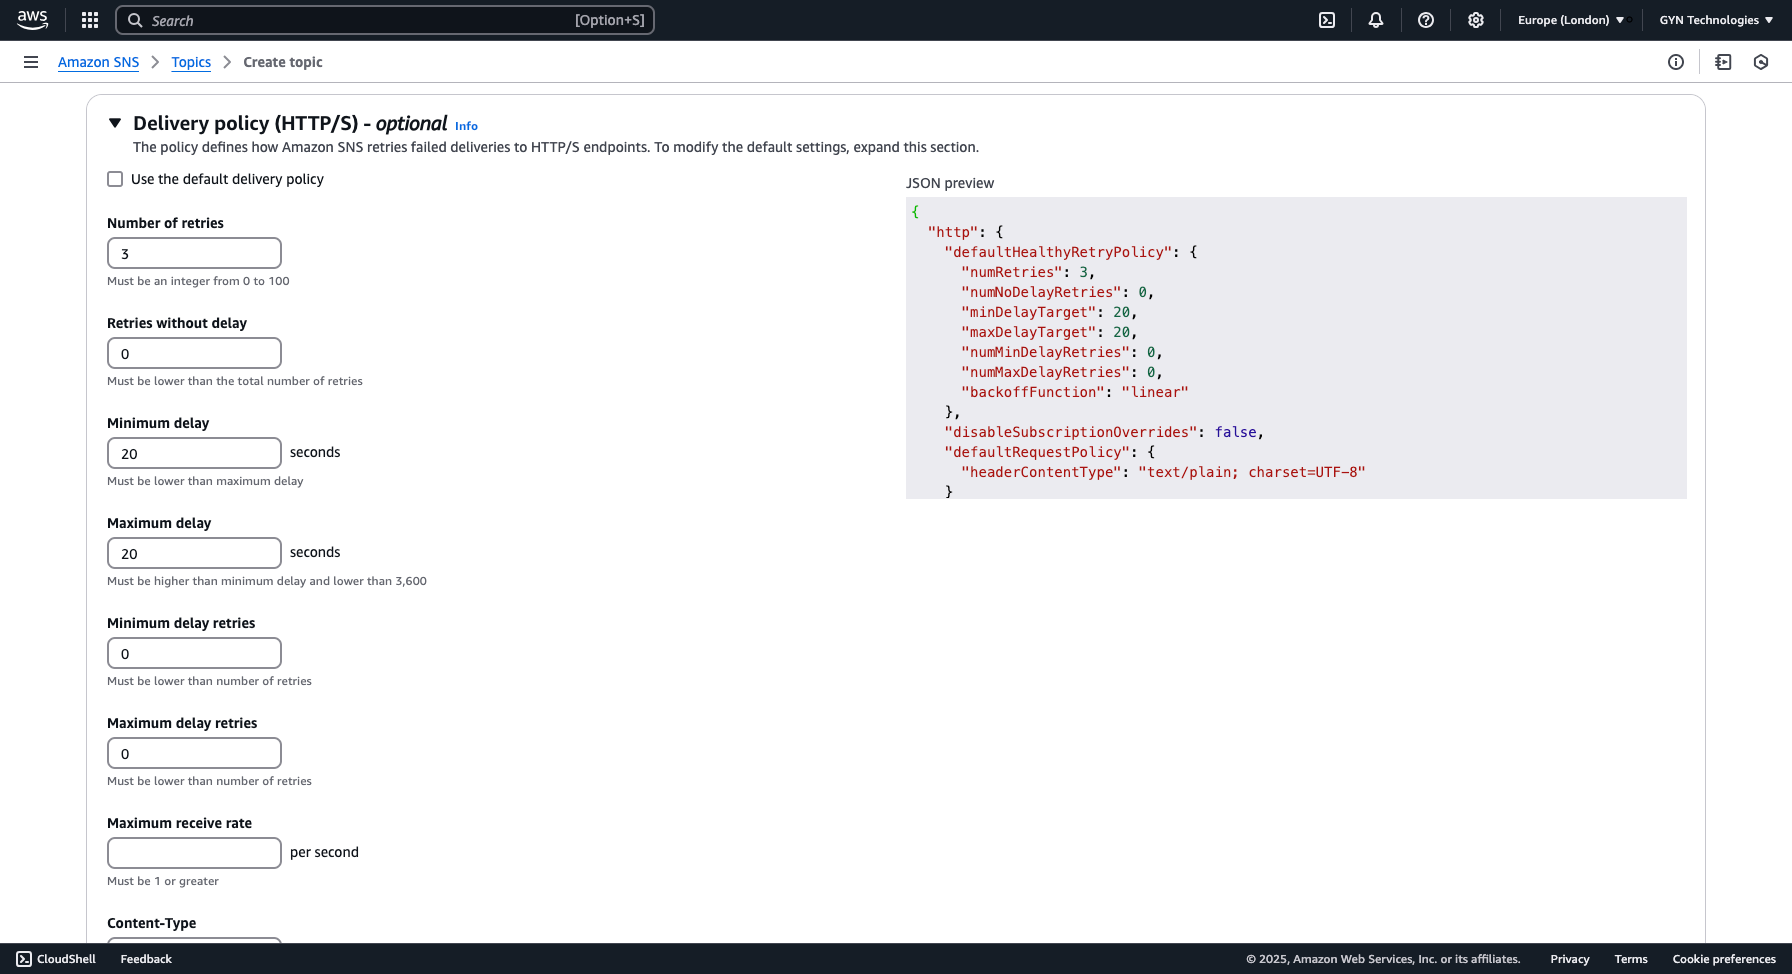
- Scroll down to the Content-Type input and change
text/plaintoapplication/json.
Finalizing the Topic Creation
Once everything is set up, scroll to the bottom and click "Create topic".

After creating the topic, you should see a confirmation page like this:
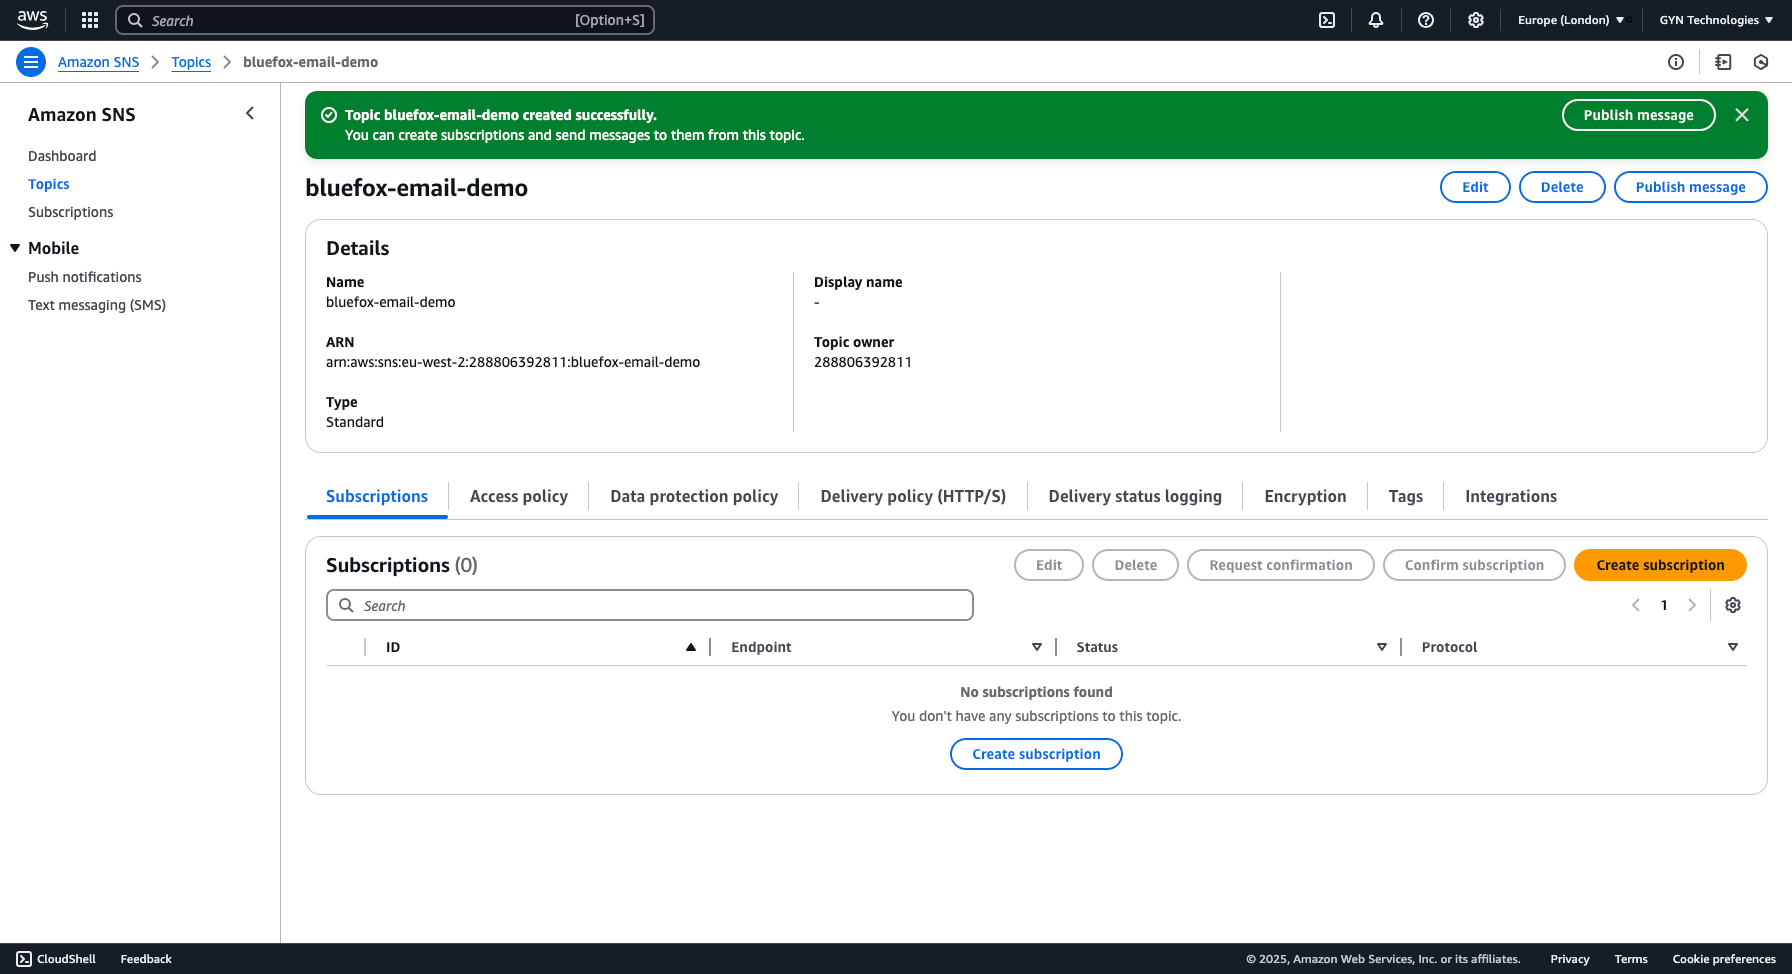
With your SNS topic now set up, you’re ready to move on to the next step: creating a subscription that will send notifications to your webhook.
Create an Amazon SNS Subscription
Now, it's time to create a subscription for your topic that will send an HTTP request to your webhook whenever an event is sent to the topic.
In order for a webhook to work, you need a publicly accessible URL. Deploying each change while developing your webhook can be cumbersome, so for development purposes, we suggest using ngrok.
Ngrok acts as a proxy, forwarding requests from a public URL to your local machine.
At first, it's perfectly fine to create a simple server that logs request headers and body to the console.
Javascript
const http = require('http');

const server = http.createServer((req, res) => {
  // Log request details
  console.log(`\n--- Incoming Request ---`);
  console.log(`Method: ${req.method}`);
  console.log(`URL: ${req.url}`);
  console.log(`Headers: ${JSON.stringify(req.headers, null, 2)}`);

  // Collect body data if any
  let body = '';
  req.on('data', chunk => {
    body += chunk.toString();
  });

  req.on('end', () => {
    if (body) {
      console.log(`Body:`);
      console.log(JSON.parse(body));
    } else {
      console.log('Body: [No Body]');
    }
    console.log(`--- End of Request ---\n`);

    // Respond to the client
    res.writeHead(200, { 'Content-Type': 'text/plain' });
    res.end('Request received and logged.');
  });
});

const PORT = 8080;
server.listen(PORT, () => {
  console.log(`Server is running on http://localhost:${PORT}`);
});
Then, start ngrok:
bash
ngrok http http://localhost:8080This will generate a public URL that proxies requests to your local machine on port 8080. Ngrok prints the URL in your terminal when started. You’ll need this URL when creating your SNS subscription, and it will allow you to test your webhook locally.
We can take care of your webhooks for you
If handling webhooks feels like a hassle, bluefox.email takes care of bounce and complaint processing for you.
Grab your free account!
If you already use bluefox.email, just copy the webhook URL from the Set up bounces/complaints dialog in your
project settings.
Now, go back to the previous screen and click the "Create subscription" button.
This will take you to the subscription creation page. The Topic ARN field should already be selected. If not, select your SNS topic manually.
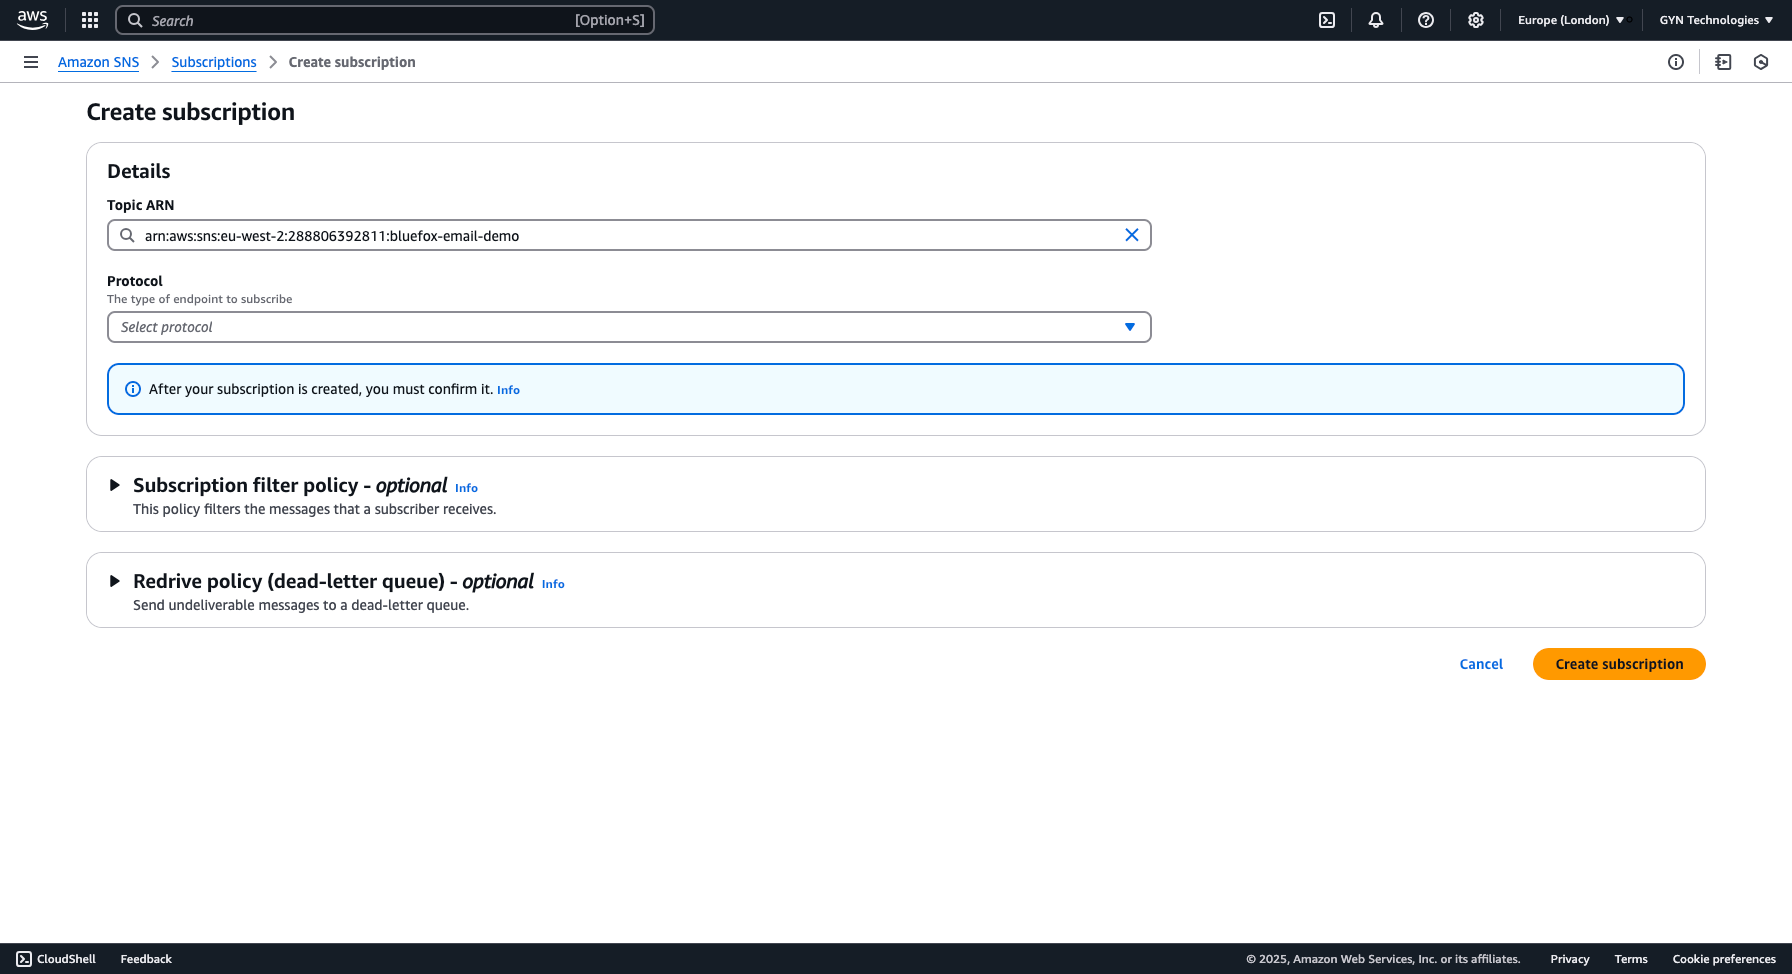
Configure Subscription Settings
Set Protocol to HTTPS
In the Protocol dropdown, select HTTPS.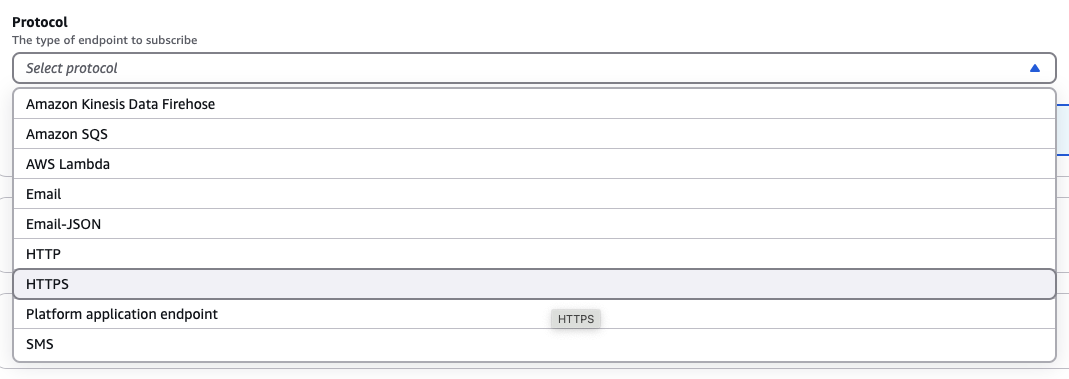
Enter Your Webhook URL
- If you're using ngrok, paste the public URL generated earlier.
- If you're using bluefox.email, enter the webhook URL copied from your project settings.
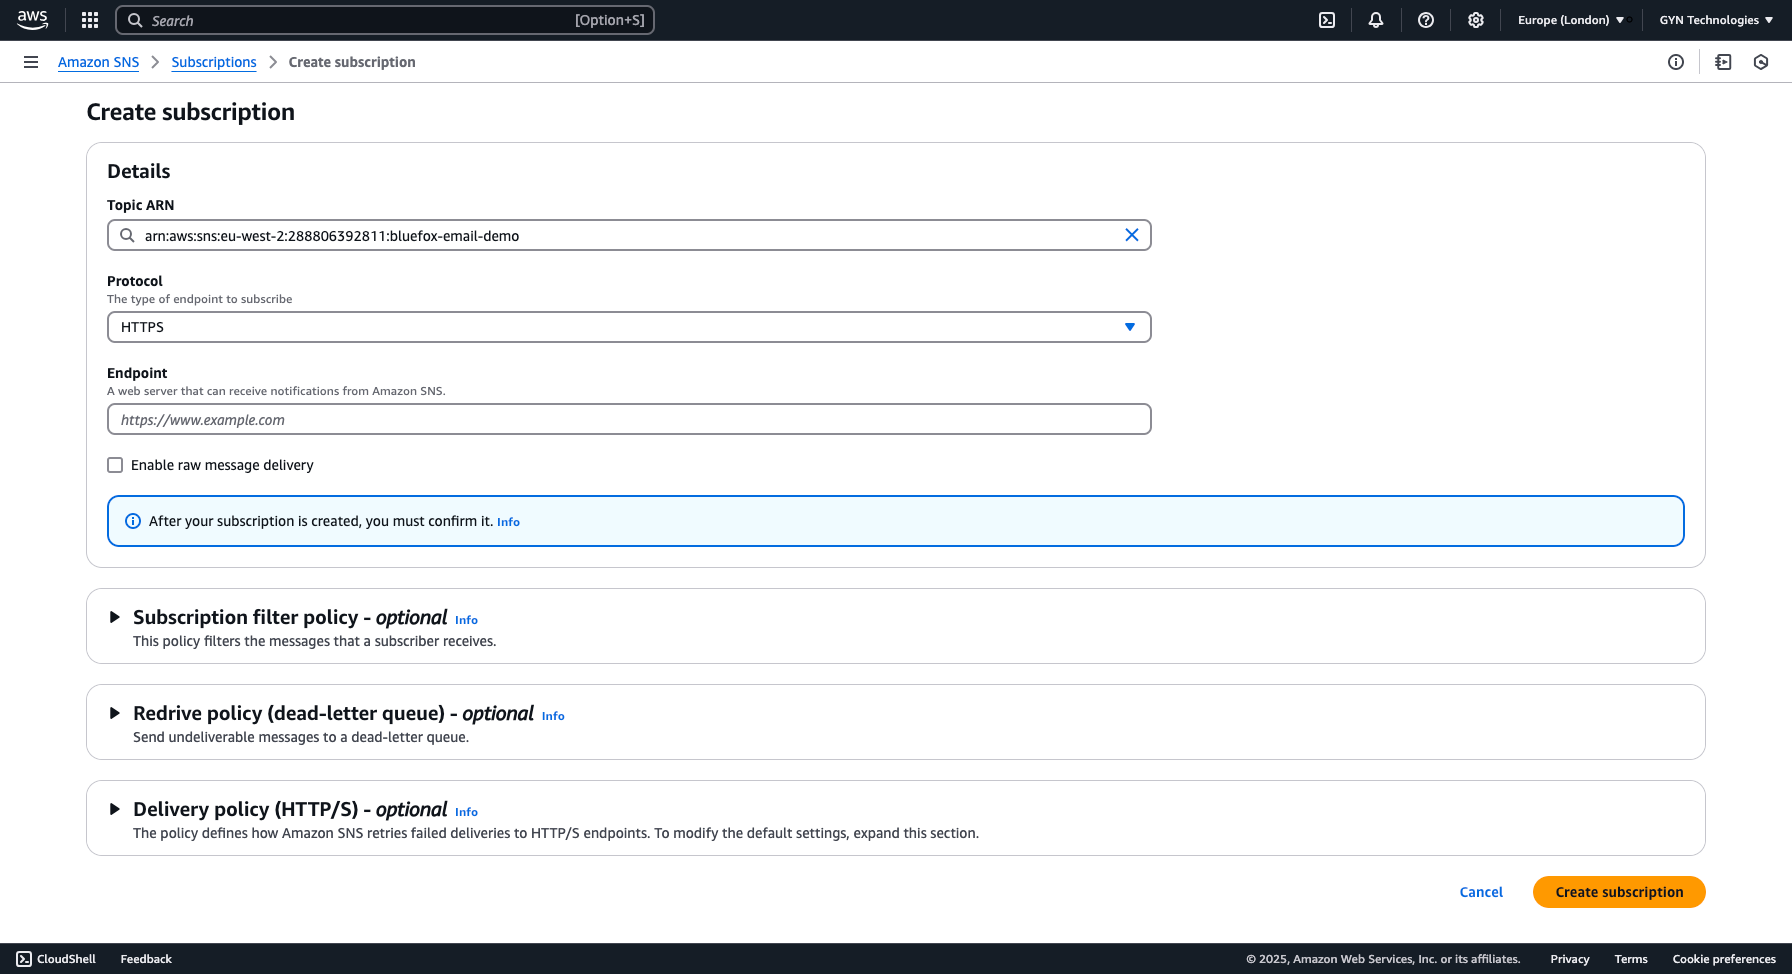
Note that there is an info box. If you click the link in the info box, a sidebar appears on the right-hand side, explaining how you can confirm your subscription. You can either open the link sent to your webhook or copy the link back to the AWS SNS UI. We will get back to this in a bit.
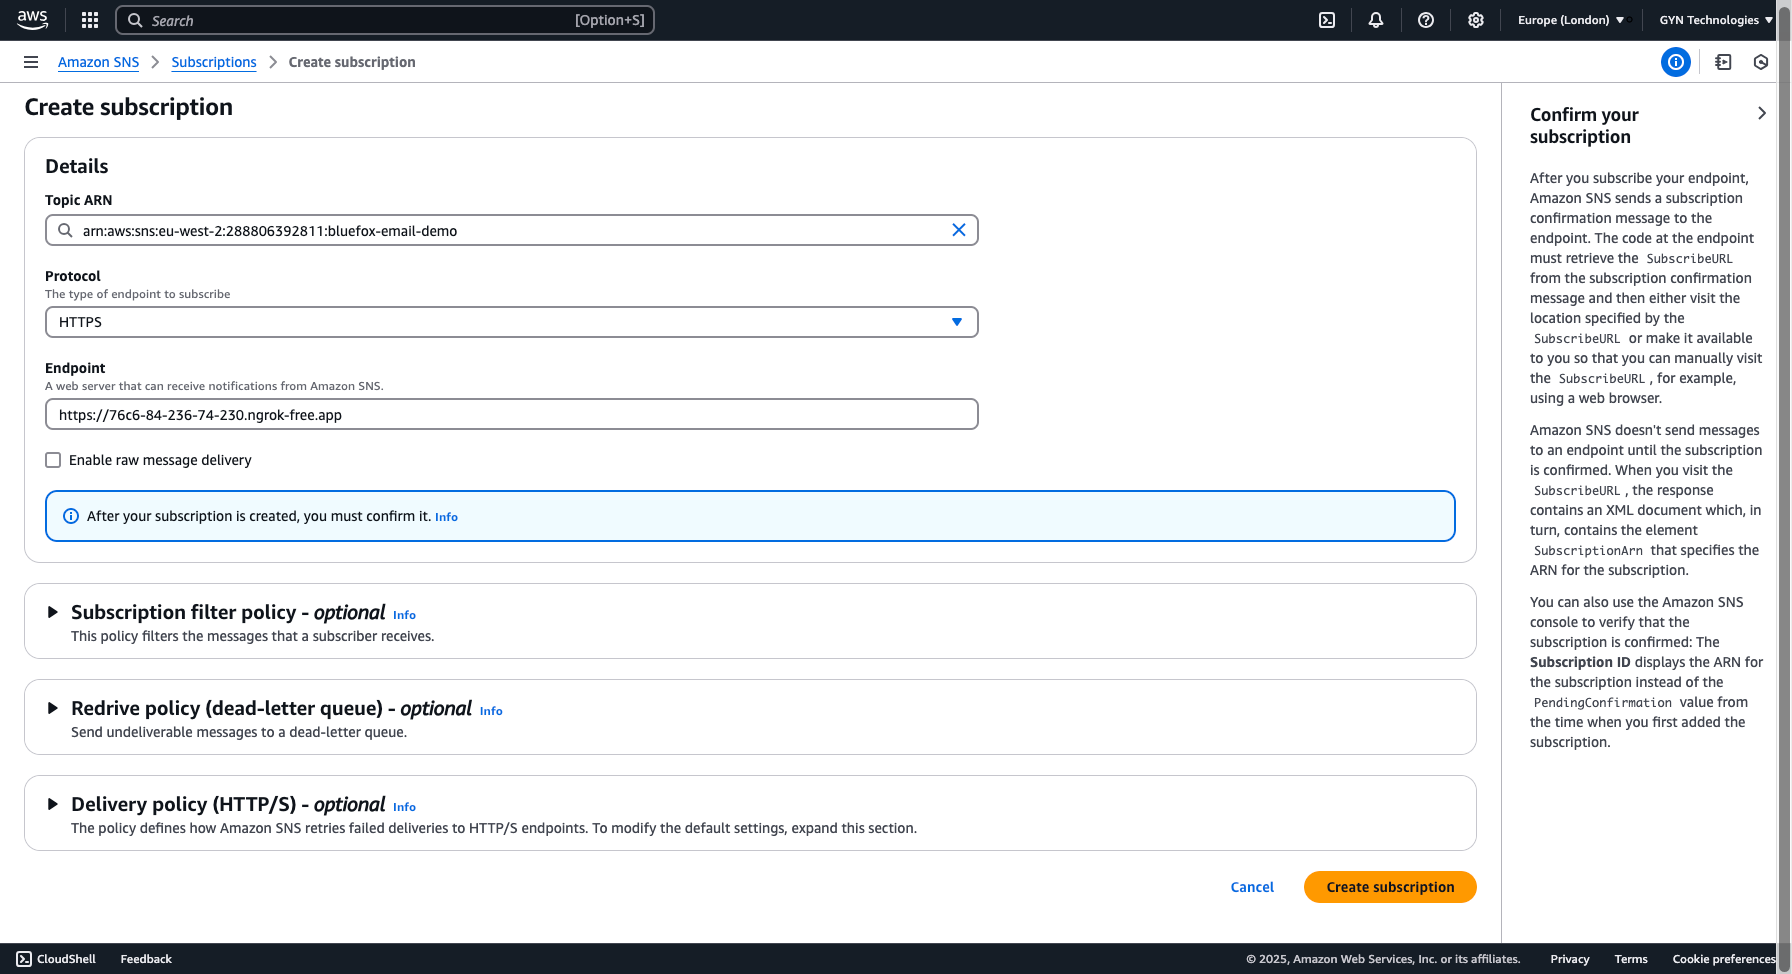
Scroll down to the Delivery policy section. Just like with the topic configuration, change the Content-Type from text/plain to application/json.
- Uncheck the "Use default delivery policy" option.
- Change Content-Type to
application/json.
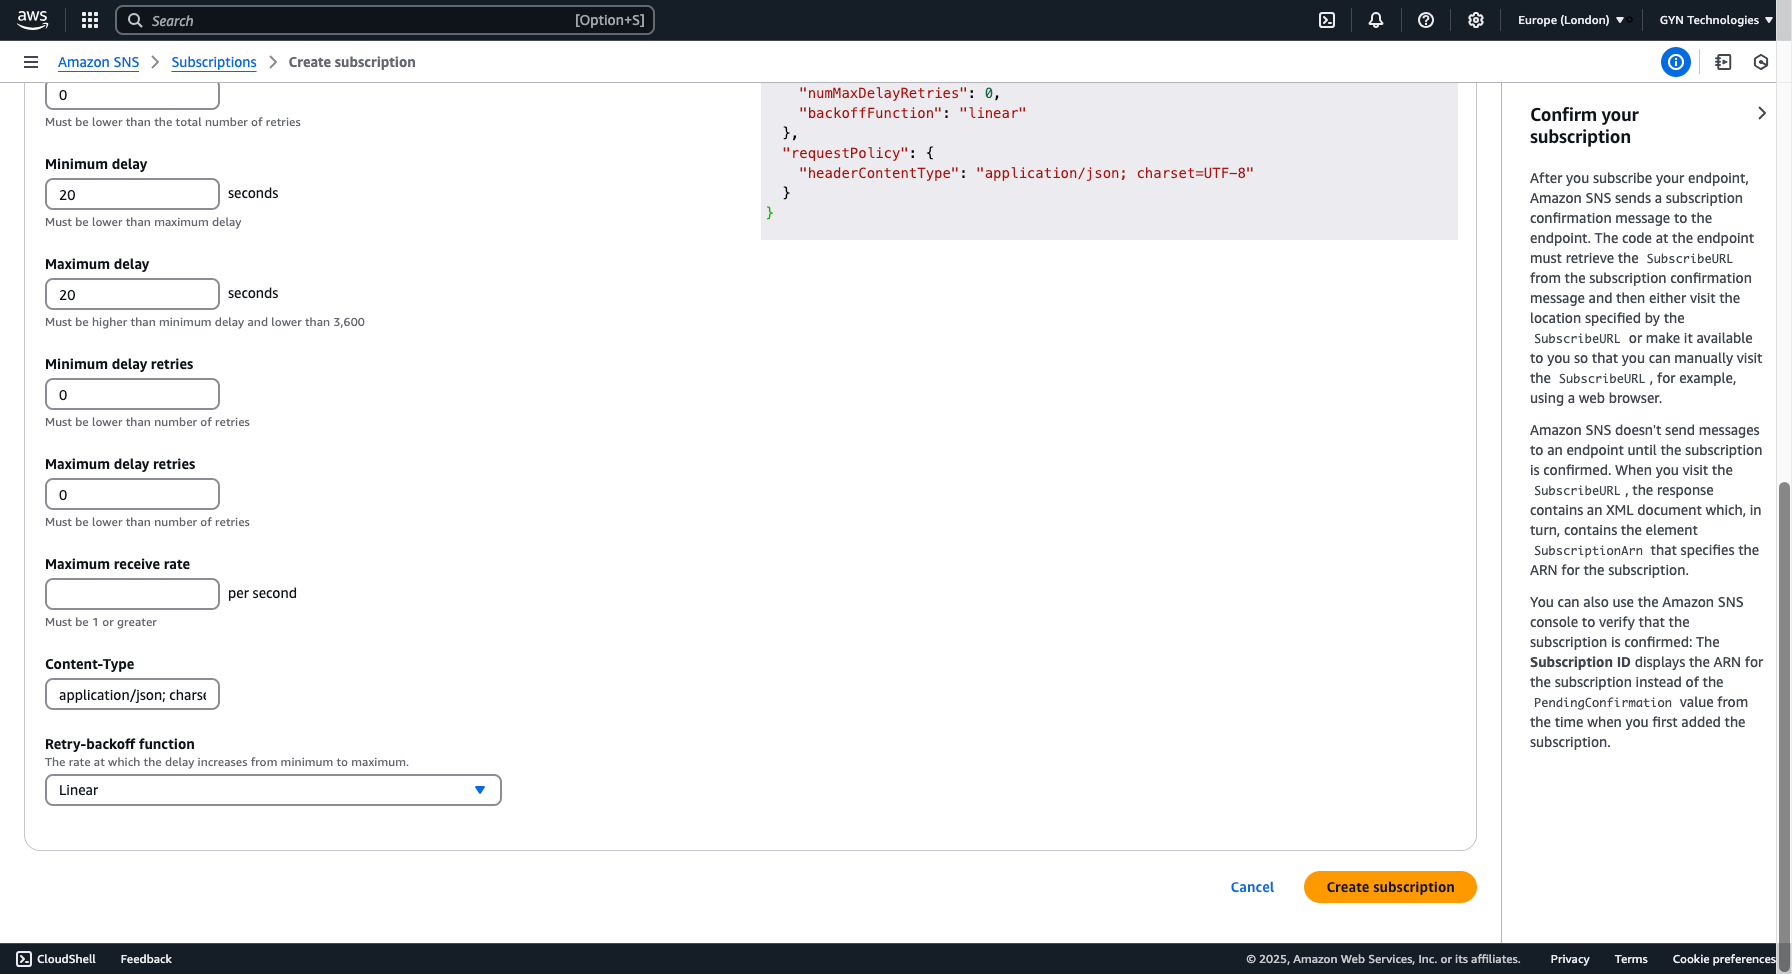
Click "Create subscription" at the bottom of the page.
After clicking "Create subscription", your webhook will immediately receive an HTTP POST request from AWS SNS.
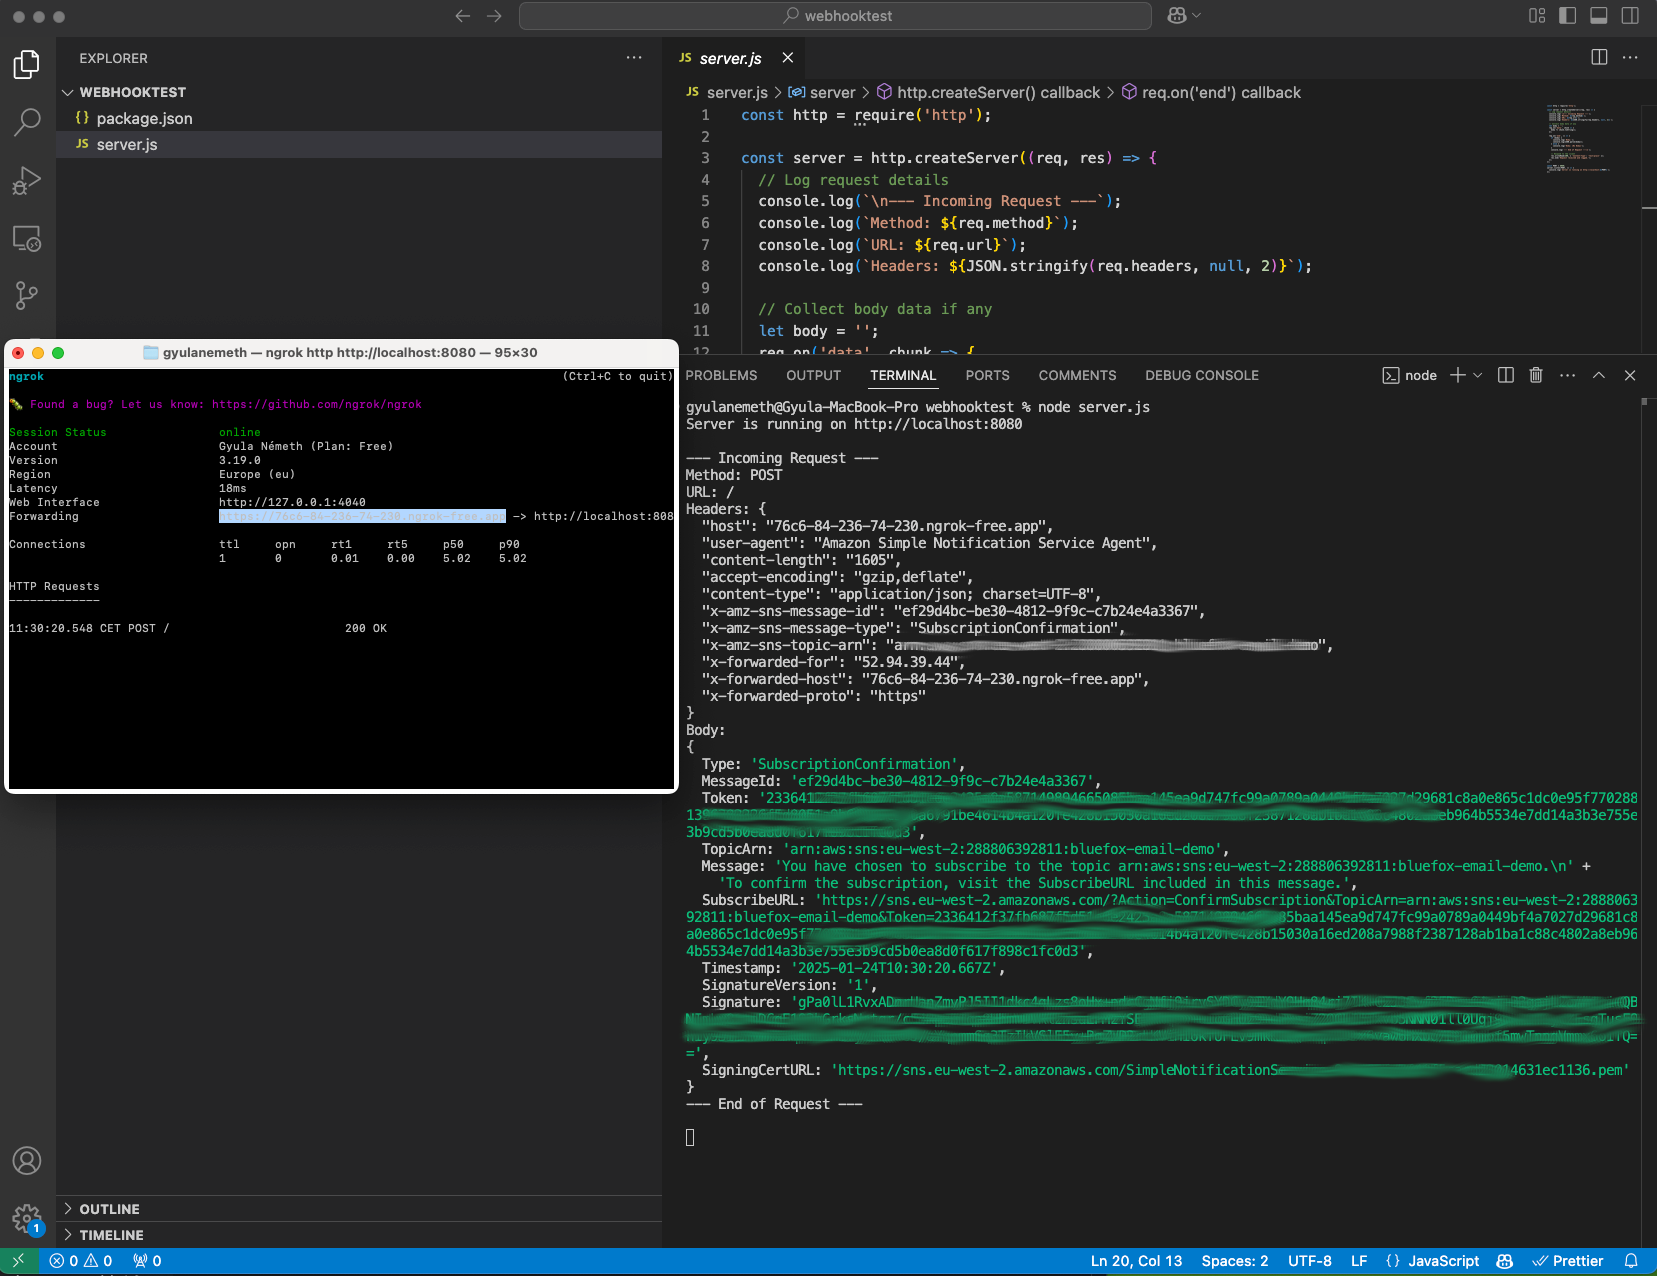
As mentioned previously, you must confirm your subscription by either opening the "SubscribeURL" you received or by entering it in the AWS SNS UI. Until then, your subscription status will be Pending confirmation, as shown below:
If you open the SubscribeURL directly, you will see a similar xml response:

Of course, you can do it programmatically, or you can use the AWS UI to confirm your subscription.
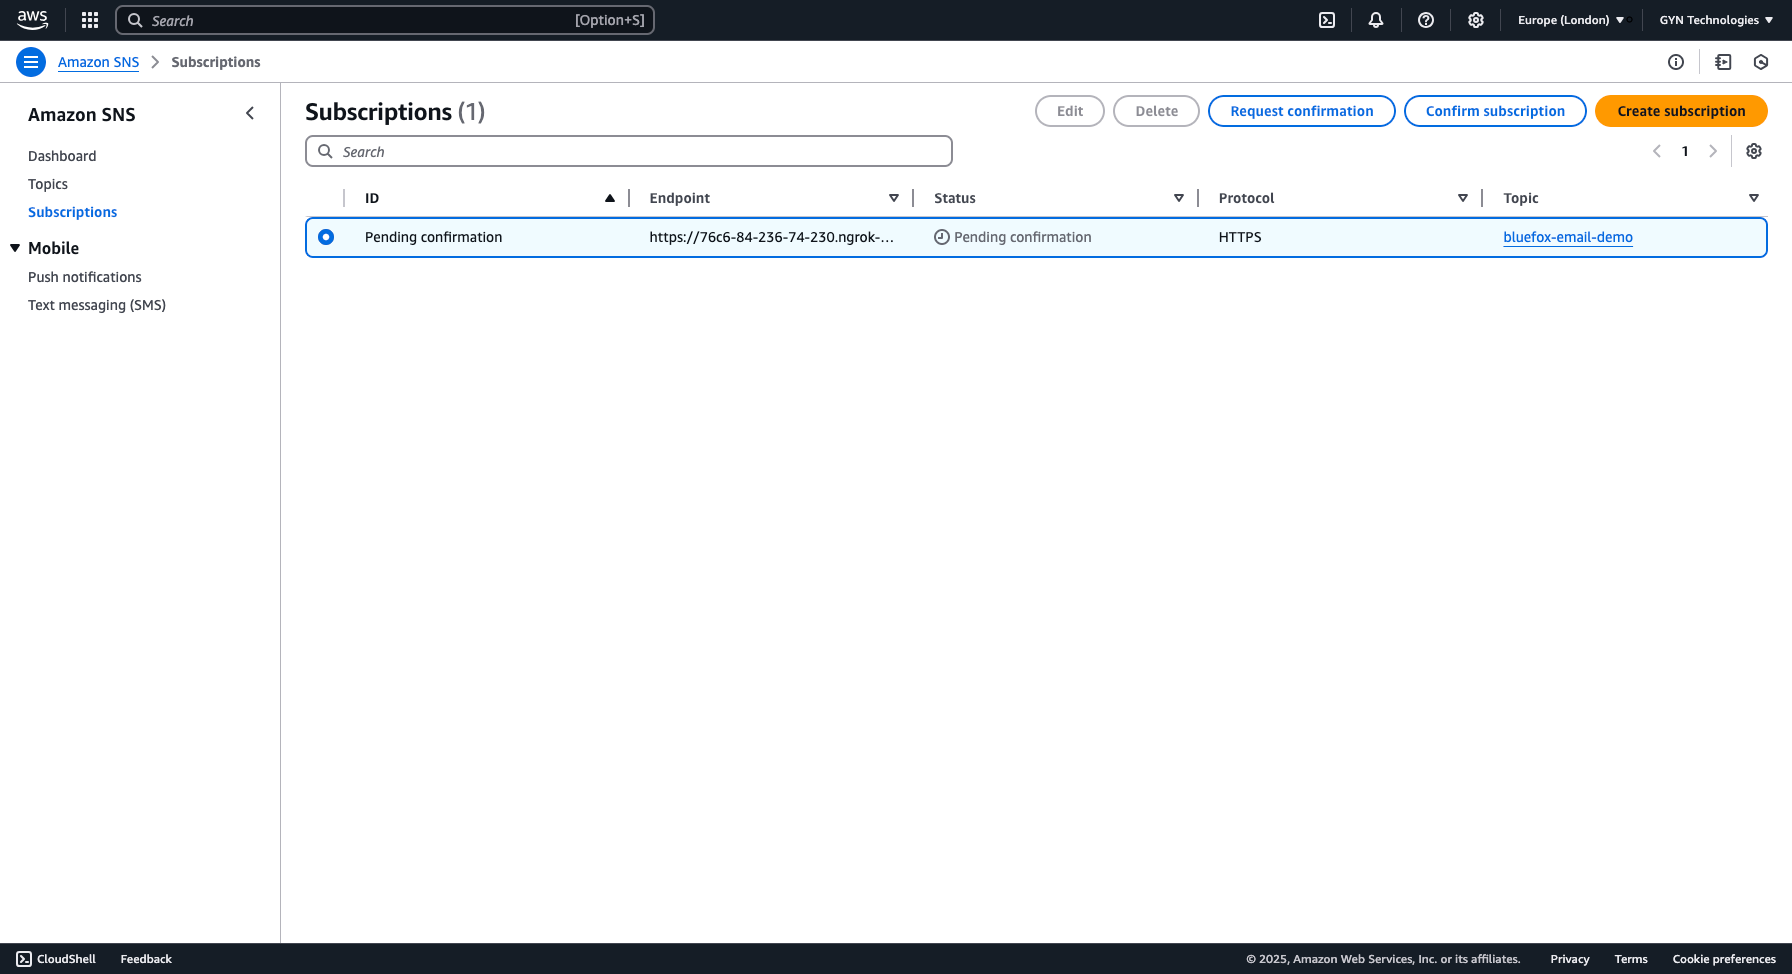
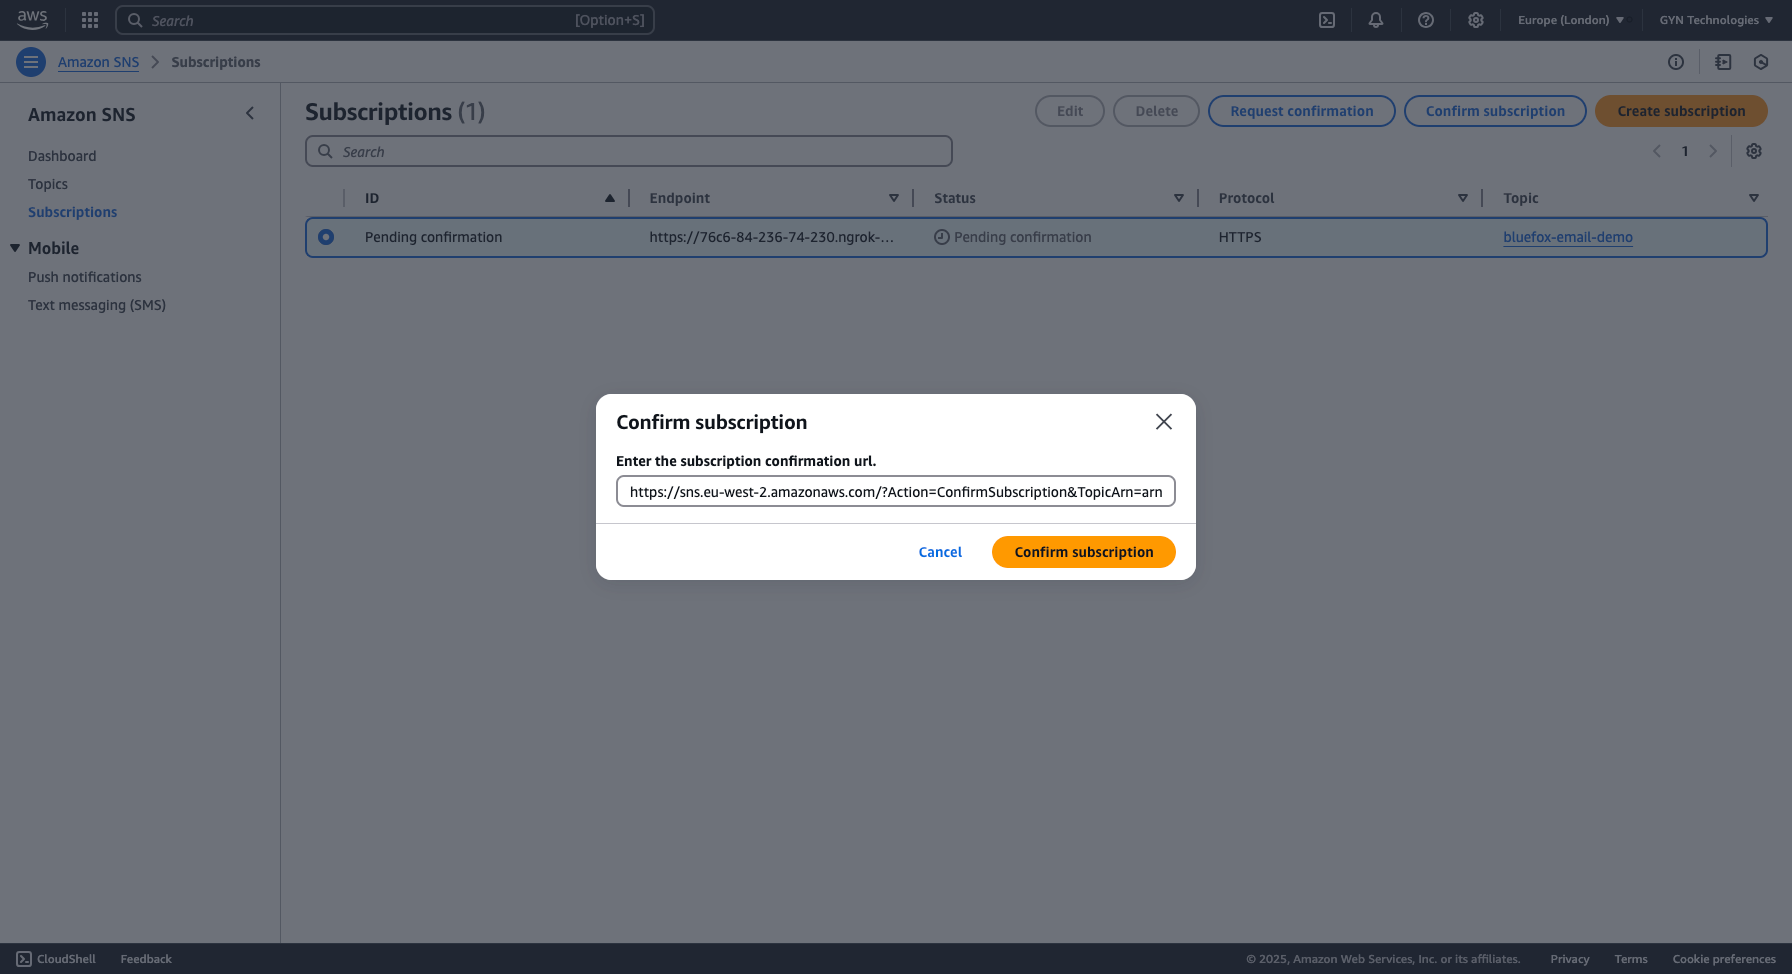
If you decide to confirm via the UI, navigate to your SNS Subscriptions page, select the pending subscription, and click the "Confirm subscription" button:
A dialog will appear with a single input field. Paste your "SubscribeURL" into the input box:
We chose the UI-based approach
At bluefox.email, we opted for manual confirmation to ensure full transparency. This way, you have complete control over which subscriptions you confirm.
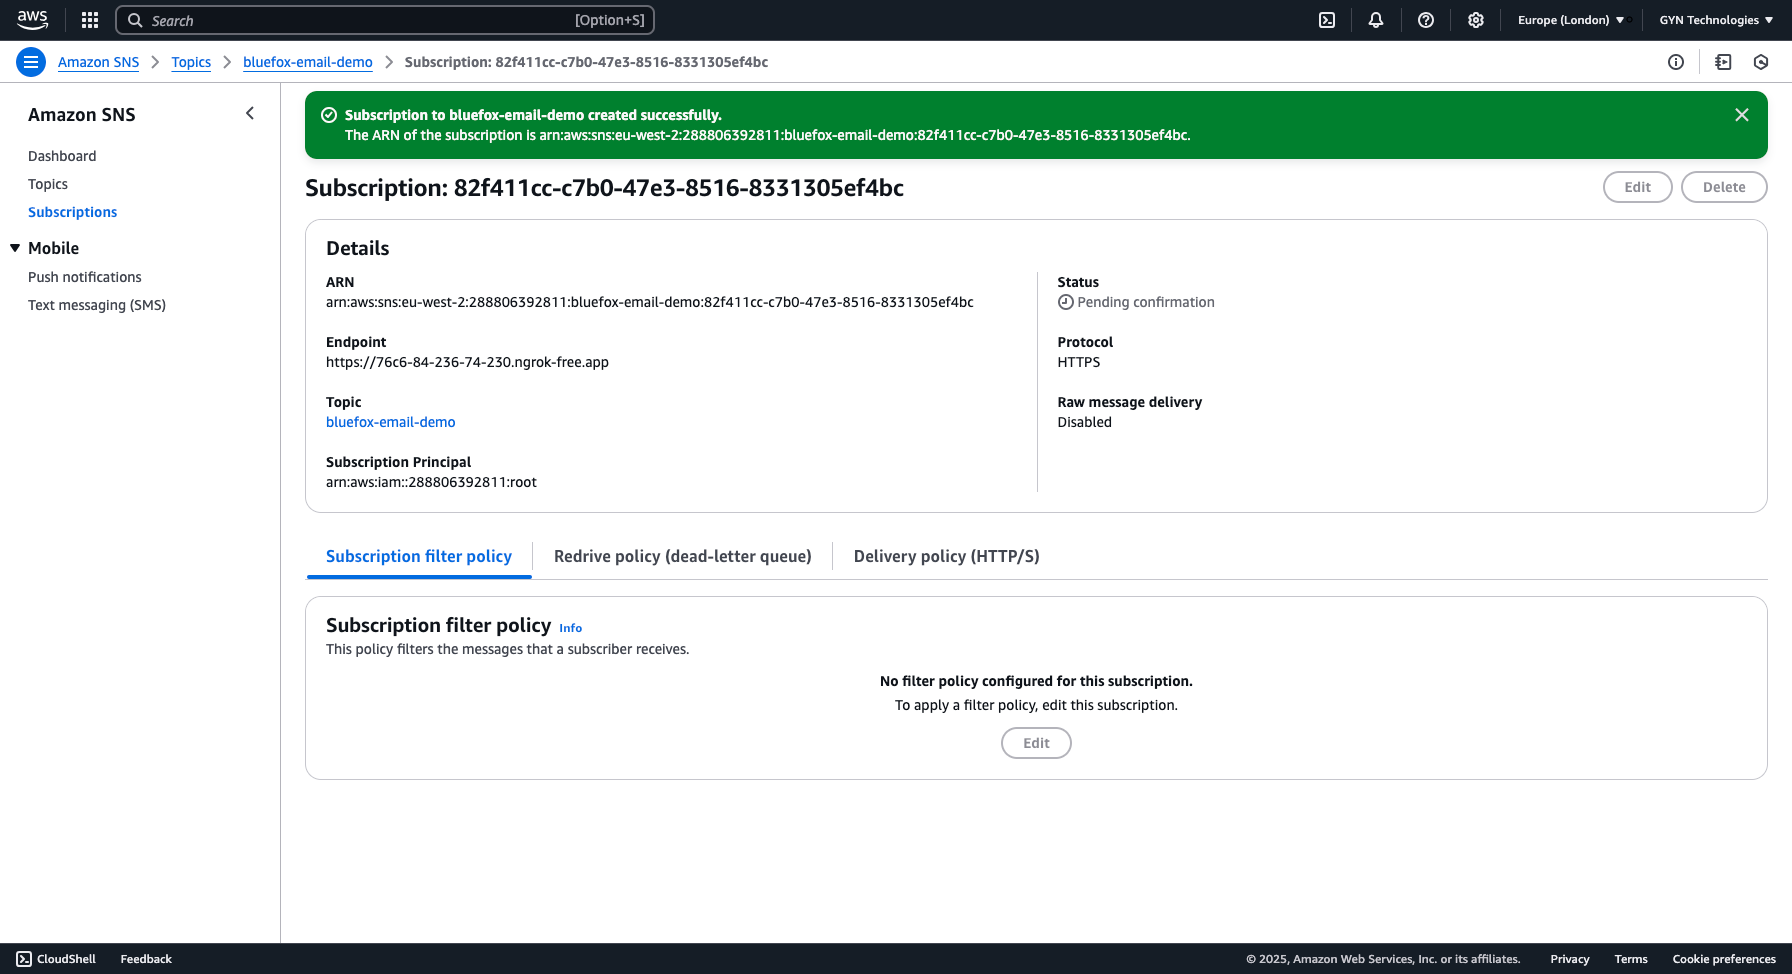
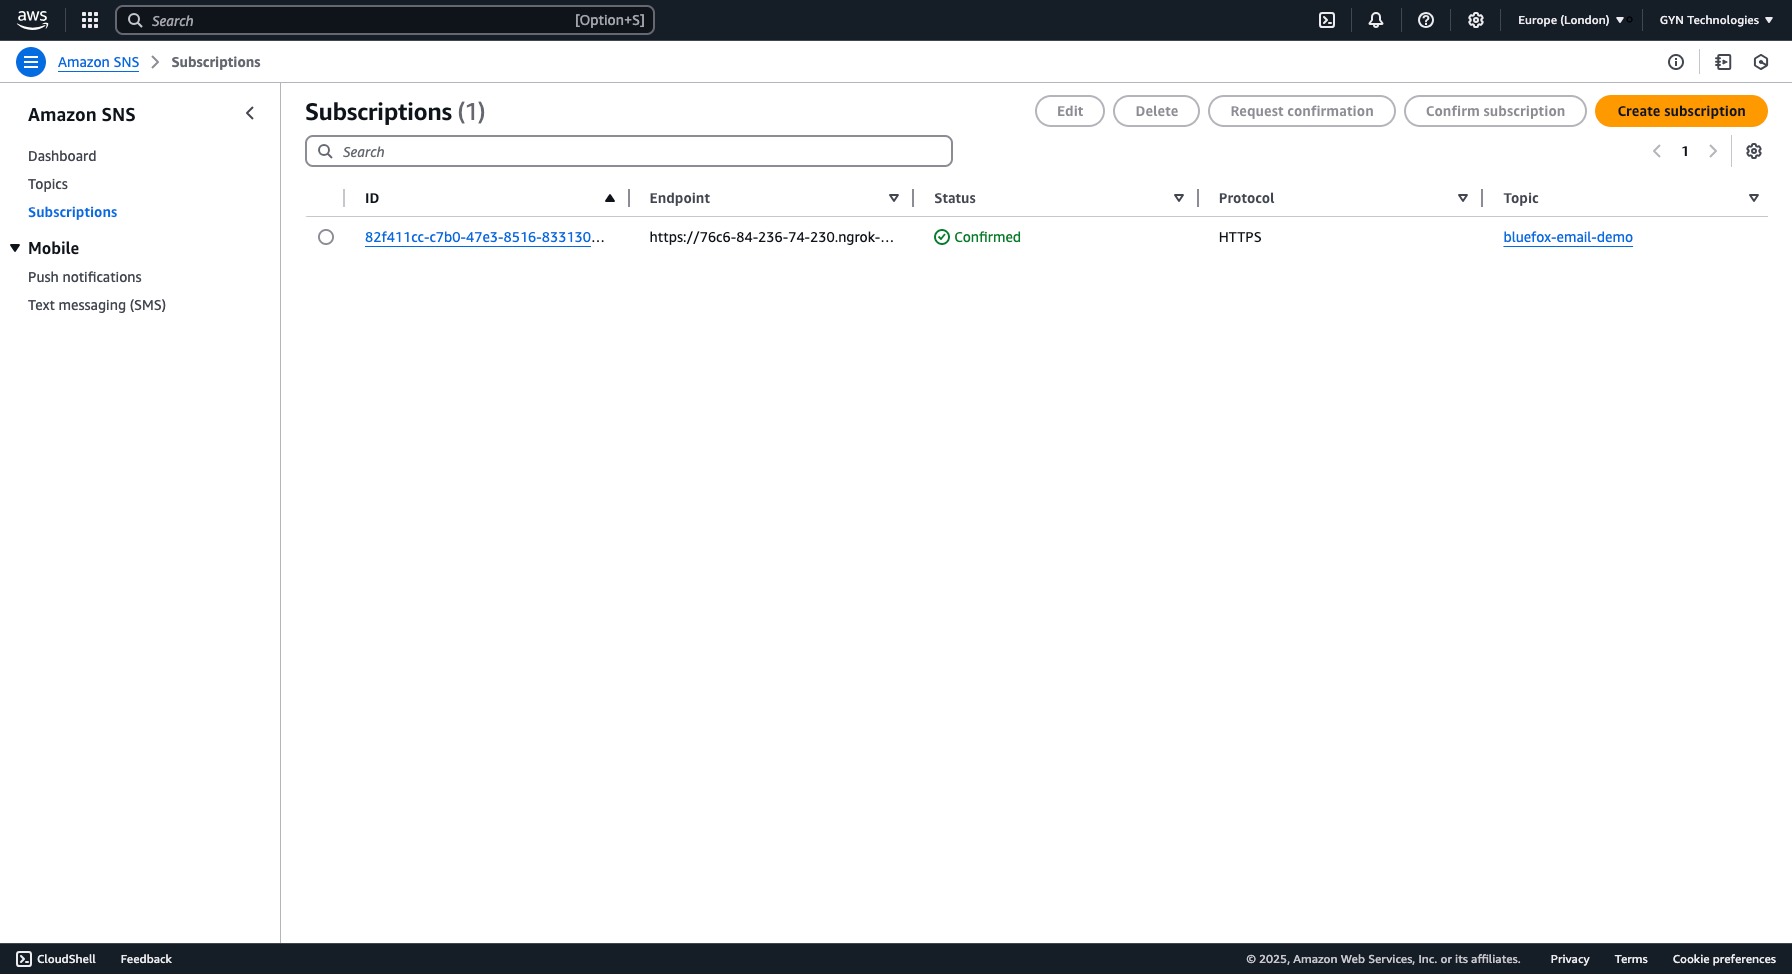
Once you confirm your subscription, its status should change to Confirmed.
Set Up Bounce and Complaint Notifications at Your Amazon SES Identity
Now that your SNS topic and subscription are ready, it's time to configure your Amazon SES sending identity to send bounce and complaint notifications to your SNS topic. This ensures that SES events trigger your SNS subscription, which will then send them to your webhook.
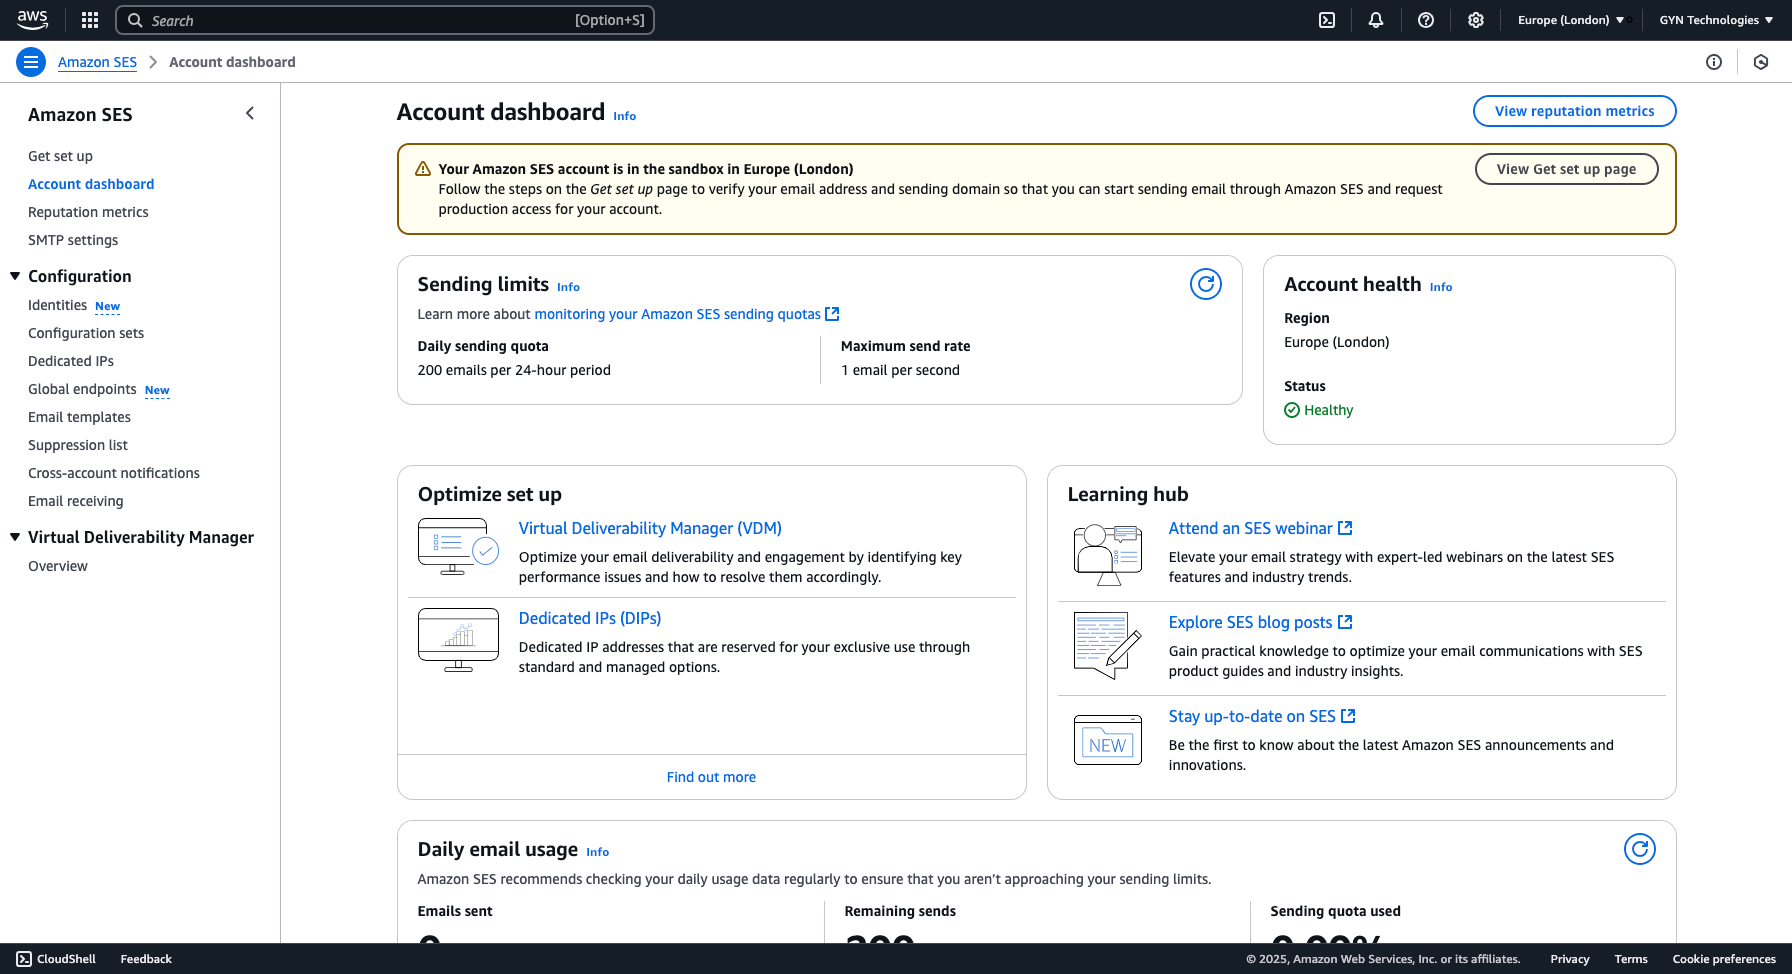
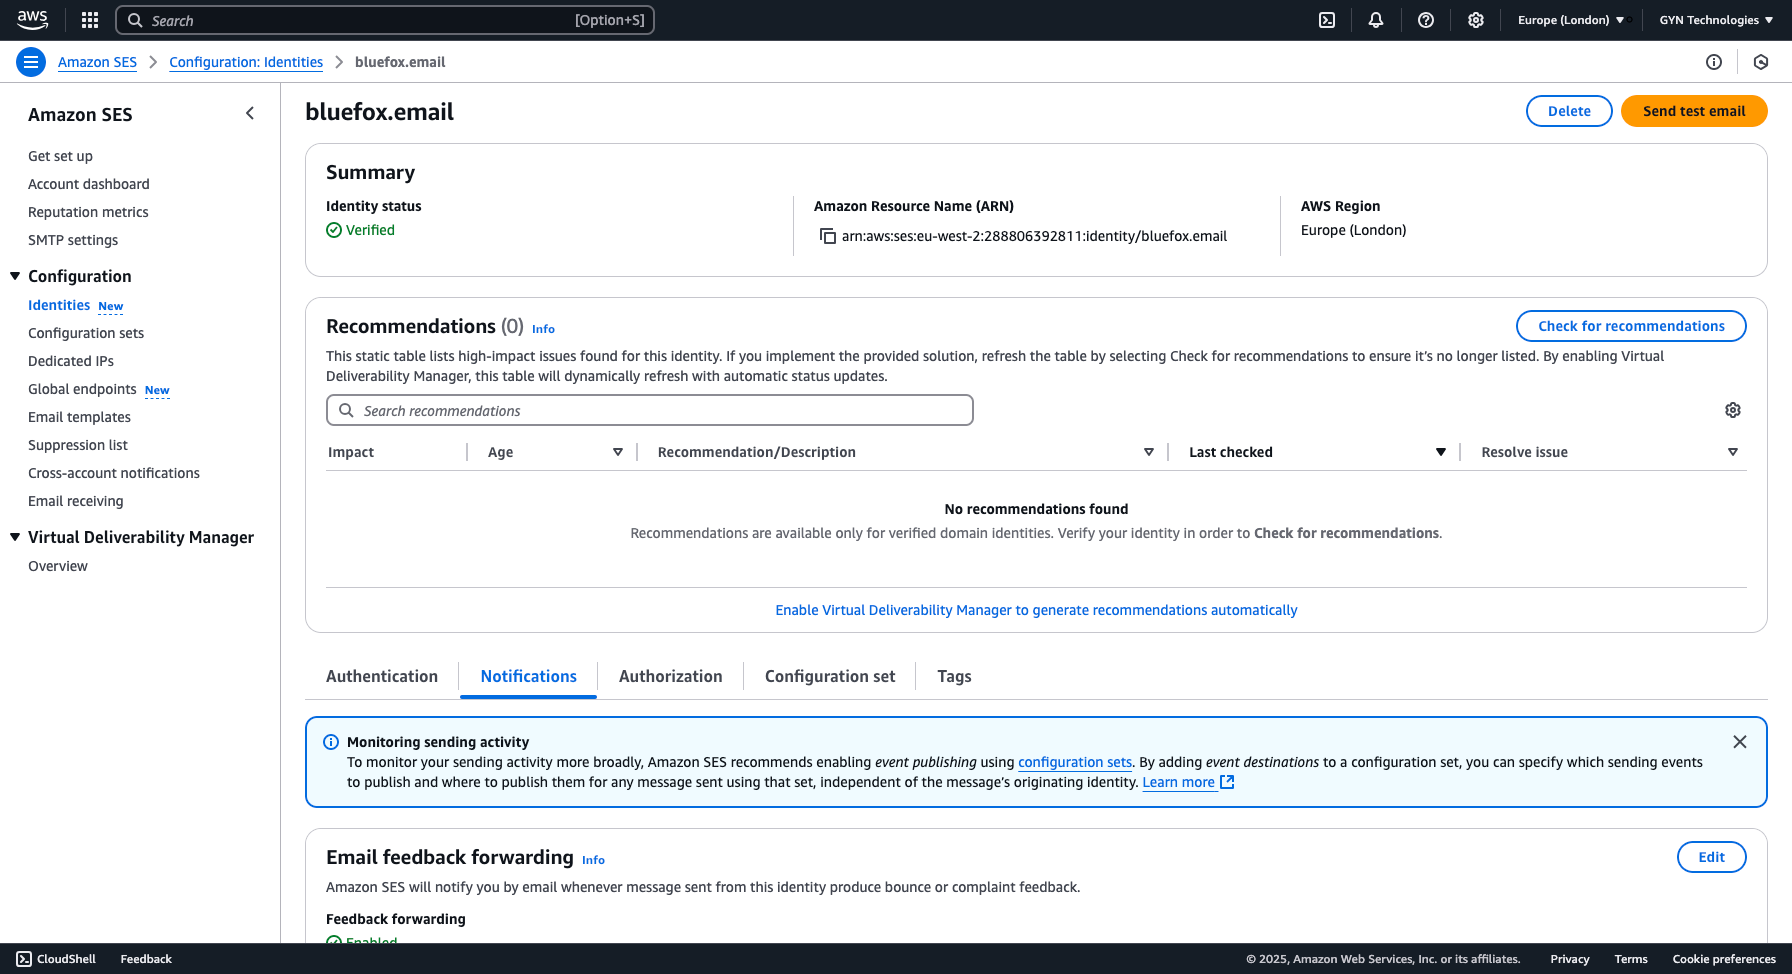
First, navigate to your SES dashboard.
Select Your Sending Identity
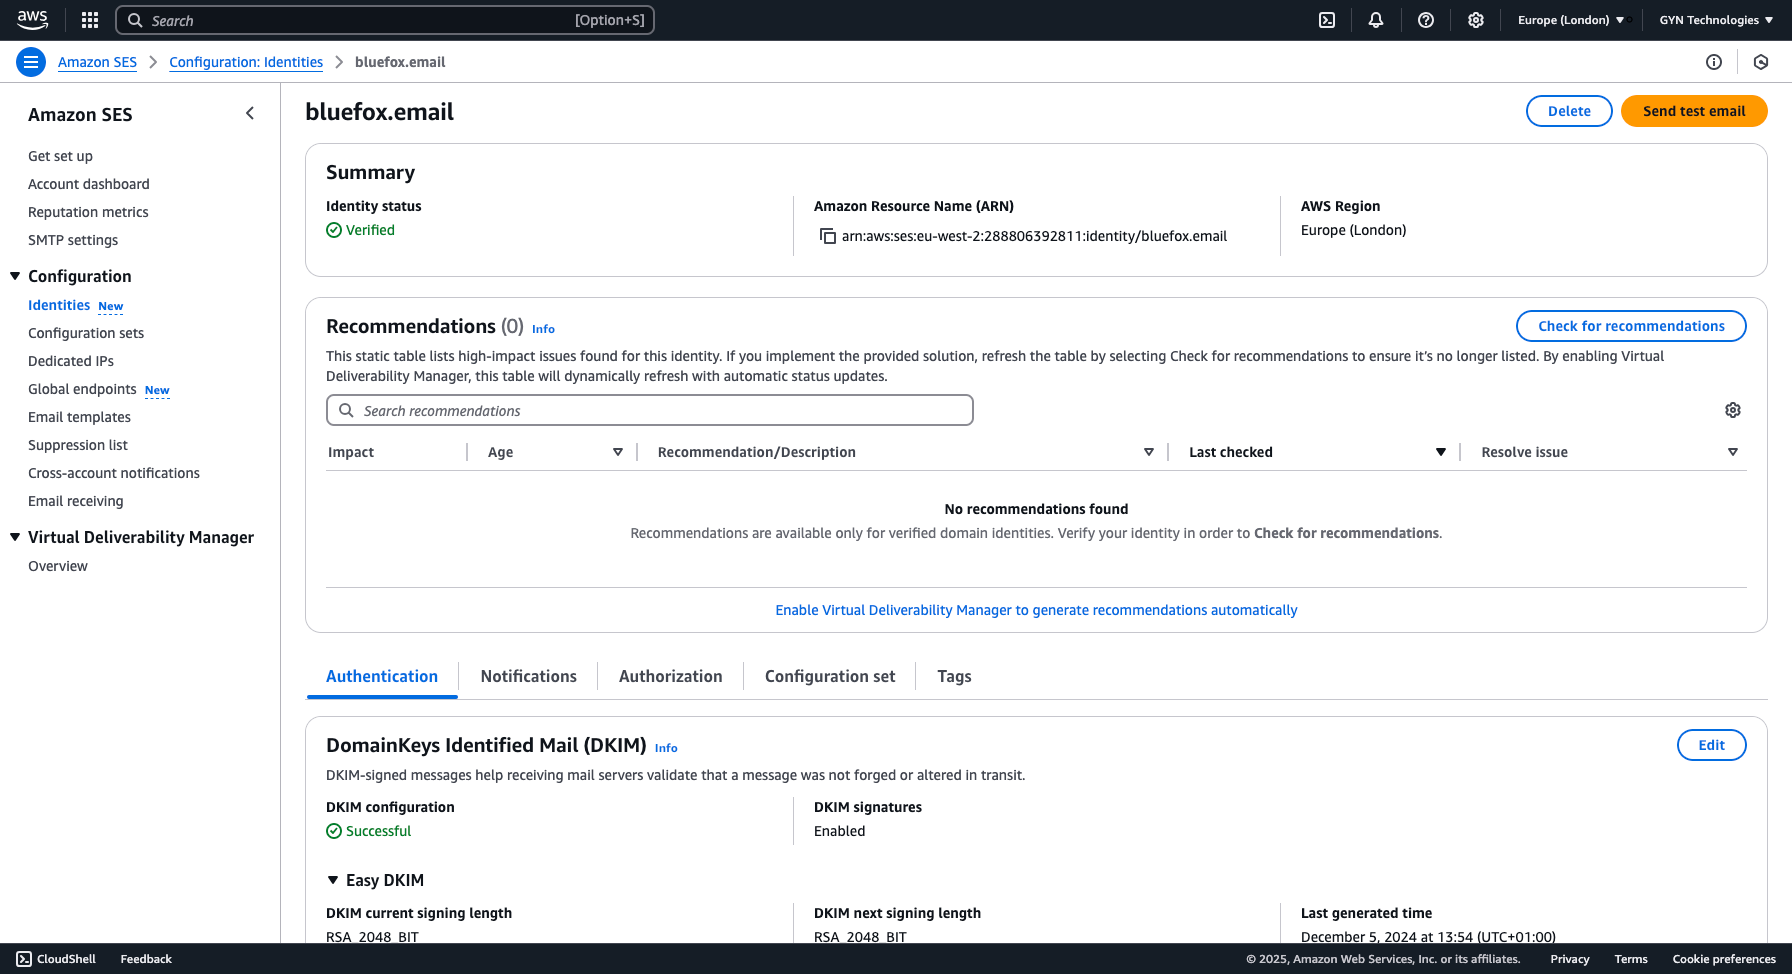
From the Configuration section in the left-hand menu, click Identities.
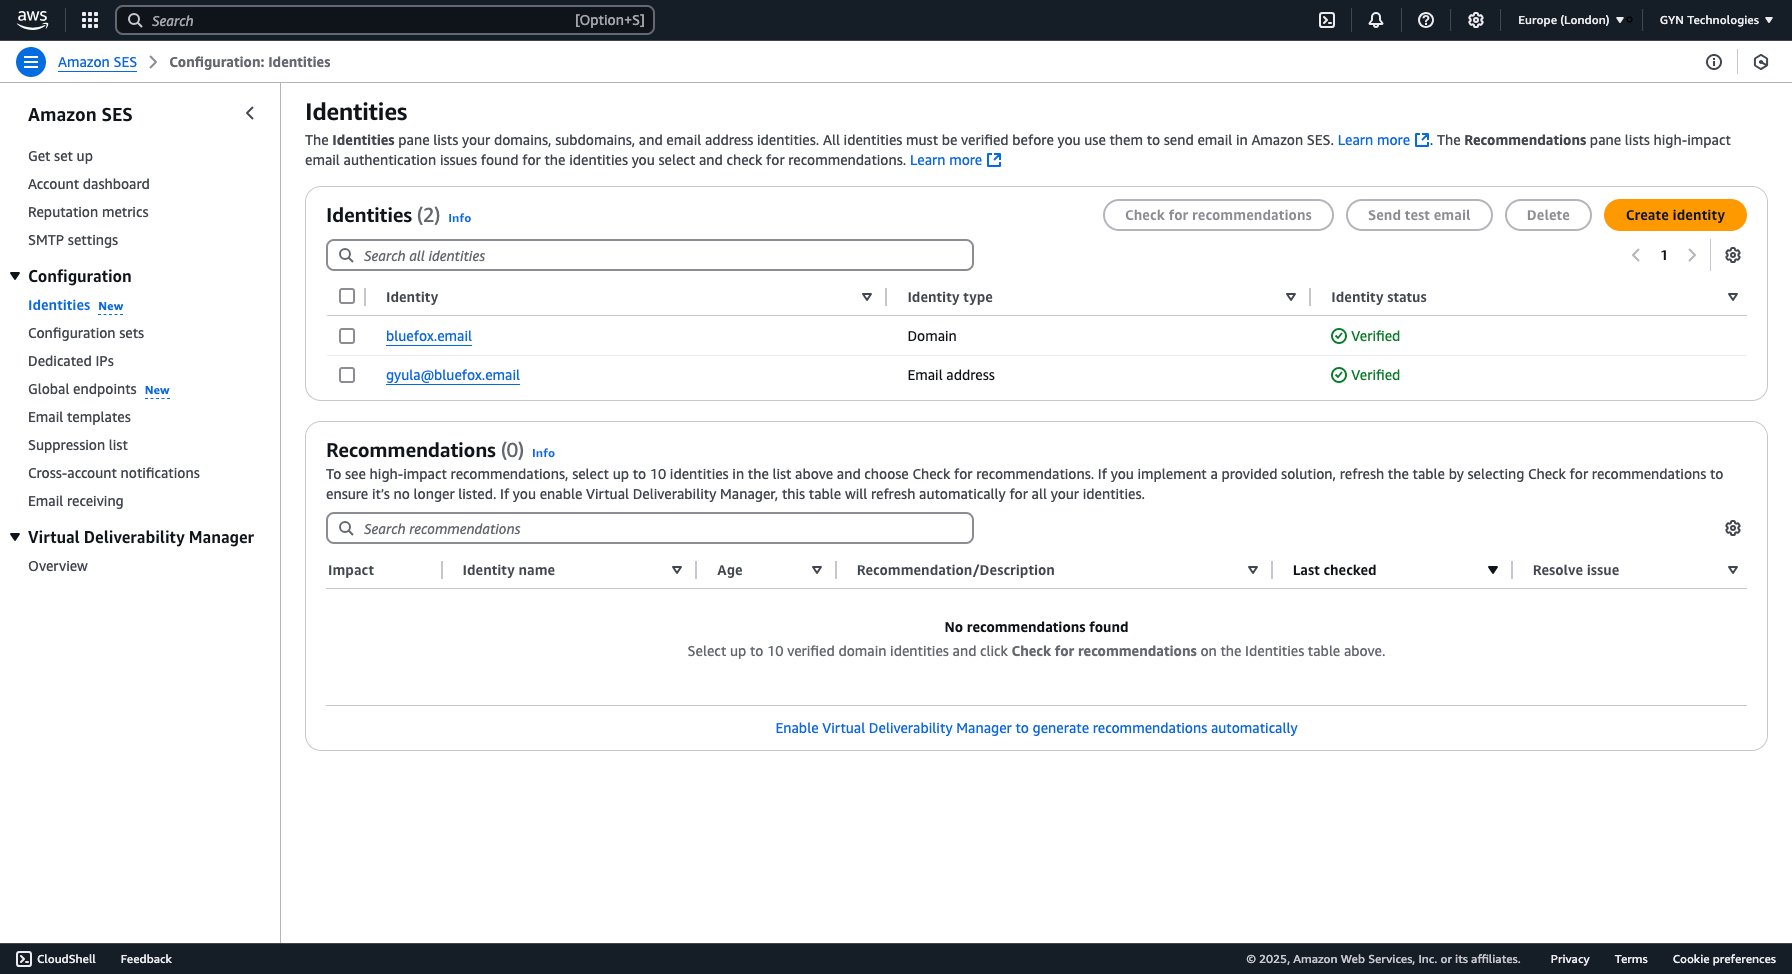
Now, select the sending identity (domain or email) that you want to configure.
If you haven't set up a sending domain yet, follow our How to Set Up AWS SES guide.
Configure Notifications
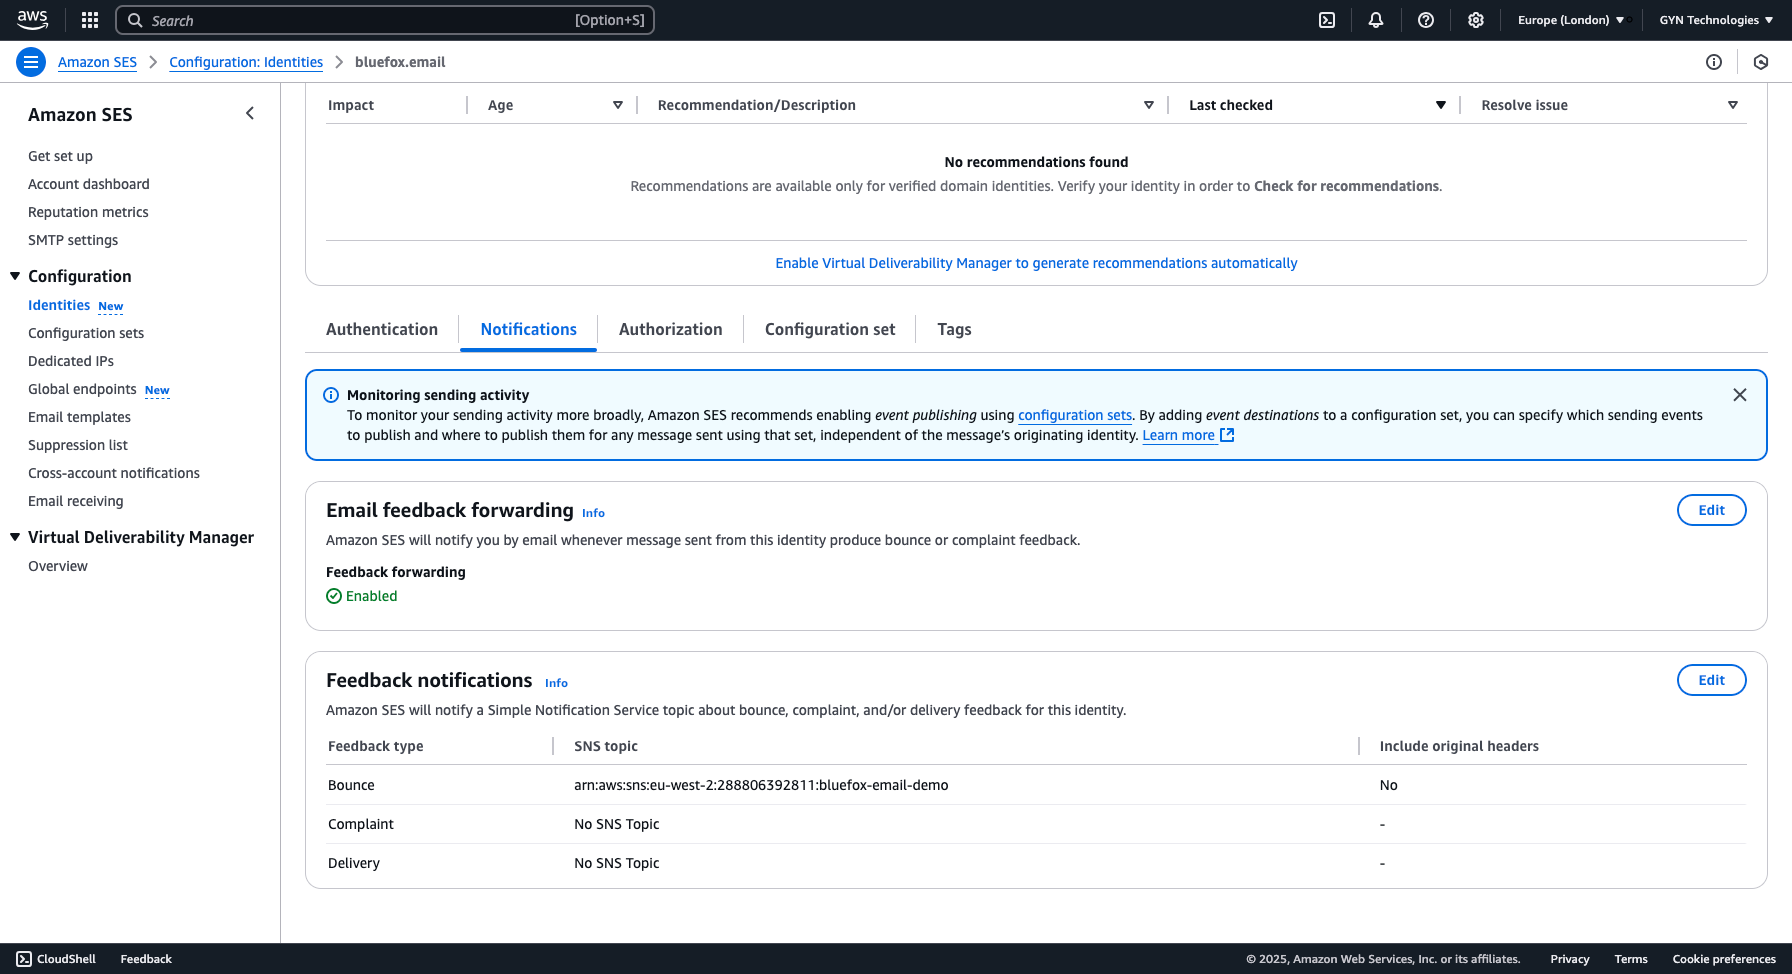
Inside your sending identity settings, go to the Notifications tab.

Find the "Feedback notifications" section and click the Edit button.
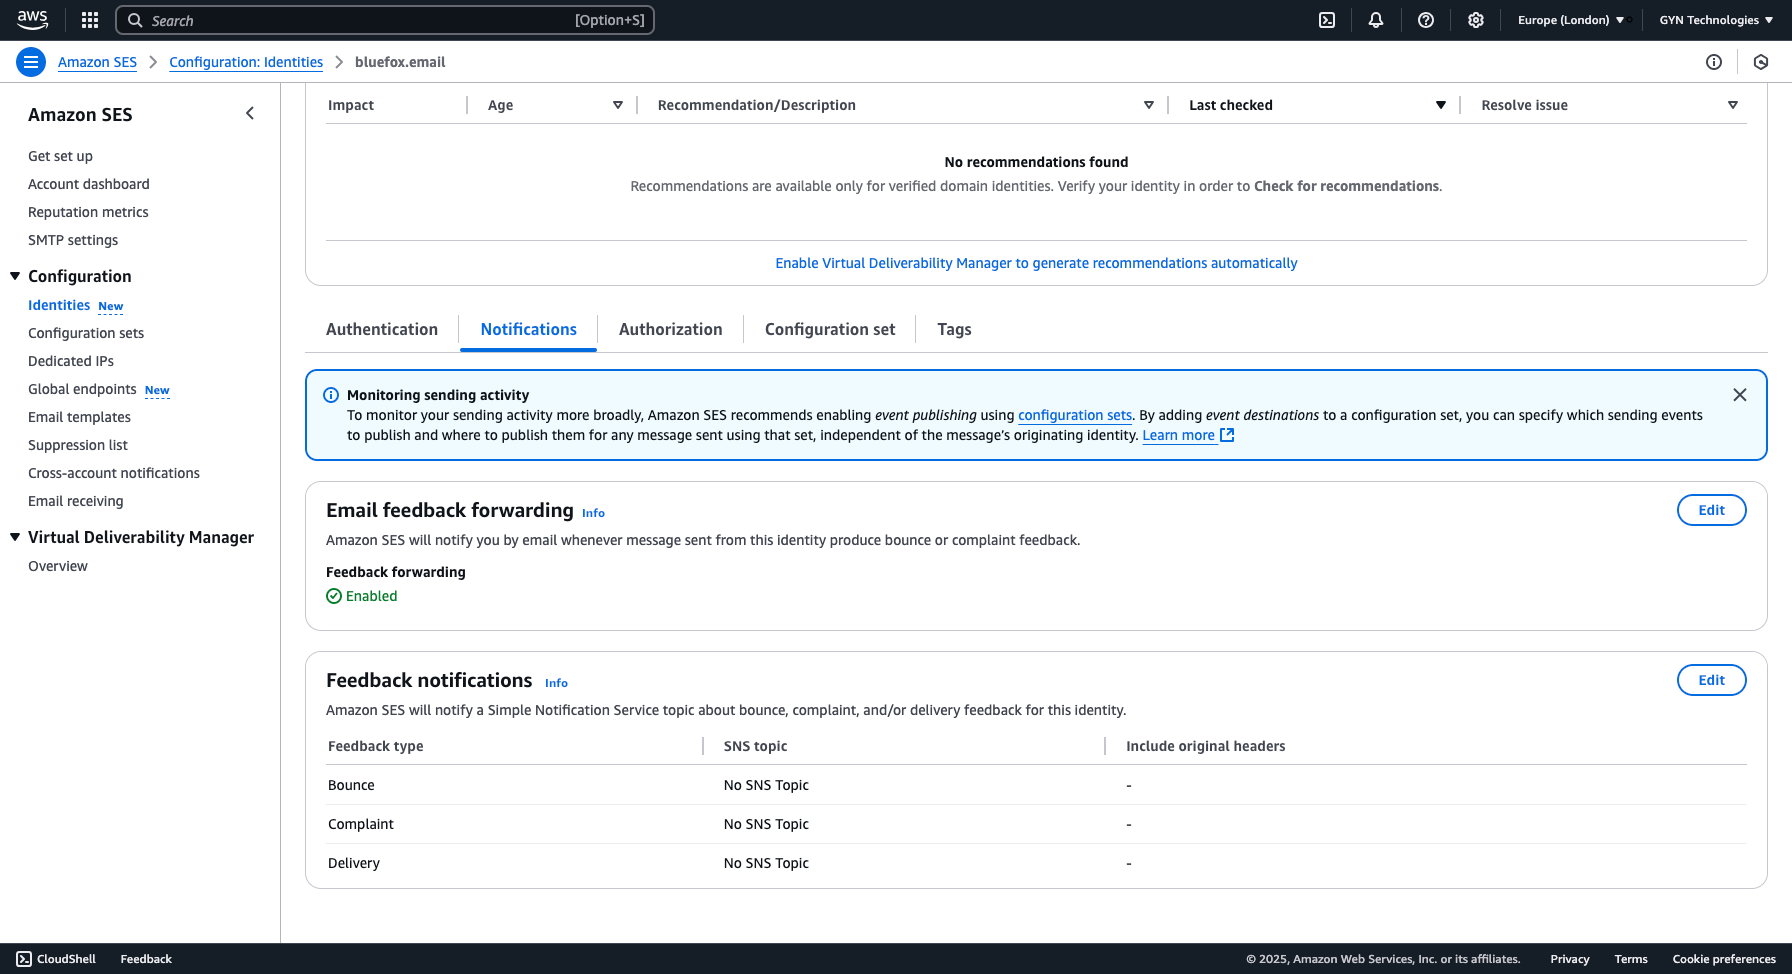
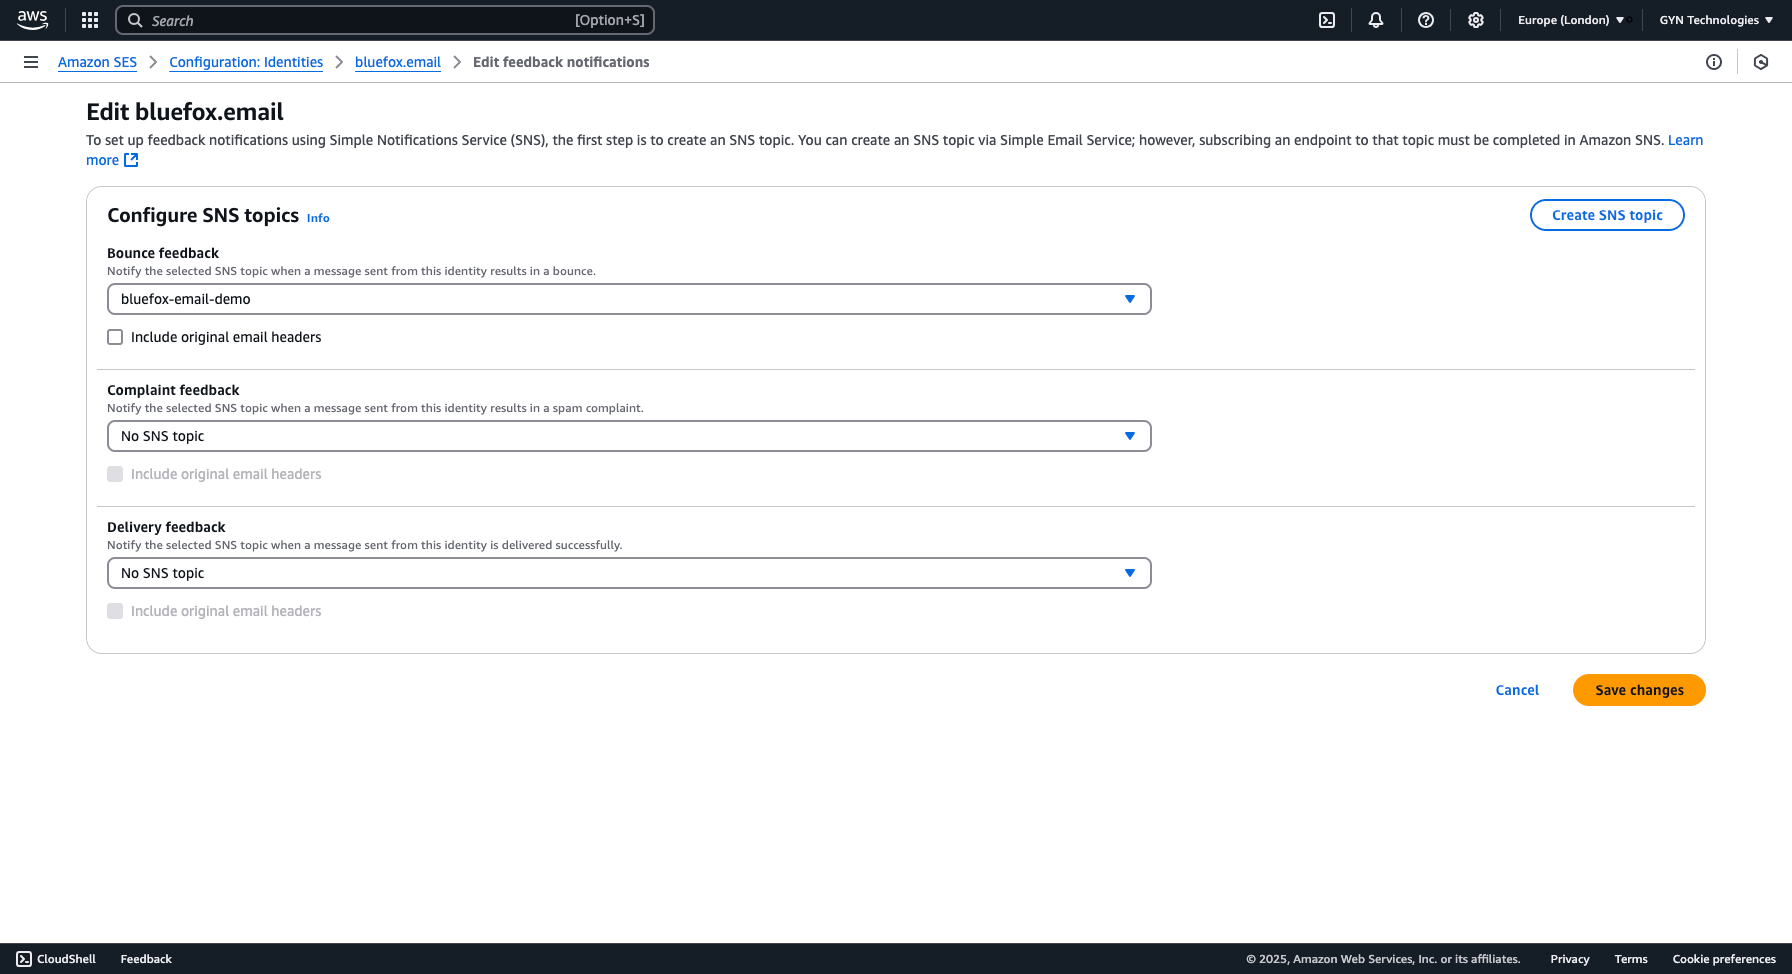
Assign SNS Topics
Now, you can assign SNS topics for bounces and complaints. (You can also configure one for delivery feedback, but it's optional.)
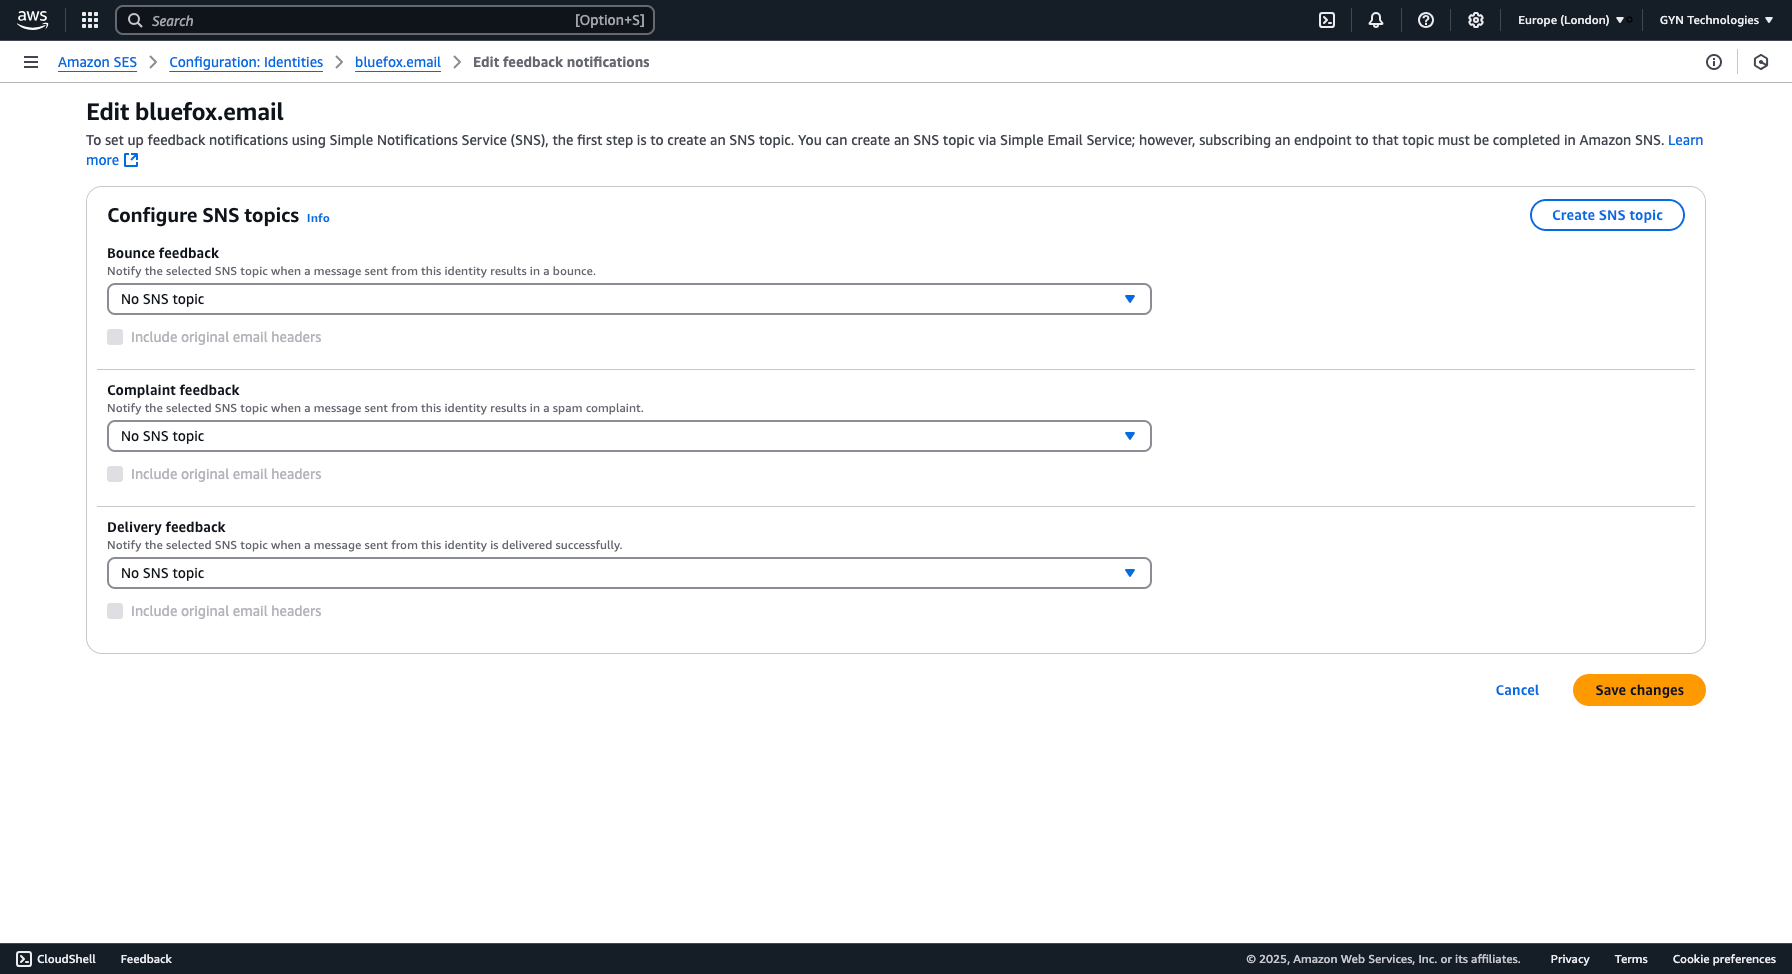
Select the SNS topics you previously created.
Disable Email Feedback Forwarding (Optional)
Once your webhook is fully implemented, you may want to disable email feedback forwarding since notifications will already be sent to your webhook through SNS.
At this point, your SES identity is properly configured to send bounce and complaint notifications to your SNS topics, ensuring your webhook receives the necessary events in real time.
Test the Notification Process
If you've followed all the steps so far, your notification system should be in place. Now, let's test it!
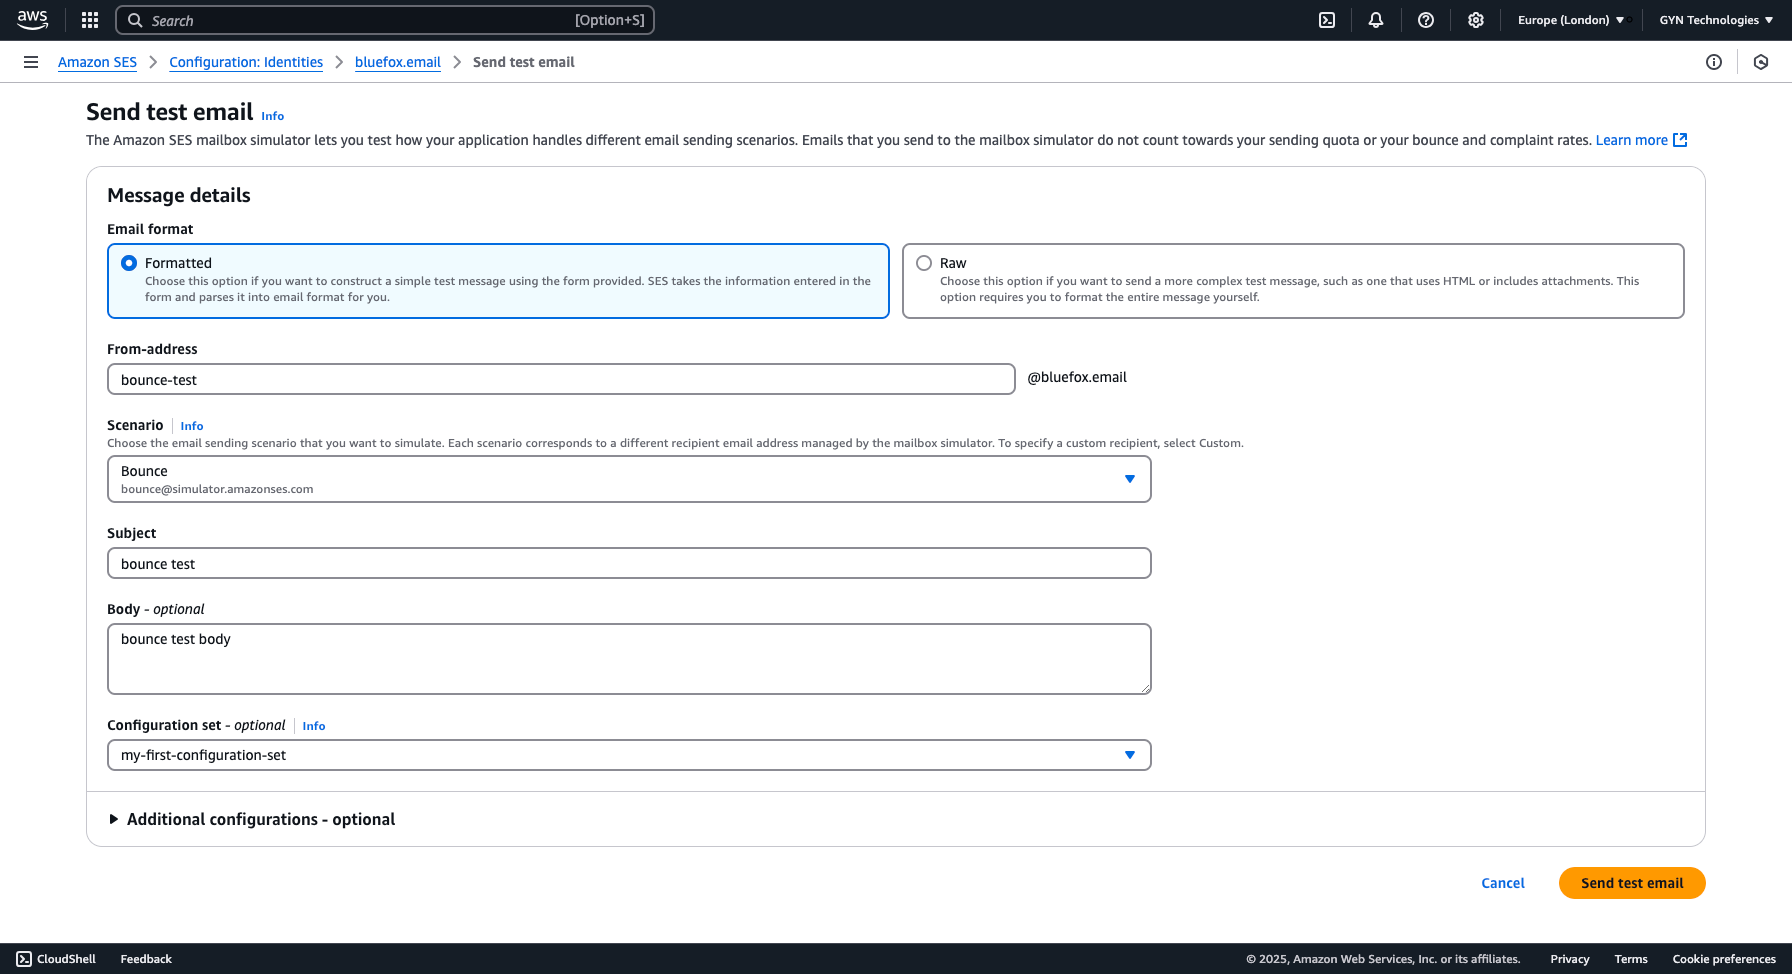
Scroll up and click the "Send test email" button.
In the How to Set Up AWS SES tutorial, we sent a custom email. Now, we'll test different scenarios. You can format the email and fill in any subject and body.
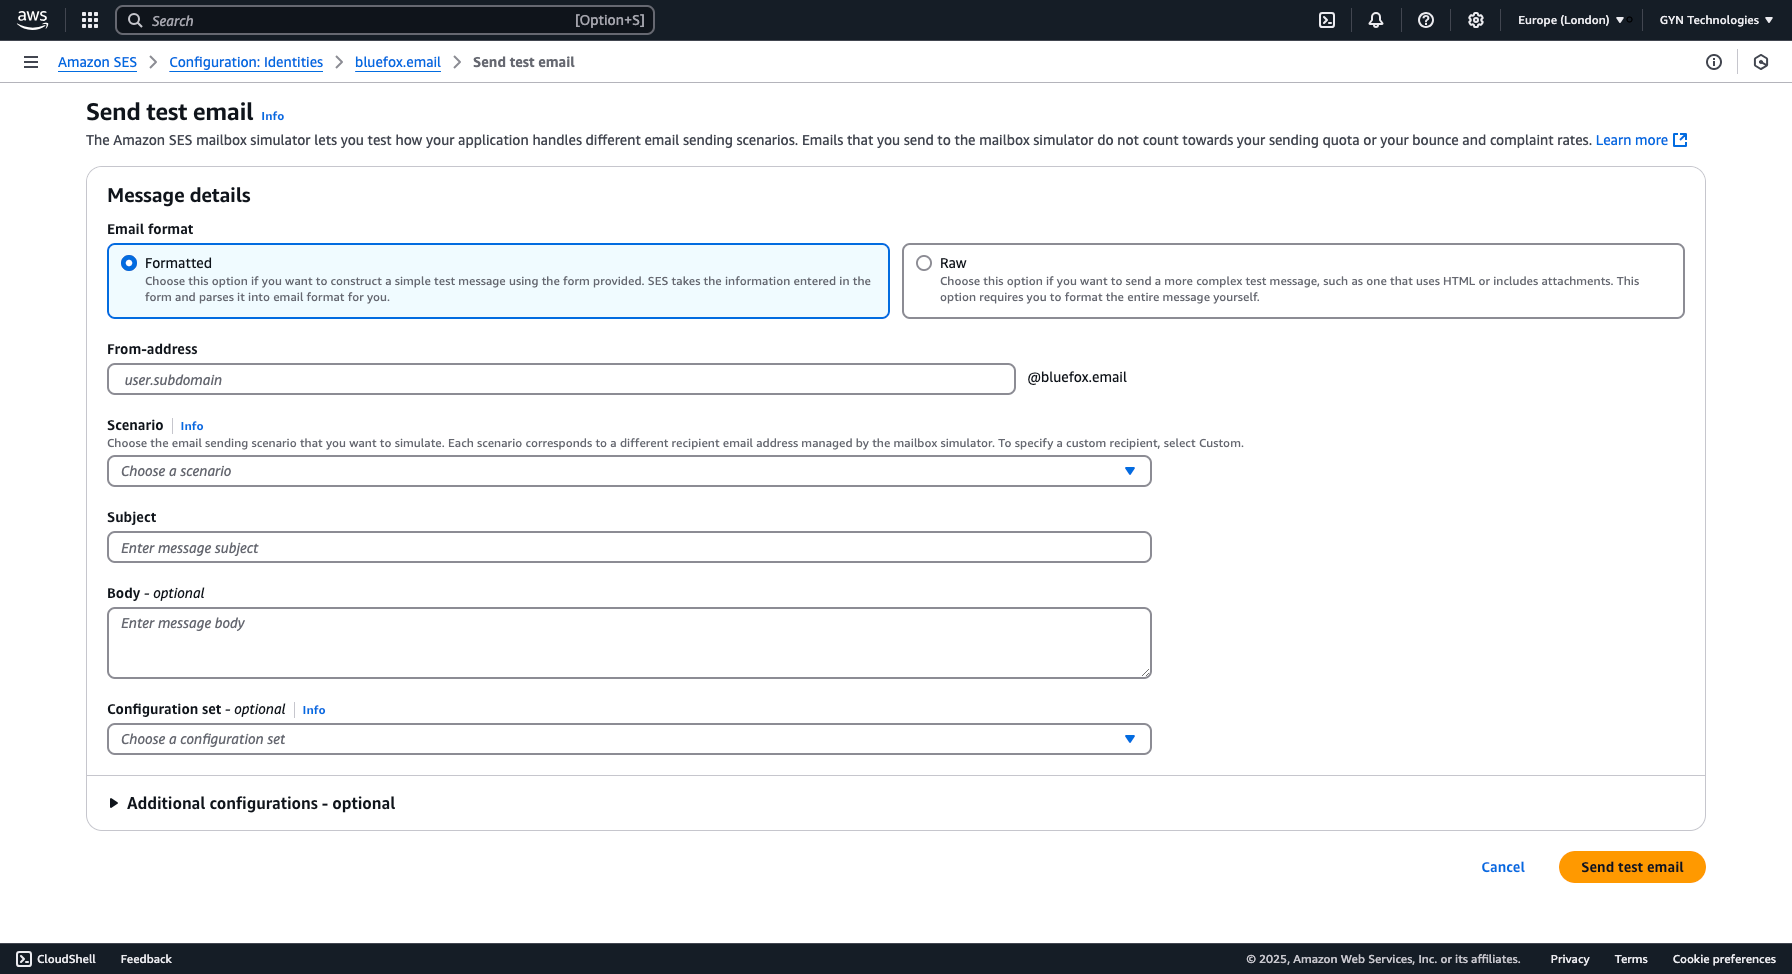
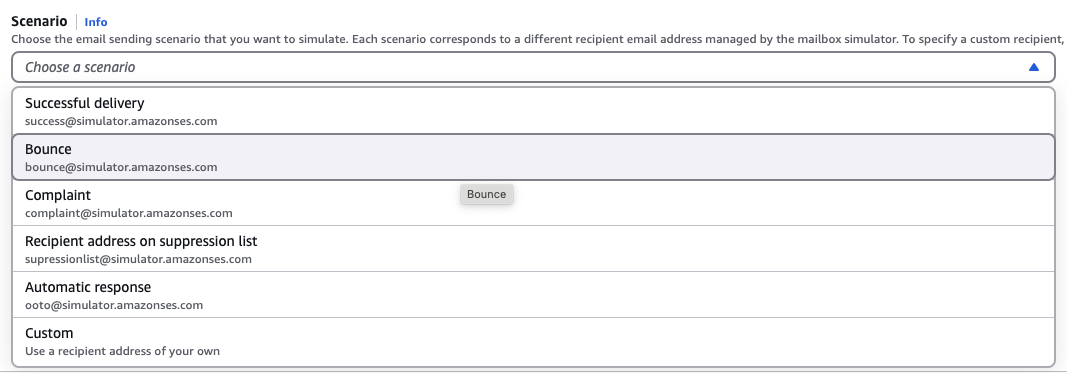
In the Scenario dropdown, select "Bounce" or "Complaint", depending on what you want to test. In this case, we're testing Bounce.
Now, click the "Send test email" button in the bottom-right corner.
Once the test email is sent, your webhook should receive an HTTP request. In the request body, the "Type" field will be set to Notification. More details can be found in the "Message" property. Since the "Message" is a JSON string, you will need to parse it. In this example, the "notificationType" is Bounce.
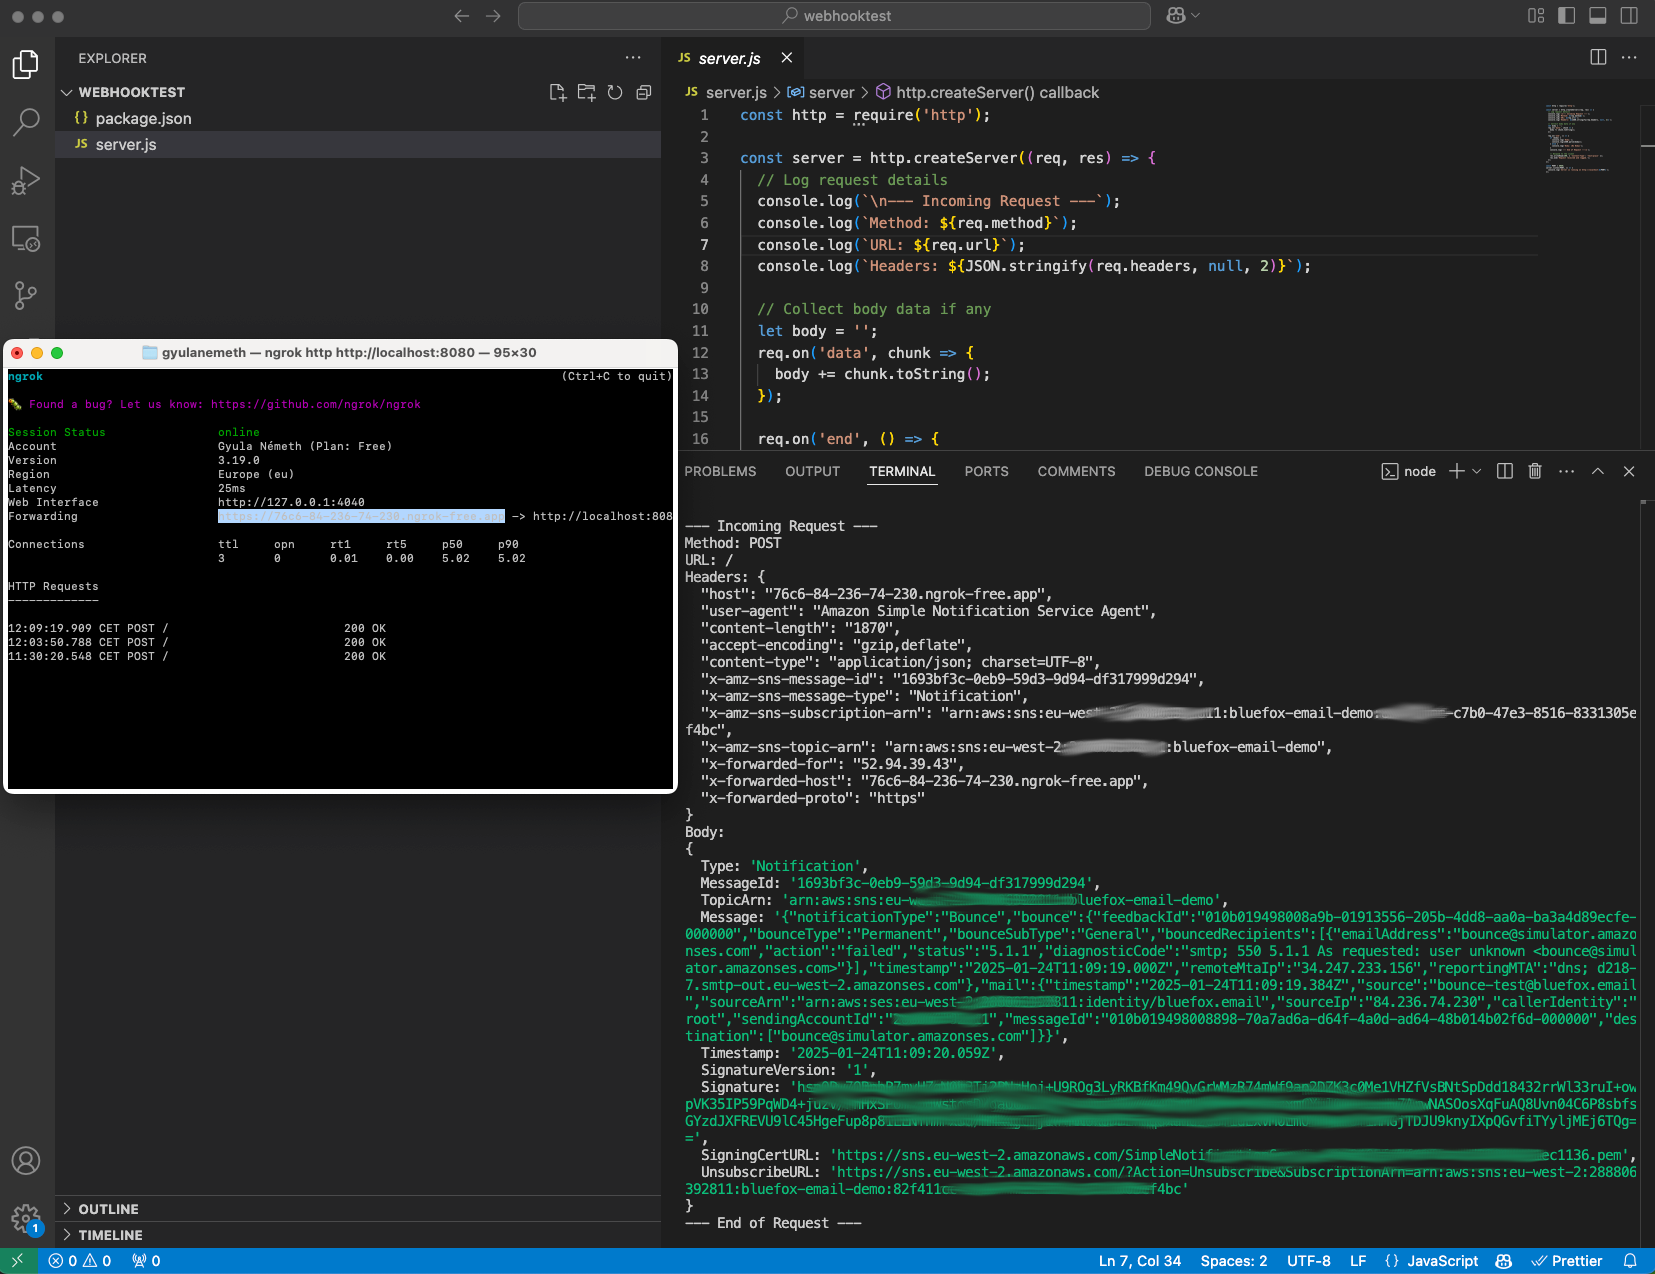
As you can see, the notification system is working! You can now test different scenarios in your local development environment.
Another way to test it is by sending an email with your SES directly to AWS's bounce simulator at: bounce@simulator.amazonses.com If everything is set up correctly, your webhook should be invoked when the email bounces.
Implement Your Webhooks
Once your SNS subscription is set up and receiving notifications, the next step is to implement webhook logic to process bounces and complaints properly.
Remove Bounced and Complained Addresses
When your webhook receives a bounce or complaint notification, you should:
- Remove the affected email address from your subscriber list.
- Prevent future emails from being sent to those addresses.
Use an Internal Suppression List
Instead of just removing bounced and complained addresses from your active list, it's even better to maintain an internal suppression list.
Why an Internal Suppression List?
- Prevents accidentally re-adding bounced or complained email addresses due to bot activity or data sync issues.
- Ensures compliance with AWS SES sending policies, improving your sender reputation.
- Helps protect your email deliverability, reducing the risk of being marked as spam.
When processing bounce and complaint notifications, your webhook should check the suppression list before allowing an email to be sent.
We handle bounces and complaints automatically
With bluefox.email, you don’t have to worry about handling bounces and complaints manually.
✅ We automatically remove bounced emails from your lists.
✅ We remove subscribers who complained.
✅ We add them to an internal suppression list to prevent accidental resends.
This means you'll never send emails to users who marked your messages as spam—even if they sneak back into your list due to bot activity.
Multiple Sending Identities
If you're sending emails from multiple identities (e.g., different domains or email addresses), it's critical to handle bounces and complaints for all of them.
Why It’s Important
Each SES identity (domain or email) operates independently.
- Bounce and complaint notifications are not shared across identities.
- If you don’t configure SNS notifications for all identities, you could still be sending emails to invalid or spam-reported addresses from some of them.
Handling Multiple Identities in bluefox.email
At bluefox.email, we take care of this for you:
- We automatically detect and track bounces and complaints across all your sending identities.
- We ensure that all identities have properly configured SNS webhooks.
- If any identity is missing a bounce or complaint configuration, we notify you.
Here’s what this looks like in bluefox.email:
