
Appearance
Subscriber List Management via the API
Legacy endpoint. New integrations should use the Subscriber Lists and Subscriptions resources instead.
This guide explains how to manage subscribers using the bluefox.email API. You can subscribe, unsubscribe, pause, activate, and list subscribers from your email lists. Follow the examples and code snippets to integrate these functionalities into your system.
Which route to use
- Contact data (name, email, tags, custom properties): use the contact routes.
- Subscriptions (subscribe, unsubscribe, pause, activate): use the subscriber list routes.
The subscription routes accept contact fields too, but keeping the two apart avoids surprises. For example, subscribing a contact who already exists also overwrites their name and tags.
Subscribe
To subscribe a user to a subscriber list, use the following URL pattern:
https://api.bluefox.email/v1/subscriber-lists/##YOUR_SUBSCRIBER_LIST_ID##Replace the placeholders with your specific information:
##YOUR_SUBSCRIBER_LIST_ID####YOUR_API_KEY##
You can find the IDs to replace by clicking on the code guide button in Manage List dropdown in a subscriber list:
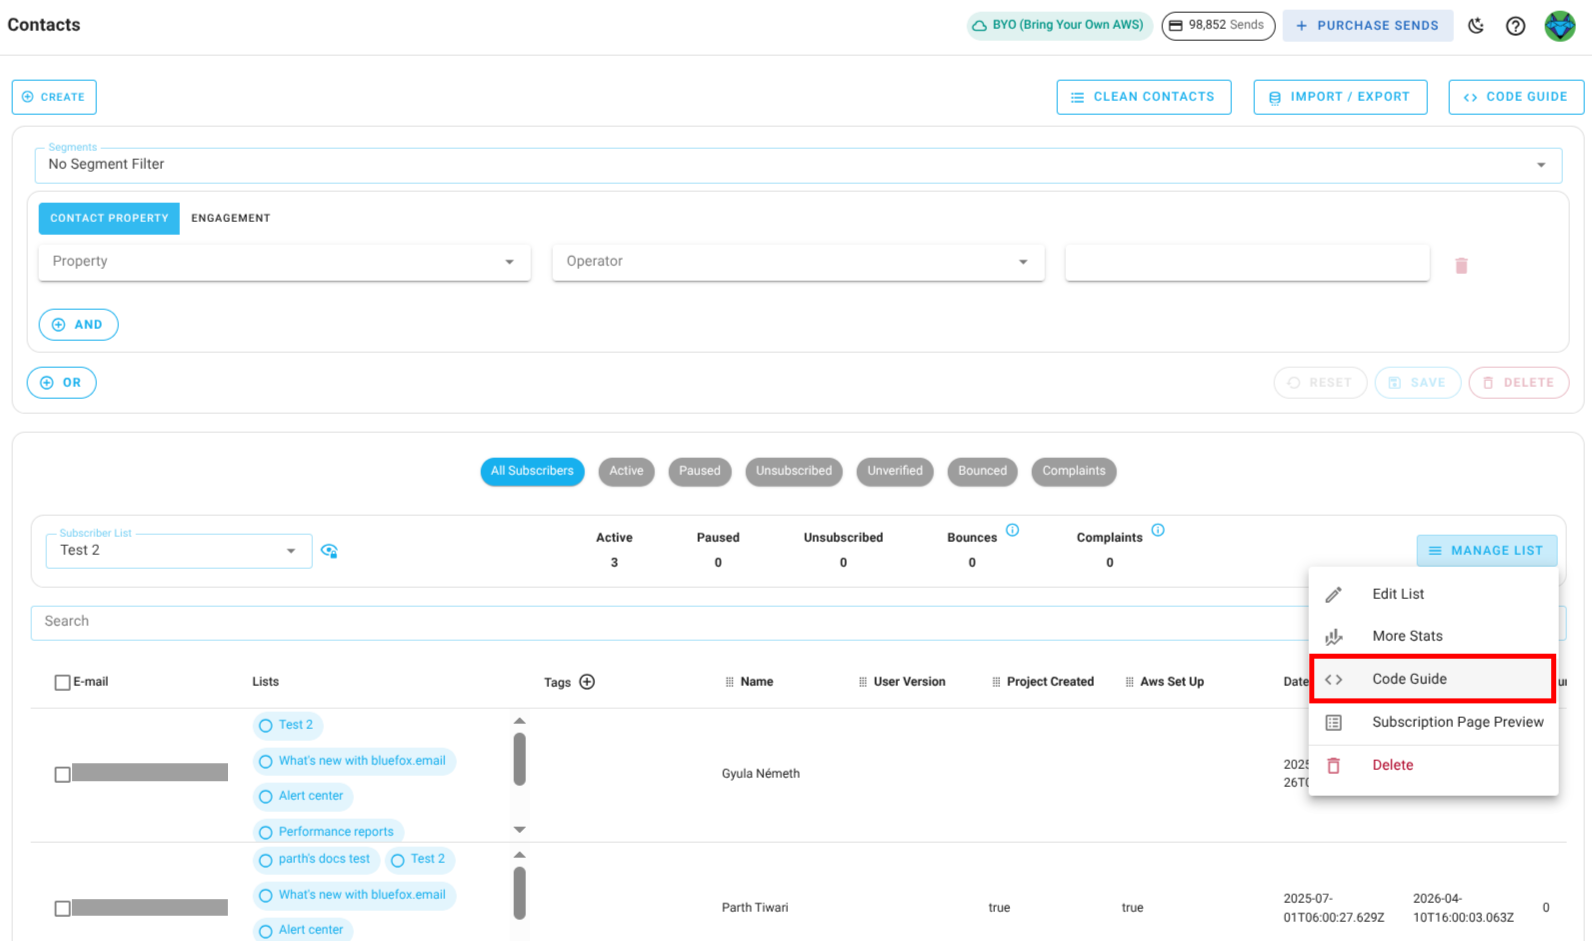
In the code guide dialog, these values are automatically filled in. If you copy the code snippets, you only need to replace the ##YOUR_API_KEY##.
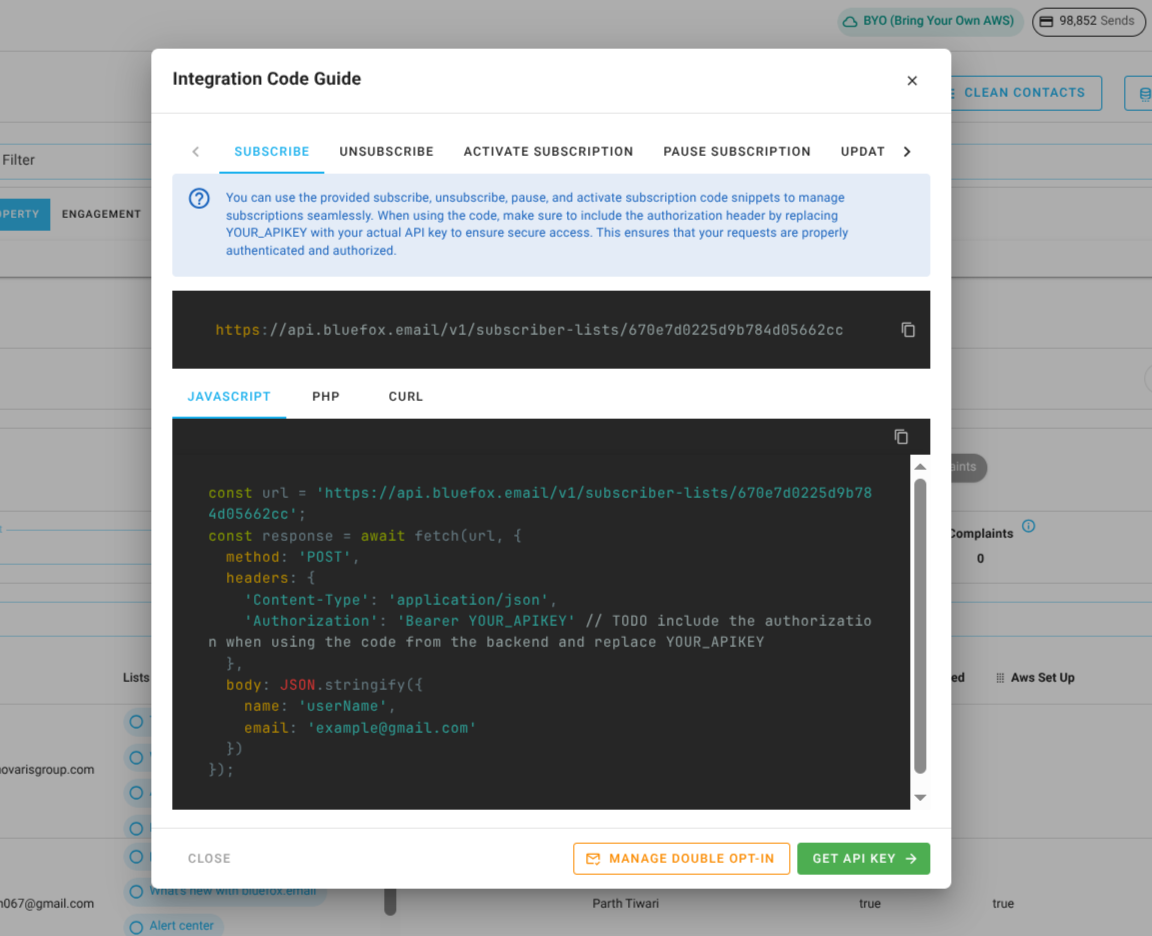
Request Body:
json
{
  "name": "Jon Doe",
  "email": "jon@doe.com"
}
INFO
You can pass values for contact custom properties inside the data field in the request body. Just make sure the keys match with the custom property API names defined in your project settings.
NOTE
If the list has double opt-in on, the contact gets a verification email and becomes active only after clicking its link.
cUrl:
bash
curl -X POST "https://api.bluefox.email/v1/subscriber-lists/##YOUR_SUBSCRIBER_LIST_ID##" -H "Content-Type: application/json" -H "Authorization: Bearer ##YOUR_API_KEY##" -d '{"name": "Jon Doe", "email": "jon@doe.com"}'Javascript:
javascript
const url = 'https://api.bluefox.email/v1/subscriber-lists/##YOUR_SUBSCRIBER_LIST_ID##'

const response = await fetch(url, {
  method: 'POST',
  headers: {
    'Content-Type': 'application/json',
    'Authorization': 'Bearer ##YOUR_APIKEY##'
  },
  body: JSON.stringify({
    name: 'Jon Doe',
    email: 'jon@doe.com'
  })
})PHP:
php
  $apiKey = "##YOUR_API_KEY##"; // TODO: replace YOUR_APIKEY

  $url = "https://api.bluefox.email/v1/subscriber-lists/##YOUR_SUBSCRIBER_LIST_ID##";

  $data = array(
      'name' => 'userName',
      'email' => 'example@gmail.com'
  );

  $options = array(
      'http' => array(
          'header'  => "Content-Type: application/json\r\n" .
                      "Authorization: Bearer $apiKey\r\n",
          'method'  => 'POST',
          'content' => json_encode($data),
      ),
  );

  $context  = stream_context_create($options);
  $response = file_get_contents($url, false, $context);
Security Warning
Since an API key is very sensitive information, never store it in your frontend code. Always use it from your backend.
Update Subscriber
To update a user from a subscriber list, use the following URL pattern:
https://api.bluefox.email/v1/subscriber-lists/##YOUR_SUBSCRIBER_LIST_ID##/##SUBSCRIBER_EMAIL_ADDRESS##Replace the placeholders with your specific information:
##YOUR_SUBSCRIBER_LIST_ID####SUBSCRIBER_EMAIL_ADDRESS####YOUR_API_KEY##
You can find the IDs to replace by clicking on the code guide button in a subscriber list:
In the code guide dialog, these values are automatically filled in. If you copy the code snippets, you need to replace the ##YOUR_API_KEY## and ##SUBSCRIBER_EMAIL_ADDRESS##.
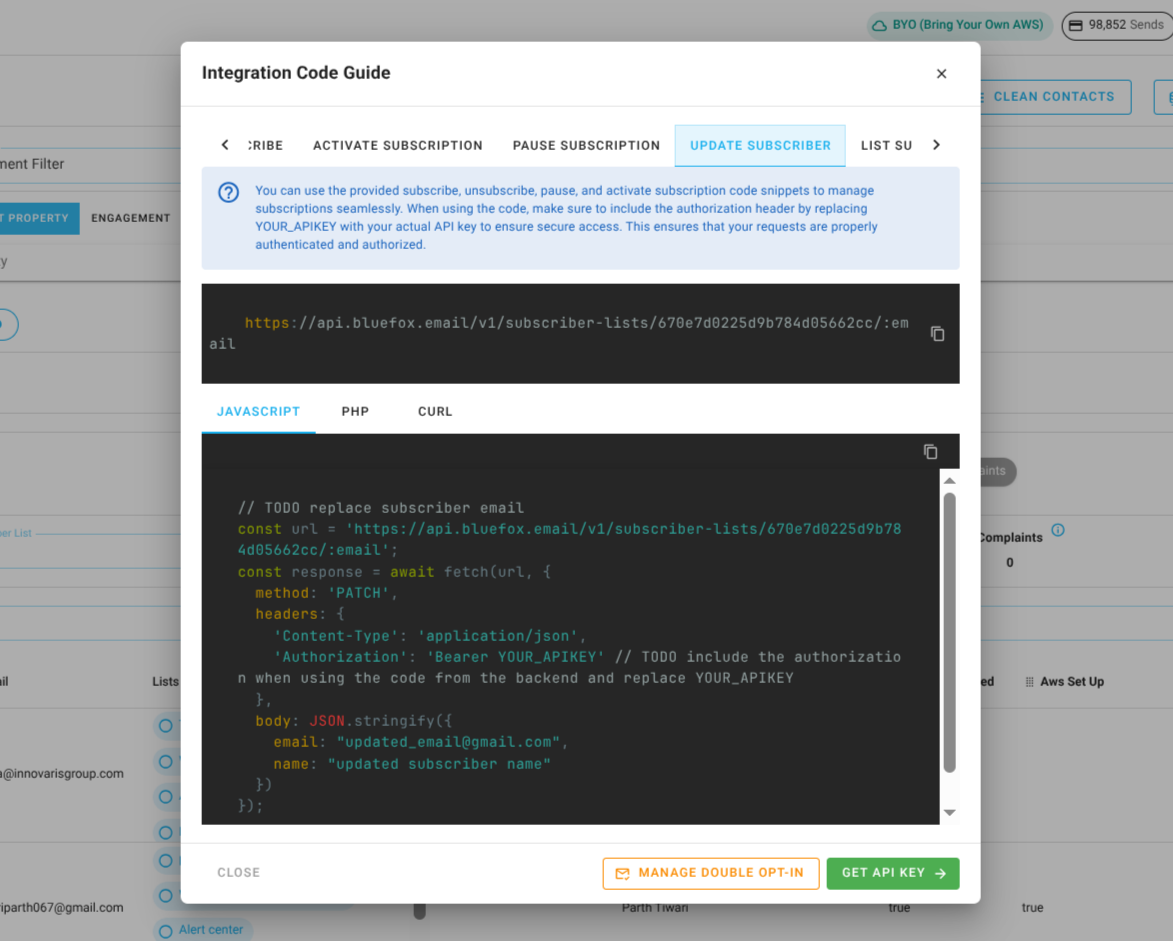
Requiest body:
json
{
  "email": "updated_email@gmail.com",
  "name": "updated subscriber name"
}
INFO
You can pass values for contact custom properties inside the data field in the request body. Just make sure the keys match the custom property API names defined in your project settings.
cUrl:
bash
curl -X PATCH "https://api.bluefox.email/v1/subscriber-lists/##YOUR_SUBSCRIBER_LIST_ID##/##SUBSCRIBER_EMAIL_ADDRESS##" -H "Content-Type: application/json" -H "Authorization: Bearer ##YOUR_API_KEY##" -d '{"email": "updated_email@gmail.com", "name": "updated subscriber name"}'Javascript:
javascript
const url = 'https://api.bluefox.email/v1/subscriber-lists/##YOUR_SUBSCRIBER_LIST_ID##/##SUBSCRIBER_EMAIL_ADDRESS##'

const response = await fetch(url, {
  method: 'PATCH',
  headers: {
    'Content-Type': 'application/json',
    'Authorization': 'Bearer ##YOUR_API_KEY##'
  },
  body: JSON.stringify({
    email: "updated_email@gmail.com",
    name: "updated subscriber name"
  })
})PHP:
php
$apiKey = "##YOUR_API_KEY##";

$url = "https://api.bluefox.email/v1/subscriber-lists/##YOUR_SUBSCRIBER_LIST_ID##/##SUBSCRIBER_EMAIL_ADDRESS##";

$data = array(
    'email' => 'updated_email@gmail.com'
    'name' => 'updated subscriber name'
);

$options = array(
    "http" => array(
        "header"  => "Content-Type: application/json\r\n" .
                    "Authorization: Bearer $apiKey\r\n",
        "method"  => "PATCH",
        'content' => json_encode($data),
    ),
);

$context  = stream_context_create($options);
$response = file_get_contents($url, false, $context);
Security Warning
Since an API key is very sensitive information, never store it in your frontend code. Always use it from your backend.
Unsubscribe
To unsubscribe a user from a subscriber list, use the following URL pattern:
https://api.bluefox.email/v1/subscriber-lists/##YOUR_SUBSCRIBER_LIST_ID##/##SUBSCRIBER_EMAIL_ADDRESS##Replace the placeholders with your specific information:
##YOUR_SUBSCRIBER_LIST_ID####SUBSCRIBER_EMAIL_ADDRESS####YOUR_API_KEY##
You can find the IDs to replace by clicking on the code guide button in a subscriber list:
In the code guide dialog, these values are automatically filled in. If you copy the code snippets, you need to replace the ##YOUR_API_KEY## and ##SUBSCRIBER_EMAIL_ADDRESS##.
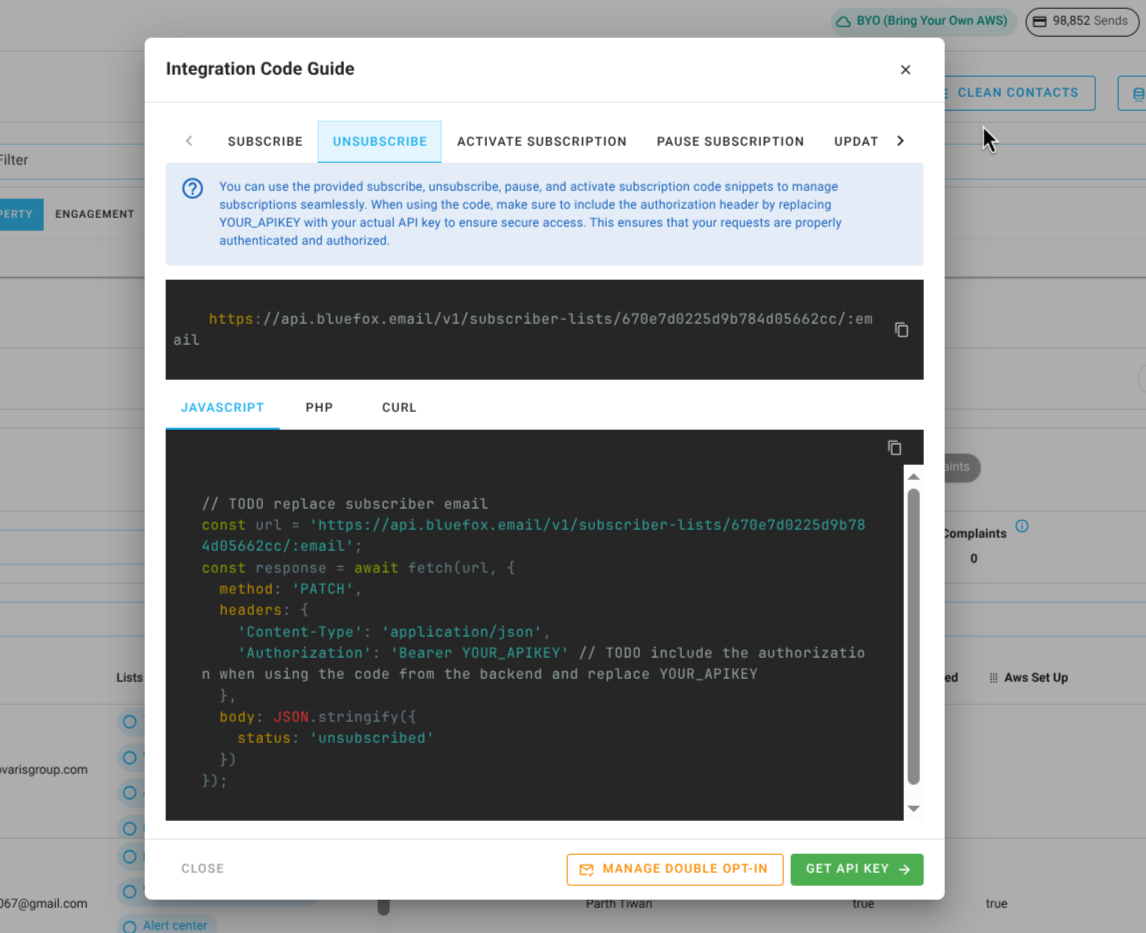
Requiest body:
json
{
  "status": "unsubscribed"
}cUrl:
bash
curl -X PATCH "https://api.bluefox.email/v1/subscriber-lists/##YOUR_SUBSCRIBER_LIST_ID##/##SUBSCRIBER_EMAIL_ADDRESS##" -H "Content-Type: application/json" -H "Authorization: Bearer ##YOUR_API_KEY##" -d '{"status": "unsubscribed"}'Javascript:
javascript
const url = 'https://api.bluefox.email/v1/subscriber-lists/##YOUR_SUBSCRIBER_LIST_ID##/##SUBSCRIBER_EMAIL_ADDRESS##'

const response = await fetch(url, {
  method: 'PATCH',
  headers: {
    'Content-Type': 'application/json',
    'Authorization': 'Bearer ##YOUR_API_KEY##'
  },
  body: JSON.stringify({
    status: 'unsubscribed'
  })
})PHP:
php
$apiKey = "##YOUR_API_KEY##";

$url = "https://api.bluefox.email/v1/subscriber-lists/##YOUR_SUBSCRIBER_LIST_ID##/##SUBSCRIBER_EMAIL_ADDRESS##";

$data = array(
    'status' => 'unsubscribed'
);

$options = array(
    "http" => array(
        "header"  => "Content-Type: application/json\r\n" .
                    "Authorization: Bearer $apiKey\r\n",
        "method"  => "PATCH",
        'content' => json_encode($data),
    ),
);

$context  = stream_context_create($options);
$response = file_get_contents($url, false, $context);
Security Warning
Since an API key is very sensitive information, never store it in your frontend code. Always use it from your backend.
Pause Subscription
At our subscription preferences page we provide you, we offer users to pause their subscriptions. It is a great way to reduce unsubscribe rates.
To pause a user from a subscriber list, use the following URL pattern:
https://api.bluefox.email/v1/subscriber-lists/##YOUR_SUBSCRIBER_LIST_ID##/##SUBSCRIBER_EMAIL_ADDRESS##Replace the placeholders with your specific information:
##YOUR_SUBSCRIBER_LIST_ID####SUBSCRIBER_EMAIL_ADDRESS####YOUR_API_KEY####PAUSED_UNTIL##
You can find the IDs to replace by clicking on the code guide button in a subscriber list:
In the code guide dialog, these values are automatically filled in. If you copy the code snippets, you need to replace the ##YOUR_API_KEY##, ##SUBSCRIBER_EMAIL_ADDRESS## and ##PAUSED_UNTIL##.
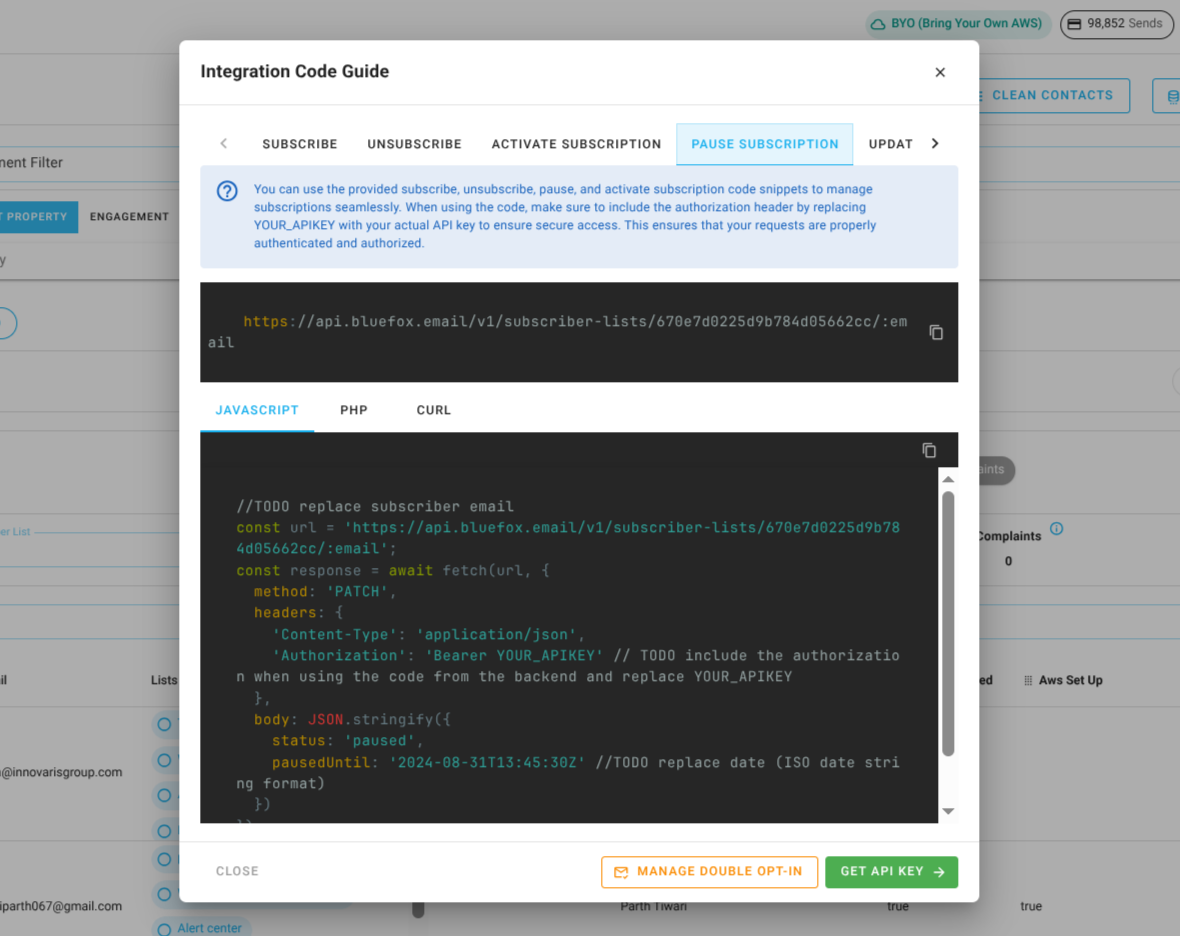
Requiest body:
json
{
  "status": "paused",
  "pausedUntil": "##PAUSED_UNTIL##" //TODO replace date (ISO date string format)
}cUrl:
bash
curl -X PATCH "https://api.bluefox.email/v1/subscriber-lists/##YOUR_SUBSCRIBER_LIST_ID##/##SUBSCRIBER_EMAIL_ADDRESS##" -H "Content-Type: application/json" -H "Authorization: Bearer ##YOUR_API_KEY##" -d '{"status": "paused", "pausedUntil": "##PAUSED_UNTIL##" }'Javascript:
javascript
const url = 'https://api.bluefox.email/v1/subscriber-lists/##YOUR_SUBSCRIBER_LIST_ID##/##SUBSCRIBER_EMAIL_ADDRESS##'

const response = await fetch(url, {
  method: 'PATCH',
  headers: {
    'Content-Type': 'application/json',
    'Authorization': 'Bearer ##YOUR_API_KEY##'
  },
  body: JSON.stringify({
    status: 'paused',
    pausedUntil: '##PAUSED_UNTIL##'
  })
})PHP:
php
$apiKey = "##YOUR_API_KEY##";

$url = "https://api.bluefox.email/v1/subscriber-lists/##YOUR_SUBSCRIBER_LIST_ID##/##SUBSCRIBER_EMAIL_ADDRESS##";

$data = array(
    'status' => 'paused',
    'pausedUntil' => '##PAUSED_UNTIL##'
);

$options = array(
    "http" => array(
        "header"  => "Content-Type: application/json\r\n" .
                    "Authorization: Bearer $apiKey\r\n",
        "method"  => "PATCH",
        'content' => json_encode($data),
    ),
);

$context  = stream_context_create($options);
$response = file_get_contents($url, false, $context);
Security Warning
Since an API key is very sensitive information, never store it in your frontend code. Always use it from your backend.
Activate Subscription
Users with paused subscription or users who unsubscribed, can be activated.
NOTE
If the list has double opt-in on, unverified and unsubscribed contacts get a verification email instead of being activated. Paused contacts are activated right away.
To activate a user from a subscriber list, use the following URL pattern:
https://api.bluefox.email/v1/subscriber-lists/##YOUR_SUBSCRIBER_LIST_ID##/##SUBSCRIBER_EMAIL_ADDRESS##Replace the placeholders with your specific information:
##YOUR_SUBSCRIBER_LIST_ID####SUBSCRIBER_EMAIL_ADDRESS####YOUR_API_KEY##
You can find the IDs to replace by clicking on the code guide button in a subscriber list:
In the code guide dialog, these values are automatically filled in. If you copy the code snippets, you need to replace the ##YOUR_API_KEY## and ##SUBSCRIBER_EMAIL_ADDRESS##.
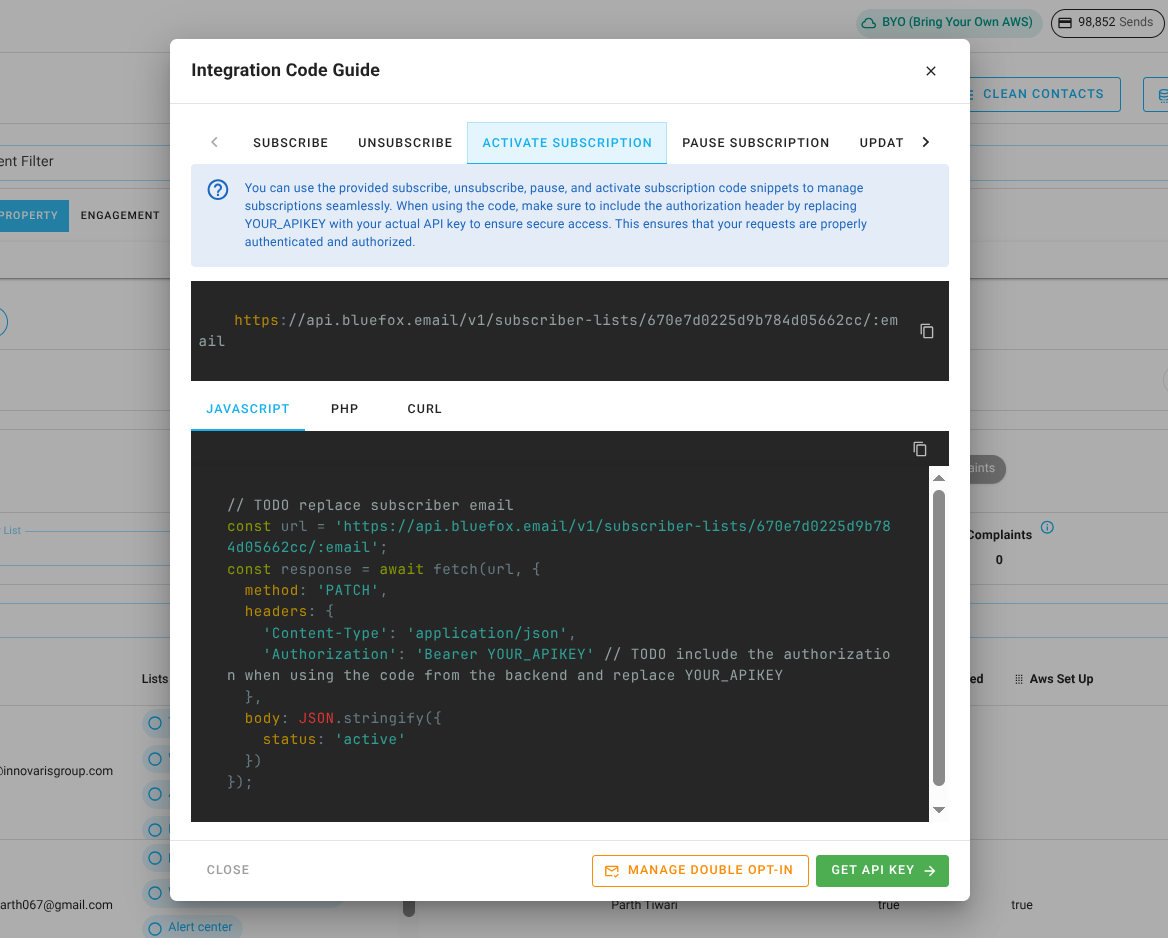
Requiest body:
json
{
  "status": "active"
}cUrl:
bash
curl -X PATCH "https://api.bluefox.email/v1/subscriber-lists/##YOUR_SUBSCRIBER_LIST_ID##/##SUBSCRIBER_EMAIL_ADDRESS##" -H "Content-Type: application/json" -H "Authorization: Bearer ##YOUR_API_KEY##" -d '{"status": "active"}'Javascript:
javascript
const url = 'https://api.bluefox.email/v1/subscriber-lists/##YOUR_SUBSCRIBER_LIST_ID##/##SUBSCRIBER_EMAIL_ADDRESS##'

const response = await fetch(url, {
  method: 'PATCH',
  headers: {
    'Content-Type': 'application/json',
    'Authorization': 'Bearer ##YOUR_API_KEY##'
  },
  body: JSON.stringify({
    status: 'active'
  })
})PHP:
php
$apiKey = "##YOUR_API_KEY##";

$url = "https://api.bluefox.email/v1/subscriber-lists/##YOUR_SUBSCRIBER_LIST_ID##/##SUBSCRIBER_EMAIL_ADDRESS##";

$data = array(
    'status' => 'active'
);

$options = array(
    "http" => array(
        "header"  => "Content-Type: application/json\r\n" .
                    "Authorization: Bearer $apiKey\r\n",
        "method"  => "PATCH",
        'content' => json_encode($data),
    ),
);

$context  = stream_context_create($options);
$response = file_get_contents($url, false, $context);
Security Warning
Since an API key is very sensitive information, never store it in your frontend code. Always use it from your backend.
Import Contacts
To add many contacts to a list at once, send up to 1000 contacts in one request:
POST https://api.bluefox.email/v1/projectId/##YOUR_PROJECT_ID##/subscriber-lists/##YOUR_SUBSCRIBER_LIST_ID##/importRequest body:
json
{
  "contacts": [
    { "email": "jon@doe.com", "name": "Jon Doe", "tags": ["vip"] },
    { "email": "jane@doe.com" }
  ]
}
How it works:
- Contacts not yet on the list are added as
active. Double opt-in is skipped and no email is sent, like the CSV import in the app. Only import people who already agreed to receive your emails. - Contacts already on the list keep their current status. An unsubscribed contact stays unsubscribed.
- New contacts are created. Existing contacts get their name, tags, and custom properties updated.
- A row with an invalid, bounced, suppressed, or disposable email is reported in
errorsand doesn't stop the rest.
Response:
json
{ "status": 200, "result": { "imported": 1, "alreadyOnList": 0, "errors": [{ "email": "bad-email", "message": "Invalid email format" }] } }Double Opt-In
Double opt-in means a contact has to click a link in a verification email before they get your emails. You turn it on per list (see Contacts).
The tables below show what happens, and what the API returns, for each status the contact can already have on the list:
- Subscribe is
POST /v1/subscriber-lists/{listId}. - Activate is
PATCH /v1/subscriber-lists/{listId}/{email}with{ "status": "active" }.
Subscribing an existing contact
If the email already exists as a contact in your project, no new contact is created. The existing one is subscribed to the list, and its data is updated with what you send:
- Name and custom properties you send replace the old values. Ones you don't send stay as they are.
- Tags, if you send them, replace the contact's tags. If you don't send tags, they stay as they are.
- If the contact is already
activeon the list, the call returns400Email already exists.and nothing is updated.
The contact's data is updated even when a verification email is sent, before the contact confirms. To change contact data on its own, use the contact routes instead.
What the call returns depends on the contact's status on the list. See the tables below.
When double opt-in is off
The contact becomes active right away. No email is sent.
| The contact is... | Subscribe | Activate |
|---|---|---|
| New to the list | Becomes active.201 with the subscriber | - |
unverified | Becomes active.201 with the subscriber | Becomes active.200 with the subscriber |
unsubscribed | Becomes active.201 with the subscriber | Becomes active.200 with the subscriber |
paused | Becomes active.201 with the subscriber | Becomes active.200 with the subscriber |
active | No change.400 Email already exists. | No change.200 with the subscriber |
When double opt-in is on
The contact becomes active only after clicking the link in the verification email. Sending "status": "active" does not skip this.
| The contact is... | Subscribe | Activate |
|---|---|---|
| New to the list | Added as unverified, verification email sent.201 { "success": true } | - |
unverified | Verification email sent again, stays unverified.201 { "success": true } | Verification email sent again, stays unverified.200 with the subscriber and "verificationEmailSent": true |
unsubscribed | Verification email sent, stays unsubscribed.201 { "success": true } | Verification email sent, stays unsubscribed.200 with the subscriber and "verificationEmailSent": true |
paused | Becomes active, no email.201 with the subscriber | Becomes active, no email.200 with the subscriber |
active | No change.400 Email already exists. | No change.200 with the subscriber |
Setting the status to unsubscribed or paused always works right away, with or without double opt-in. It returns 200 with the subscriber.
Example responses:
Subscriber returned (201 on subscribe, 200 on activate):
json
{ "status": 201, "result": { "email": "jon@doe.com", "status": "active", "subscriberListId": "list_id", "_id": "subscriber_id" } }Verification email sent on subscribe:
json
{ "status": 201, "result": { "success": true } }Verification email sent on activate:
json
{ "status": 200, "result": { "email": "jon@doe.com", "status": "unsubscribed", "verificationEmailSent": true } }The verification link
When the contact clicks the link in the email:
unverifiedorunsubscribed: they becomeactive.activeorpaused: nothing changes.
Exception: the hosted preferences page
Contacts who subscribe or resubscribe from the subscription preferences page hosted by bluefox.email are activated right away, without a verification email. They opened that page from the unsubscribe/preferences link in your email, so they've already proven the address is theirs.
Sign-up forms
Sign-up forms have their own double opt-in switch, separate from the list's. When someone submits a form with double opt-in on, each list on the form follows the "on" table above. One verification email covers all the lists that need confirming.
- Verification email sent:
201{ "success": true } - No email needed:
201{ "success": true, "redirectTo": "..." } - Already
activeon every list:400Email already exists.
List Subscribers
To list users from a subscriber list, use the following URL pattern:
https://api.bluefox.email/v1/subscriber-lists/##YOUR_SUBSCRIBER_LIST_ID##Replace the placeholders with your specific information:
##YOUR_SUBSCRIBER_LIST_ID####YOUR_API_KEY##
You can find the IDs to replace by clicking on the code guide button in a subscriber list:
In the code guide dialog, these values are automatically filled in. If you copy the code snippets, you need to replace the ##YOUR_API_KEY##.
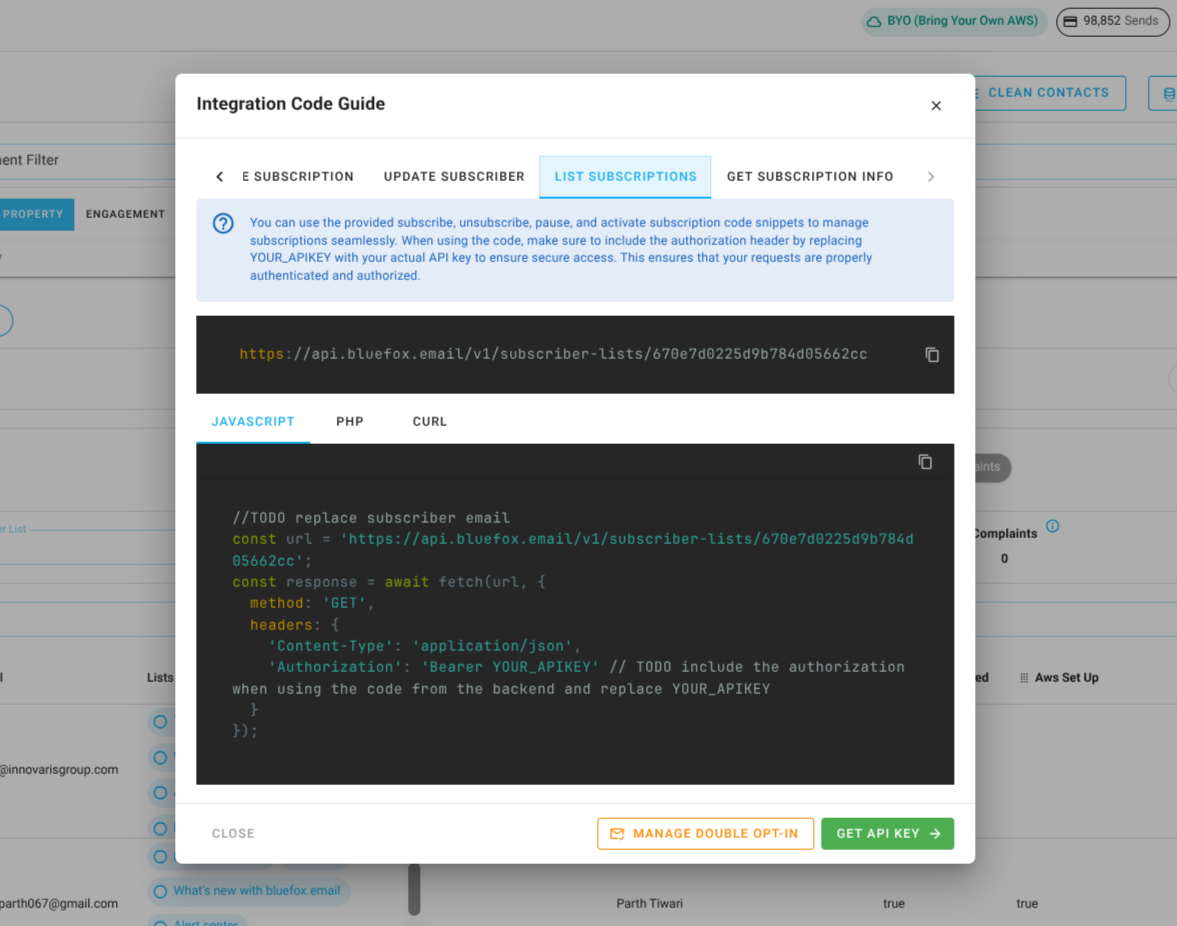
Requiest body:
none.
cUrl:
bash
curl -X GET "https://api.bluefox.email/v1/subscriber-lists/##YOUR_SUBSCRIBER_LIST_ID##" -H "Content-Type: application/json" -H "Authorization: Bearer ##YOUR_API_KEY##"Javascript:
javascript
const url = 'https://api.bluefox.email/v1/subscriber-lists/##YOUR_SUBSCRIBER_LIST_ID##'

const response = await fetch(url, {
  method: 'GET',
  headers: {
    'Content-Type': 'application/json',
    'Authorization': 'Bearer ##YOUR_API_KEY##'
  }
})PHP:
php
$apiKey = "##YOUR_API_KEY##";

$url = "https://api.bluefox.email/v1/subscriber-lists/##YOUR_SUBSCRIBER_LIST_ID##";

$options = array(
    "http" => array(
        "header"  => "Content-Type: application/json\r\n" .
                    "Authorization: Bearer $apiKey\r\n",
        "method"  => "GET"
    ),
);

$context  = stream_context_create($options);
$response = file_get_contents($url, false, $context);
Security Warning
Since an API key is very sensitive information, never store it in your frontend code. Always use it from your backend.
Get One Subscriber
To get user from a subscriber list, use the following URL pattern:
https://api.bluefox.email/v1/subscriber-lists/##YOUR_SUBSCRIBER_LIST_ID##/##SUBSCRIBER_EMAIL_ADDRESS##Replace the placeholders with your specific information:
##YOUR_SUBSCRIBER_LIST_ID####SUBSCRIBER_EMAIL_ADDRESS####YOUR_API_KEY##
You can find the IDs to replace by clicking on the code guide button in a subscriber list:
In the code guide dialog, these values are automatically filled in. If you copy the code snippets, you need to replace the ##YOUR_API_KEY## and ##SUBSCRIBER_EMAIL_ADDRESS##.
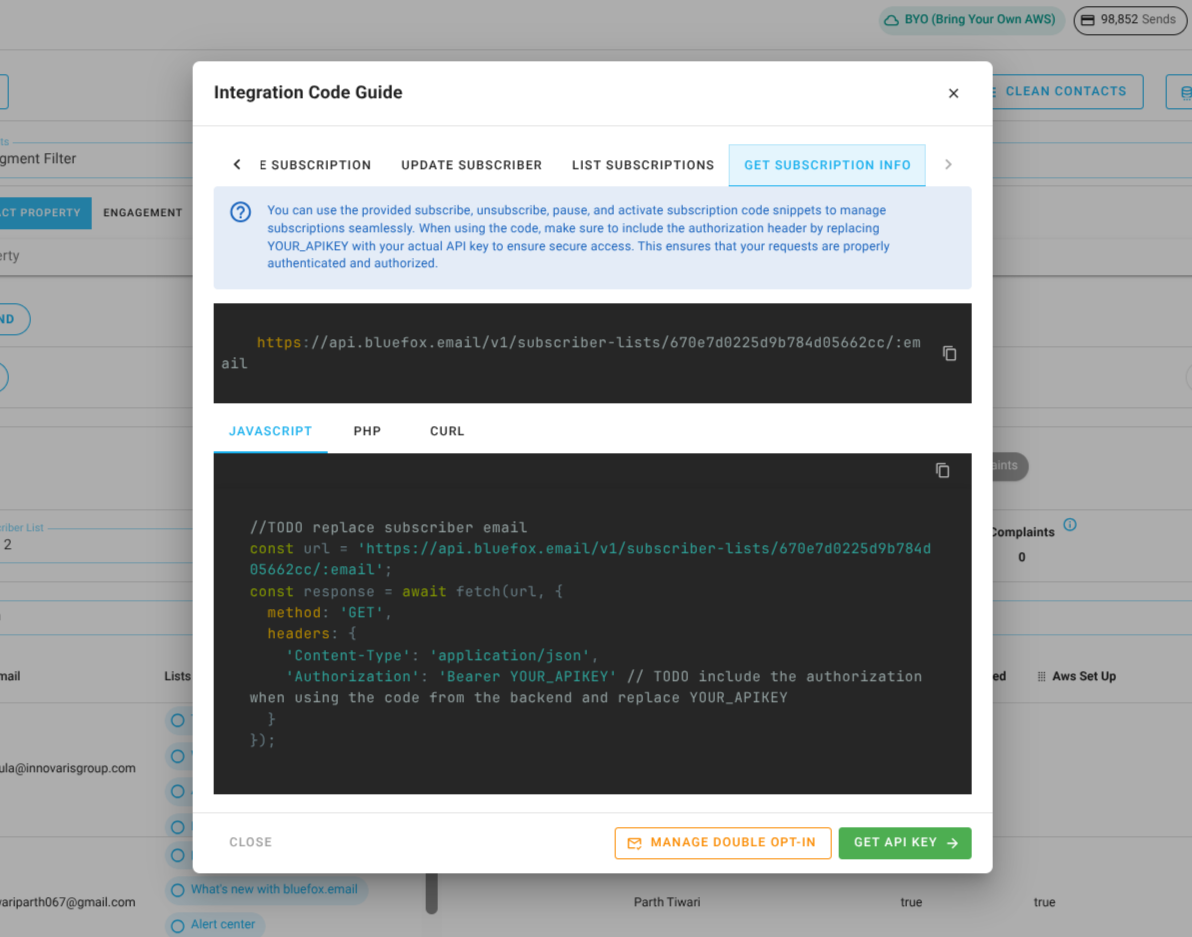
Requiest body:
none.
cUrl:
bash
curl -X GET "https://api.bluefox.email/v1/subscriber-lists/##YOUR_SUBSCRIBER_LIST_ID##/##SUBSCRIBER_EMAIL_ADDRESS##" -H "Content-Type: application/json" -H "Authorization: Bearer ##YOUR_API_KEY##"Javascript:
javascript
const url = 'https://api.bluefox.email/v1/subscriber-lists/##YOUR_SUBSCRIBER_LIST_ID##/##SUBSCRIBER_EMAIL_ADDRESS##'

const response = await fetch(url, {
  method: 'GET',
  headers: {
    'Content-Type': 'application/json',
    'Authorization': 'Bearer ##YOUR_API_KEY##'
  }
})PHP:
php
$apiKey = "##YOUR_API_KEY##";

$url = "https://api.bluefox.email/v1/subscriber-lists/##YOUR_SUBSCRIBER_LIST_ID##/##SUBSCRIBER_EMAIL_ADDRESS##";

$options = array(
    "http" => array(
        "header"  => "Content-Type: application/json\r\n" .
                    "Authorization: Bearer $apiKey\r\n",
        "method"  => "GET"
    ),
);

$context  = stream_context_create($options);
$response = file_get_contents($url, false, $context);
Security Warning
Since an API key is very sensitive information, never store it in your frontend code. Always use it from your backend.
API Responses
| Code | Name | Message | Description | JSON Response Example |
|---|---|---|---|---|
| 200 | - | - | The request was successfully processed. | json { "status": 200 , "result": { "accountId": "account_id", "projectId": "project_id", "subscriberListId": "subscriberList_id", "name": "name", "email": "example@gmail.com", "status": "status", "_id": "subscriber_id", "createdAt": "Date", "updatedAt": "Date" } } |
| 201 | - | - | A new subscriber has been created as a result of the request. | json { "status": 201 , "result": { "accountId": "account_id", "projectId": "project_id", "subscriberListId": "subscriberList_id", "name": "name", "email": "example@gmail.com", "status": "status", "_id": "subscriber_id", "createdAt": "Date", "updatedAt": "Date" } } |
| 200 | - | - | In case of double opt-in, activating an unverified or unsubscribed subscriber sent them a verification email instead. Their status is unchanged. | json { "status": 200 , "result": { "email": "example@gmail.com", "status": "unsubscribed", "verificationEmailSent": true } } |
| 201 | - | - | In case of double opt-in, a verification email is sent. The contact becomes active after clicking its link. | json { "status": 201 , "result": {"success": true} } |
| 400 | VALIDATION_ERROR | Email already exists. | The email address is already registered in the system. | json { "status": 400, "error": {"name": "VALIDATION_ERROR", "message": "Email already exists."} } |
| 400 | VALIDATION_ERROR | Invalid email format | The request contains improperly formatted email. Ensure email is valid email address. | json { "status": 400, "error": {"name": "VALIDATION_ERROR", "message": "Invalid email format"} } |
| 400 | VALIDATION_ERROR | The pausedUntil date must be set in the future. | The provided date cannot be in the past. | json { "status": 400, "error": {"name": "VALIDATION_ERROR", "message": "The pausedUntil date must be set in the future."} } |
| 405 | METHOD_NOT_ALLOWED | The provided email has been flagged due to bouncing. If this is incorrect and the email is valid, please contact support. | The email address has been marked as undeliverable due to previous failed delivery attempts. | json { "status": 405, "error": { "name": "METHOD_NOT_ALLOWED", "message": "The provided email has been flagged due to bouncing. If this is incorrect and the email is valid, please contact support." } } |