
Appearance
MCP Server Integration with BlueFox Email
The MCP server integration lets an AI agent work directly inside one of your projects. You can ask it to draft and schedule campaigns, manage contacts and subscriber lists, build and monitor automations, check your sending setup, and review deliverability, all in plain language from your AI client.
It is a Model Context Protocol server that runs locally on your own computer as a small Node.js program. Nothing is hosted on our side, and it's open-source on GitHub. The server is the only thing that talks to BlueFox Email on your behalf, using the API key you give it, so your key never reaches the AI model itself.
Quick Note
Every action the agent takes is a separate tool call, and you see its arguments and its result as it happens. The agent can only use the tools listed below, so it can never reach beyond them.
Requirements
You need Node.js 20 or newer, and three environment variables set before the server will start. All three come from you, never from the agent.
| Variable | What it is | Where to find it |
|---|---|---|
BLUEFOX_BASE_URL | The API endpoint | Always https://api.bluefox.email |
BLUEFOX_PROJECT_ID | The project the server works in | Already filled in for you under Project Settings > Integrations > MCP Server |
BLUEFOX_API_KEY | The key the server authenticates with | Project Settings > API Keys and Domain Whitelist |
If any of them is missing, the server stops with an error instead of starting up half-connected.
Finding the Setup in Your Project Settings
Your project generates both setup snippets for you, with your project ID already filled in, so you never have to put them together by hand.
Open your project and go to Project Settings.
Choose Integrations in the settings sub-menu.
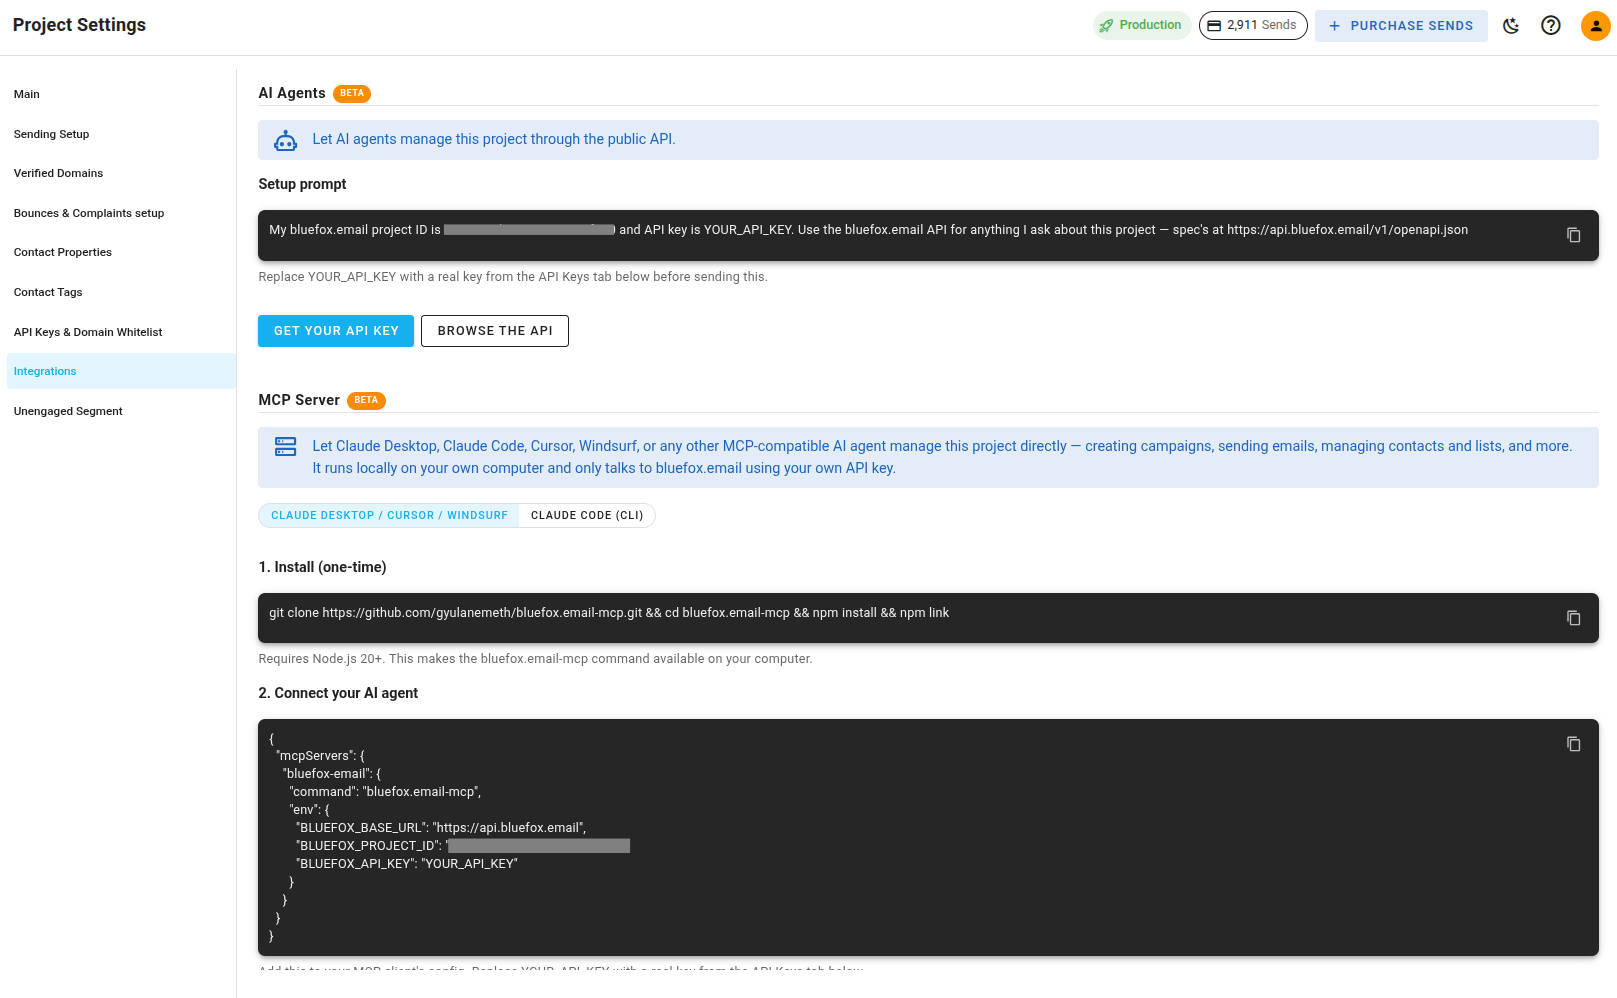
Scroll to the MCP Server section, below AI Agents.
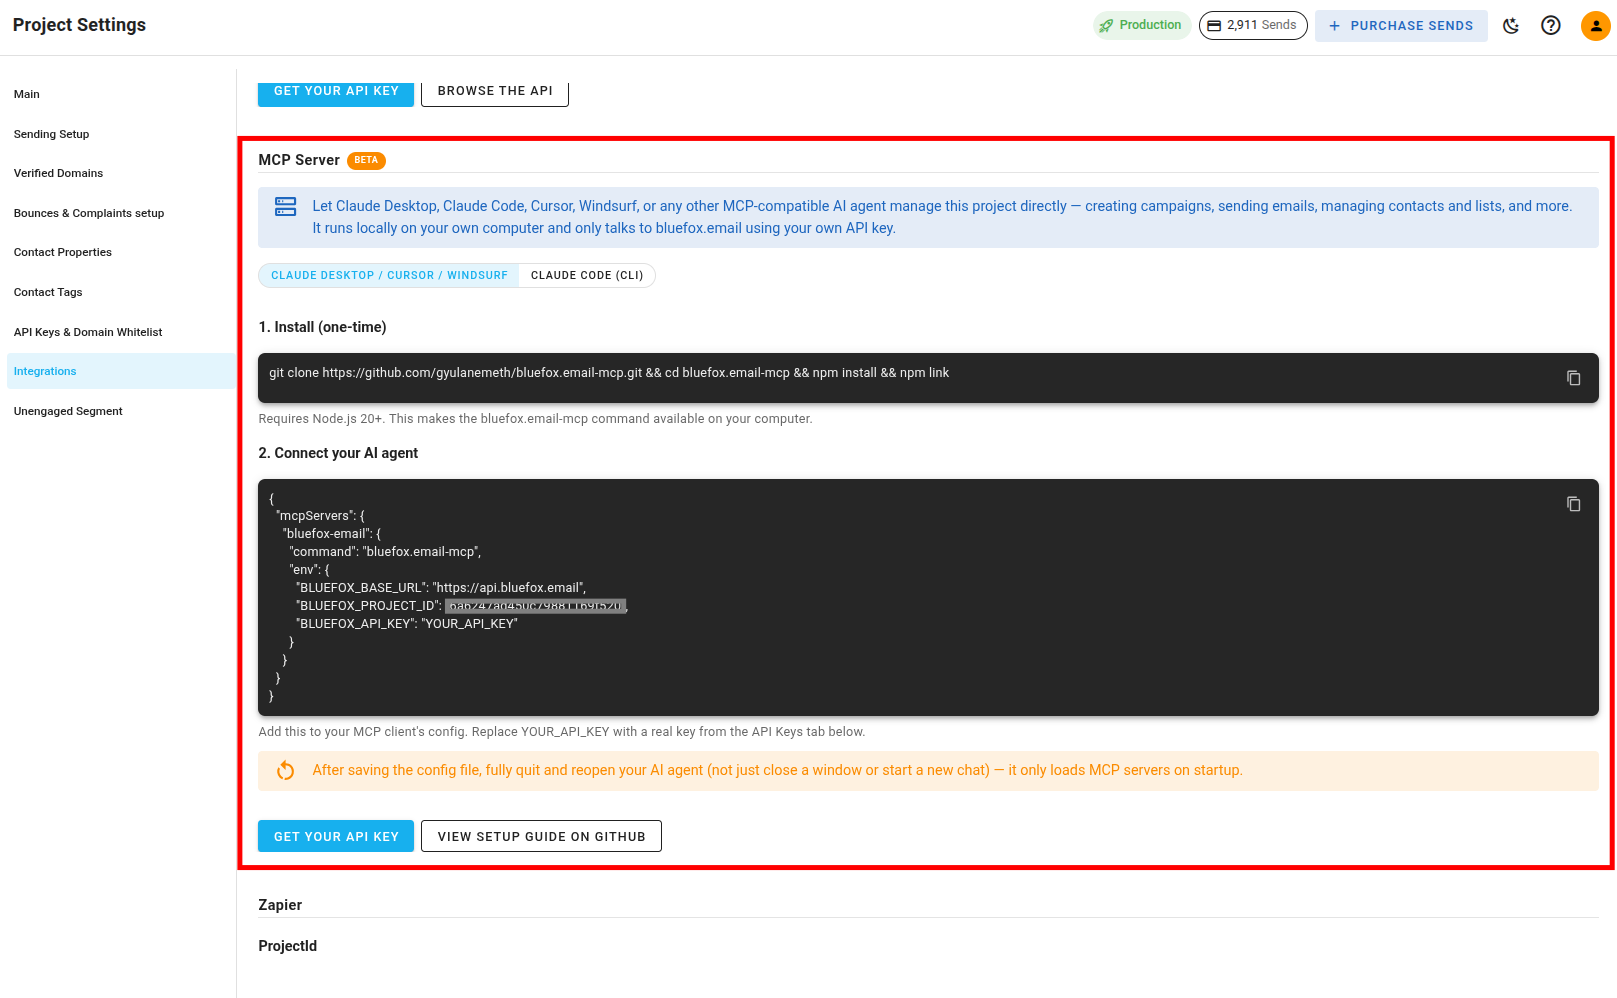
Pick the tab for your client: Claude Desktop / Cursor / Windsurf if your client is set up with a config file, Claude Code (CLI) if you set it up from a terminal, or Codex CLI (ChatGPT) if you use OpenAI's Codex CLI.
Each tab gives you two copyable blocks, one for each of the next two sections: a one-time install command, and a connection snippet for your client. Both already contain your project ID. Replace YOUR_API_KEY in the connection snippet with a real key from the API Keys and Domain Whitelist section, creating one there first if your project does not have one yet.
Quick Note
The AI Agents section just above MCP Server is a different thing. It gives you a setup prompt that points an agent at our public API and its OpenAPI spec, with no local server involved. Use that one for AI clients that only support hosted MCP servers, such as ChatGPT web chat. The ChatGPT desktop app, Codex CLI, and Codex IDE extension can run this local server instead; see Codex and ChatGPT Desktop App below. Codex CLI has its own Codex CLI (ChatGPT) tab; the ChatGPT desktop app and Codex IDE extension don't have a dedicated tab yet, so build their config from the environment variables above.
Installation
Clone the server from its GitHub repository, install its dependencies, and link it so your AI client can start it by name:
bash
git clone https://github.com/bluefox-email/bluefox.email-mcp.git
cd bluefox.email-mcp
npm install
npm link
The MCP Server section in your project settings gives you the same commands as a single copyable line. Once npm link finishes, the bluefox.email-mcp command is available on your computer, and that is what every configuration below refers to.
Connecting Your AI Client
Add the server to your client along with the three environment variables, then restart or reload the client. The tools show up in every new conversation after that, with nothing to repeat per session.
Claude Desktop
Open Settings > Developer > Edit Config and add the server to claude_desktop_config.json:
json
{
  "mcpServers": {
    "bluefox-email": {
      "command": "bluefox.email-mcp",
      "env": {
        "BLUEFOX_BASE_URL": "https://api.bluefox.email",
        "BLUEFOX_PROJECT_ID": "YOUR_PROJECT_ID",
        "BLUEFOX_API_KEY": "YOUR_API_KEY"
      }
    }
  }
}
Restart Claude Desktop once you have saved the file.
Windows Note
On Windows, replace the command line with "command": "cmd" and add "args": ["/c", "bluefox.email-mcp.cmd"] next to it. The env block stays exactly the same.
Claude Code
There is no config file to edit here. Register the server from your terminal instead. The Claude Code (CLI) tab in your project settings shows this command with your project ID already in it:
bash
claude mcp add bluefox-email \
  --env BLUEFOX_BASE_URL=https://api.bluefox.email \
  --env BLUEFOX_PROJECT_ID=YOUR_PROJECT_ID \
  --env BLUEFOX_API_KEY=YOUR_API_KEY \
  -- bluefox.email-mcp
Cursor
Add the same mcpServers block shown for Claude Desktop to .cursor/mcp.json to use it in one project, or to ~/.cursor/mcp.json to make it available everywhere.
Windsurf
Add the same block to ~/.codeium/windsurf/mcp_config.json.
Cline
Add the server through Cline's MCP Servers panel in VS Code, using the same command and environment variables.
Codex and ChatGPT Desktop App
According to OpenAI's documentation, the ChatGPT desktop app, the Codex CLI, and the Codex IDE extension all read MCP server configuration from the same file on your computer (~/.codex/config.toml by default, or a project-scoped .codex/config.toml), so adding the server once makes it available in all three. This uses the same bluefox.email-mcp command and environment variables as every other client on this page.
Add this to config.toml:
toml
[mcp_servers.bluefox-email]
command = "bluefox.email-mcp"

[mcp_servers.bluefox-email.env]
BLUEFOX_BASE_URL = "https://api.bluefox.email"
BLUEFOX_PROJECT_ID = "YOUR_PROJECT_ID"
BLUEFOX_API_KEY = "YOUR_API_KEY"
Or, from the Codex CLI, register it in one command instead of editing the file. The Codex CLI (ChatGPT) tab in your project settings shows this command with your project ID already filled in:
bash
codex mcp add bluefox-email \
  --env BLUEFOX_BASE_URL=https://api.bluefox.email \
  --env BLUEFOX_PROJECT_ID=YOUR_PROJECT_ID \
  --env BLUEFOX_API_KEY=YOUR_API_KEY \
  -- bluefox.email-mcp
In the ChatGPT desktop app, add the same server from Settings > MCP servers > Add server: give it a name, choose STDIO, and enter bluefox.email-mcp as the command. That writes the same config.toml entry shown above.
Windows Note
On Windows, use command = "cmd" with args = ["/c", "bluefox.email-mcp.cmd"] instead of the bare command, the same substitution as Claude Desktop above.
After saving, restart the client (in the ChatGPT desktop app, select Restart after adding the server). Type /mcp in the composer to confirm bluefox-email shows up as a connected server before asking it to do anything.
Start with a read-only request, such as asking it to list your subscriber lists, rather than one that sends, schedules, or changes anything. That confirms the connection without touching real data.
ChatGPT Web
This setup only reaches the ChatGPT desktop app, Codex CLI, and Codex IDE extension. ChatGPT web (the browser-based chat) doesn't read local Codex configuration and can't run this local server. A remote MCP server for web-based clients like ChatGPT web is in the works; until it ships, use the BlueFox Email API directly, or the ready-made prompt in the AI Agents section of your project settings.
Troubleshooting
- Command not found: Confirm
npm linkfinished without errors and that runningbluefox.email-mcpon its own in a terminal works. On Windows, use thecmd /c bluefox.email-mcp.cmdform above instead. - Missing environment variable errors: The server exits immediately if
BLUEFOX_BASE_URL,BLUEFOX_PROJECT_ID, orBLUEFOX_API_KEYisn't set; check the[mcp_servers.bluefox-email.env]table or--envflags match exactly. - Server doesn't appear after restart: Re-check
config.toml's syntax (each server needs its own[mcp_servers.<name>]table), and make sure you restarted the client after saving.
See OpenAI's MCP documentation for how Codex and the ChatGPT desktop app handle MCP servers in general.
How the Agent Works
A few things are built into the server itself, so they hold no matter which AI client you use:
- You can use names instead of IDs: nearly every tool takes either an ID or the name you see in the app, so you can say "the newsletter list" rather than looking up an ID.
- Nothing is sent by accident: creating a campaign or a triggered email saves a draft. Sending it, or scheduling it, is always a separate step you have to ask for.
- Automations only go live on your say-so: activating, pausing, resuming, merging, or discarding changes to an automation each need your explicit confirmation. Once an automation is running, edits to its trigger, exit criteria, or steps are staged as a draft and do not touch what is live until they are merged.
- The agent asks instead of guessing: subject lines, preview text, and sender identity all affect your open rates and deliverability, so the tools tell the agent to ask you rather than invent them.
- Dates are worked out before the call: "tomorrow at 8am" is turned into an exact date and time by the agent, since the tools themselves do not read dates written in plain language.
- One bad row does not stop an import:
import_contactsandbulk_update_contactsreport what went through and what did not, and a failed row does not stop the rest. - Email content is HTML or plain text: the agent writes the body itself as a Handlebars template. All the usual merge tags work, including
{{contact.name}}, your own contact properties,{{unsubscribeLink}}and{{pauseSubscriptionLink}}on campaigns and triggered emails,{{webVersionLink}}on campaigns (a public "view in browser" link, which needs the campaign's web version turned on), and{{verifyLink}}in a transactional email used for double opt-in confirmation. Emails can also pull in RSS, Atom, or JSON feeds, and you can turn open and click tracking off per email.
Available Tools
There are 60+ tools in total, grouped the same way the app is. Wherever a tool takes both an ID and a name, you only need one of the two.
Emails
Tools for campaigns, transactional emails, and triggered emails.
create_campaign: Create a campaign for a subscriber list, optionally narrowed down by a segment. It is saved as a draft unless you give a send time and time zone.create_transactional_email: Create a reusable transactional email to send to one recipient later.send_transactional_email: Send a transactional email now to one address, with your own data for the merge tags and optional attachments.create_triggered_email: Create a triggered email tied to a subscriber list, such as a welcome email.send_triggered_email: Send an existing triggered email now, either to specific addresses or to everyone active on its list.update_email: Update a campaign, transactional, or triggered email. This is also how a scheduled campaign is rescheduled or moved back to draft, which is not possible within 6 minutes of its send time.get_email: Look up one email together with its statistics, or list every email of one type. Statistics can be limited to a date range, or broken down by hour, day, week, or month.get_email_recipients: See what each recipient did with one particular send: received, opened, clicked, bounced, complained, unsubscribed, paused, or resubscribed.delete_email: Delete a campaign, transactional, or triggered email.list_email_error_log: Review sending and delivery errors for one email over the last 30 days.send_test_email: Send a test email that does not affect your statistics, either to one address or to a private subscriber list.
Contacts
Tools for the same things you can do on the contacts page.
create_contact: Add a contact, with tags and contact properties. New tags are created for you.get_contact: Look up one contact, with its list memberships and property values.list_contacts: List contacts, narrowed by subscriber list and status, segment, tags, or contact property values. Use it to answer "who is in X" without exporting everything.update_contact: Change a contact, including its email address. Passing tags replaces the whole set.delete_contact: Delete a contact and remove it from every list.import_contacts: Import many contacts at once, optionally adding them to a list as active. This skips double opt-in, so no verification emails are sent.bulk_update_contacts: Apply one change to many contacts: delete them, add or remove tags, add them to the suppression list, or subscribe and unsubscribe them. Subscribing skips double opt-in, like "Assign to list" in the app.clean_contacts: Find contacts that have already bounced or complained, and optionally delete them.export_contacts: Export all of your contacts to a CSV file on your computer.resend_verification_email: Send the double opt-in confirmation again to a contact who has not confirmed yet.
Subscriber Lists
create_subscriber_list: Create a list, with double opt-in, confirmation messages, and sign-up form styling. A double opt-in email has to contain{{verifyLink}}, otherwise the list cannot be saved.update_subscriber_list: Change any of those settings on an existing list.get_subscriber_list: Look up one list, or list all of them with their statistics.delete_subscriber_list: Delete a list, as long as no triggered email, campaign, or automation still uses it.list_list_subscribers: See everyone on one list with their subscription status.get_list_subscriber: Check one contact's status on one list.add_list_subscriber: Subscribe a contact to a list, creating the contact if it does not exist yet.update_list_subscriber: Change a contact's status on one list only, including pausing it until a date you choose.
Signup Forms
Tools for the sign-up forms described in Forms & Pages.
create_signup_form: Create a form for one or more lists, choosing which contact properties appear, how the form looks, and whether it uses a captcha.update_signup_form: Change an existing form.get_signup_form: Look up one form, or list all of them.delete_signup_form: Delete a form. Everyone who signed up through it stays subscribed.get_signup_form_embed_html: Save the ready-to-embed HTML of a form to a file, so you can hand it to whoever looks after your website.
Automations
Tools for automations: a trigger followed by a sequence of steps.
manage_automation: List, look up, create, rename, or delete automations. A new one needs a trigger up front, or can be duplicated from an existing automation. It starts as a draft.manage_automation_trigger: Read or set what makes contacts enter: a contact being added to a list, a contact property changing, entering or leaving a segment, or a daily, weekly, or monthly schedule.manage_automation_node: Add, change, delete, or restore steps: delays, emails, audience filters, branches, setting a contact property, tag changes, webhooks, and notifications.manage_automation_email_content: List, read, or update the email behind each send step, such as its subject, preview text, body, and sender.manage_automation_exit_criteria: Read, set, or clear the condition that removes a contact from the automation part-way through.activate_automation: Make a draft automation live. The whole sequence is checked first, and nothing changes if anything is invalid.pause_automationandresume_automation: Pause a live automation, or start a paused one again.merge_automation_draft: Apply staged edits to a running automation.discard_automation_draft: Drop staged edits without touching what is live.get_automation_stats: See how many contacts went through an automation, plus sends, opens, clicks, bounces, and complaints for each email, over time or per recipient.manage_automation_running_contacts: See how many contacts are at each step right now, and who they are.
Project Settings
manage_segment: List, create, change, or delete segments, based on contact properties, tags, dates, or engagement history. A segment still used by a campaign or automation cannot be deleted.manage_project_settings: Change your project name and logo, your unengaged segment, what happens to contacts that bounce or complain, your domain whitelist, and the address of your own subscription preferences page. It cannot read or change API keys.manage_contact_fields_and_tags: Manage which contact properties and tags exist in your project. Properties can be added and removed but not renamed, and removing one loses the values stored under it.manage_design_system: Read or override parts of your email theme, such as colors, fonts, and button styles. It can only override the theme you already use, not switch to another one.manage_sending_setup: Manage your domains, sender identities, and regions. A sender identity needs a verified domain first, and the first identity in the list is the default one.manage_webhook: Read, set, or remove your project's webhook. Setting it replaces the whole configuration, so every event you want has to be included each time.test_webhook: Send a test event to your webhook URL to check that it is reachable.manage_suppression_list: Add to, remove from, or review your project's suppression list.manage_templates: List, inspect, duplicate, rename, or delete your templates.manage_gallery: Browse and manage your media gallery: create, rename, and delete folders and images, and upload an image from a web link or a file on your computer. Folders shared across your account are included.
Production Access and Sending Limits
Tools for the delivery modes described in your project settings.
apply_for_production_access: Apply to leave sandbox mode. You need at least one domain with SPF, MX, and DKIM verified.get_production_access_status: Check where your request stands, along with your current limits and sending rates.request_limit_increase: Ask for a higher monthly sending limit once you are in production mode.get_sandbox_deliverability: See how many emails you have sent today in sandbox mode, and your bounce and complaint rates.get_production_deliverability: See your worst bounce and complaint rates over the last 7, 30, and 90 days, broken down by domain.export_domain_dns: Save a domain's DKIM, SPF, DMARC, and MX records to a CSV file, for whoever manages your DNS.
AWS SES
Tools for projects that send through their own AWS account rather than our shared infrastructure.
set_byo_aws_config: Set your AWS credentials, region, sending rate, and sender identities, and switch the project over to your own AWS account.get_aws_config: Read back your region, limits, and sender identities. Your actual credentials are never returned.check_aws_credentials: Check against AWS that your credentials work, your sender identities are verified, and your sending rate fits your account.get_cloudformation_link: Get the CloudFormation link that creates the role we need in your AWS account.
Double Opt-In Tips
With double opt-in, a contact has to click a link in a verification email before they become active on a list. When a list has double opt-in off, every tool below adds or activates contacts right away and sends no email. The rest of this section is about lists with double opt-in on.
Which tools send verification emails
| Tool | Double opt-in applies? |
|---|---|
add_list_subscriber | Yes |
update_list_subscriber with status active | Yes |
import_contacts with a list | No. Contacts are added as active and no email is sent |
bulk_update_contacts with "subscribe to list" | No. Works like import_contacts |
resend_verification_email | Always sends the email again |
| Unsubscribing or pausing (any tool) | No email. It takes effect right away |
What happens for each contact
This applies to add_list_subscriber and update_list_subscriber (set to active):
| The contact on the list is... | What happens | What the agent tells you |
|---|---|---|
| New (not on the list yet) | Added as unverified, verification email sent | "The list has double opt-in, so ... was sent a verification email" |
| Unverified | Verification email sent again, stays unverified | The same message |
| Unsubscribed | Verification email sent, stays unsubscribed until they click the link | The same message |
| Paused | Becomes active right away, no email | "Subscribed ..." or "Updated ... (status: active)" |
| Active | Nothing changes. add_list_subscriber reports "Email already exists." | An error, or "Updated ... (status: active)" |
Importing and bulk subscribing
import_contacts with a list, and bulk_update_contacts with "subscribe to list", skip double opt-in. They work like the CSV import and "Assign to list" in the app:
- New to the list: added as active, no email.
- Already on the list (any status): left unchanged. An unsubscribed contact stays unsubscribed.
- Invalid, bounced, suppressed, or disposable email: reported as failed. The rest still go through.
The agent replies with something like "Imported 98/100 contact(s) to the list. 1 were already on the list and kept their current status. Failed (1): ...".
Resending the verification email
resend_verification_email only works for a contact who is unverified. Every call sends another email. For an unsubscribed contact who is waiting to confirm, ask the agent to set them to active with update_list_subscriber instead.
Avoiding surprises
- Adding many people who already agreed? Ask for
import_contactsor a bulk subscribe. Adding them one by one withadd_list_subscribersends each of them a verification email. - Don't ask the agent to retry. If a contact still shows unverified or unsubscribed, that's expected until they click the link. Asking again sends them another email.
- Resubscribing someone who unsubscribed sends them an email. Make sure they asked for it.
- Import and bulk subscribe can't resubscribe anyone. Use
add_list_subscriberfor that, which sends a verification email. - Only import or bulk subscribe people who agreed to your emails. Both skip double opt-in.
- Change contact data with
update_contact. Use the list tools only to subscribe, unsubscribe, pause, or activate. Subscribing a contact who already exists also overwrites their name and tags.
What the MCP Server Cannot Do
- It cannot design emails in the visual editor. Every email it creates is written as HTML or plain text. It cannot open, edit, or produce visual editor content, and it cannot start a new email from one of your templates.
- It cannot see your API keys. No tool can read, create, or rotate them, not even the project settings tool. Anything that needs a key, such as a webhook secret, has to be pasted in by you.
- It cannot filter lists by date range. Lists of emails, contacts, and the like can only be filtered on exact values, so something like "campaigns from this month" means fetching them all and sorting through them afterwards. Statistics are the exception:
get_emailandget_automation_statscan limit their numbers to a date range. - It works in one project at a time. The project ID is fixed when the server starts, so a second project means adding a second server to your client.
Example Workflow
Here is what putting together a first campaign usually looks like:
- The agent lists your sender identities and subscriber lists so you can pick who the campaign comes from and who receives it.
- You settle on a subject line and preview text together, and the campaign is saved as a draft.
- The agent writes the HTML body and updates the draft with it.
- You send yourself a test email, which does not affect your statistics.
- Only when you ask for it is the campaign scheduled or sent.
Nothing reaches a real recipient until that last step.